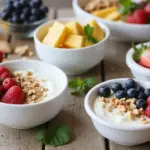
Planning a party can feel like a puzzle. You want to impress your guests, keep them happy, and make sure everyone has something delicious to nibble on. That’s why I created this post filled with 25 snack platter ideas and finger food appetizer recipes. If you find yourself scrambling for the perfect snacks that are easy to prepare yet fun to eat, you’re in the right place.
This post is for anyone who loves hosting gatherings, whether it’s a cozy get-together with friends or a larger celebration. You might be a busy parent, a college student on a budget, or just someone who enjoys making food for friends. No matter your background, these ideas will help you keep your guests satisfied without spending hours in the kitchen.
What can you expect? You’ll discover a mix of tasty, easy-to-make snacks that are perfect for any occasion. From colorful veggie boards to delightful cheese platters, there’s something here for everyone. These recipes don’t require professional cooking skills, so even if you’re a kitchen newbie, you can pull off these spreads like a pro.
Get ready to impress with snacks that are visually appealing and full of flavor. You’ll find inspiration to create platters that suit various tastes, including vegetarian, savory, and even sweet options. With these ideas in hand, you’ll make your next gathering a memorable hit. Let’s dive in and take your party snacks to the next level!
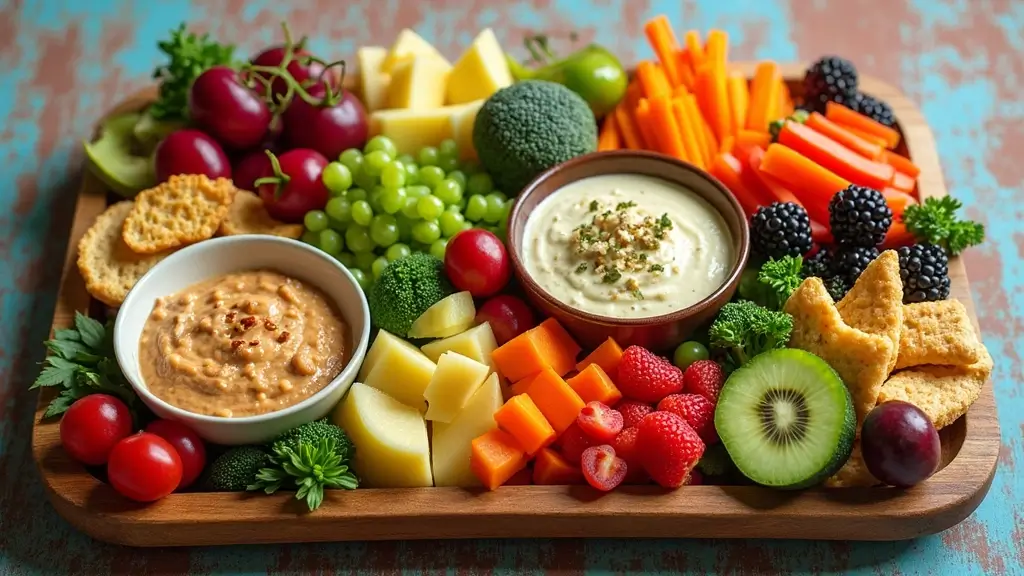
1. Colorful Veggie Platter with Hummus

Start your party with a colorful veggie platter that everyone will love! This fresh arrangement of crunchy vegetables not only looks stunning but also offers a healthy option for your guests. Think bright bell peppers, crisp cucumber slices, sweet cherry tomatoes, and adorable baby carrots. When you serve them with a creamy bowl of hummus, you create a delightful mix of flavors and textures that will have everyone reaching for more.
Customizing your platter is super easy. You can drizzle the hummus with olive oil and sprinkle paprika on top for a pop of flavor. Just pick your favorite veggies, chop them, and you’re all set! This finger food recipe is quick to prepare and makes a refreshing addition to any gathering.
Recipe Overview:
– Servings: 4-6
– Prep Time: 15 minutes
– Cook Time: 0 minutes
– Total Time: 15 minutes
– Calories: Approximately 150 per serving (with dip)
Nutritional Information:
– Calories: 150
– Protein: 4g
– Fat: 7g
– Carbohydrates: 20g
– Fiber: 6g
Ingredients:
– 1 cup baby carrots
– 1 cup cherry tomatoes
– 1 cup sliced bell peppers (various colors)
– 1 cup cucumber slices
– 1 cup hummus (store-bought or homemade)
Step-by-Step Instructions:
1. Wash and cut the vegetables into dipping sizes.
2. Arrange them on a large platter in a colorful design.
3. Place a bowl of hummus in the center of the platter.
4. Drizzle olive oil over the hummus and sprinkle with paprika if you like.
5. Serve right away and enjoy the compliments!
Want to take it up a notch? Use seasonal veggies for the best taste. Consider swapping out hummus for a bean dip for a fun twist.
Frequently Asked Questions:
– Can I prep this in advance? Yes, you can cut the veggies a few hours ahead and keep them chilled in the fridge. This makes it easy to enjoy your party without stress!
Colorful Veggie Platter with Hummus
Editor’s Choice

Fullstar The Original Pro Chopper – Vegetable Chopper and Spiralizer, Fo…

DELLING Large Serving Platter Set 16/14/12inch Large Serving Tray – Rect…

ProKeeper Progressive International Prepworks Mini Deli Air Tight Silico…
2. Mediterranean Tapenade with Crackers

Elevate your party fare with a delightful Mediterranean Tapenade served alongside gluten-free crackers. This savory spread bursts with flavors from olives, capers, garlic, and a splash of lemon, making it an irresistible choice for any gathering. Your guests will love the tangy richness, and it’s a guaranteed crowd-pleaser!
Making this tapenade is a breeze. Simply blend pitted olives—choose a mix of green and black for depth—with capers and garlic in a food processor. As you blend, drizzle in olive oil until the mixture is creamy and spreadable. Finish with a squeeze of fresh lemon juice for that perfect zesty kick. Arrange your tapenade on a platter with an array of gluten-free crackers, and watch it disappear!
Recipe Overview:
– Servings: 6-8
– Prep Time: 10 minutes
– Cook Time: 0 minutes
– Total Time: 10 minutes
– Calories: Approximately 120 per serving
Nutritional Information:
– Calories: 120
– Protein: 3g
– Fat: 9g
– Carbohydrates: 9g
– Fiber: 1g
Ingredients:
– 1 cup pitted olives (green, black, or a mix)
– 2 tablespoons capers
– 1 garlic clove
– 2 tablespoons olive oil
– Juice of half a lemon
– Gluten-free crackers for serving
Step-by-Step Instructions:
1. In a food processor, combine olives, capers, and garlic until finely chopped.
2. Gradually add olive oil while blending until you achieve the right consistency.
3. Squeeze lemon juice into the mix and blend for a few seconds more.
4. Transfer the tapenade to a serving dish and arrange gluten-free crackers around it.
5. Gather your friends and enjoy this tasty treat!
Feel free to get creative! Experiment with different types of olives to make unique flavors. You can even prepare the tapenade a day ahead to allow the flavors to meld beautifully.
Frequently Asked Questions:
– What if I don’t have olives? Consider using sun-dried tomatoes for a rich, savory alternative.
With this tapenade recipe, you’re set for a fabulous appetizer that will impress your guests and keep them coming back for more!
Mediterranean Tapenade with Crackers
Editor’s Choice

Hamilton Beach Food Processor & Vegetable Chopper for Slicing, Shredding…

Absolutely Gluten Free Original Flatbread, 5.25oz (6 Pack) | Grain Free …

Pompeian Robust Extra Virgin Olive Oil, Contains Polyphenols, First Cold…
3. Mini Stuffed Peppers

Brighten up your gatherings with adorable mini stuffed peppers! These tiny treats aren’t just cute; they burst with flavor and nutrition. Using colorful mini bell peppers, you can create a snack that’s perfect for any occasion. Imagine serving vibrant red, yellow, and orange peppers filled with a hearty mix of quinoa, black beans, and corn. Your guests will find them irresistible!
To get started, you’ll need to cook your quinoa. Once it’s fluffy, mix it with rinsed black beans, sweet corn, finely diced red onion, and a splash of lime juice for a zesty kick. Spoon this delicious filling into halved mini peppers and arrange them on a platter. The colors will pop, making your table look inviting and mouthwatering.
These mini stuffed peppers are not only a feast for the eyes but also for the taste buds. They’re easy to make ahead of time and can be served warm or at room temperature, which makes them a great party option!
Recipe Overview:
– Servings: 6-8
– Prep Time: 20 minutes
– Cook Time: 15 minutes
– Total Time: 35 minutes
– Calories: About 180 per serving
Ingredients:
– 12 mini bell peppers
– 1 cup cooked quinoa
– 1 can (15 oz) black beans, rinsed and drained
– 1 cup sweet corn (frozen or canned)
– 1 small red onion, finely diced
– Juice of 1 lime
Step-by-Step Instructions:
1. Preheat your oven to 375°F (190°C).
2. Slice the mini bell peppers in half and remove the seeds.
3. In a mixing bowl, combine the quinoa, black beans, corn, onion, and lime juice.
4. Stuff each pepper with the mixture and place them on a baking sheet.
5. Bake for 15 minutes, until the peppers are tender.
6. Serve warm or let them cool to room temperature.
Feel free to get creative! Add spices like cumin or chili powder for an extra kick. These petite snacks can be made the day before and are perfect for any gathering or casual get-together.
Tips:
– Choose colorful mini peppers for a stunning presentation.
– Add spices to customize the flavor profile.
– Make them a day in advance for easy prep.
– Serve with a side of salsa for extra flavor.
Mini Stuffed Peppers
Editor’s Choice


Pride Of India – Natural Three Color Bolivian Royal Quinoa – Protein Ric…

GoodCook Everyday Nonstick Carbon Steel Baking Sheet Set, 3 Pack – Small…
4. Avocado Bruschetta

Elevate your snack game with a delightful twist on traditional bruschetta: Avocado Bruschetta! This finger food is not only easy to make but also bursting with fresh flavors that will leave your guests raving. Imagine crisp, toasted slices of gluten-free baguette topped with a creamy avocado mix, juicy tomatoes, and fragrant basil. Drizzle it all with balsamic glaze for that perfect finishing touch, and you have a party winner on your hands.
To whip this up, start by mashing ripe avocados in a bowl. Then, mix in diced tomatoes, fresh basil, and a dash of salt for flavor. Spread this vibrant mixture over your toasted baguette slices and finish off with a drizzle of balsamic glaze. It’s a simple recipe that’s packed with healthy fats, making it not just tasty but also nutritious!
Here’s how to make it:
Ingredients:
– 1 gluten-free baguette
– 2 ripe avocados
– 1 cup diced tomatoes
– ¼ cup chopped fresh basil
– Balsamic glaze for drizzling
Instructions:
1. Preheat your oven to 400°F (200°C).
2. Slice the gluten-free baguette into ½ inch thick pieces. Arrange them on a baking sheet.
3. Toast the slices in the oven for about 5 minutes until they are lightly golden.
4. In a bowl, mash the avocados. Stir in the diced tomatoes, chopped basil, and salt to taste.
5. Spread a generous layer of the avocado mixture on each toasted baguette slice.
6. Drizzle with balsamic glaze and serve right away for the best taste.
Want to add a little zing? Toss in some minced garlic with the avocado mix for extra flavor! And remember, when choosing tomatoes, opt for the juiciest ones to enhance the taste.
Tips for Your Avocado Bruschetta:
– Add garlic for an extra flavor boost.
– Choose juicy tomatoes for the best results.
– Serve immediately to keep the bread crisp.
– Use fresh basil for that garden-fresh taste.
This Avocado Bruschetta is perfect for parties, picnics, or just a cozy night in. Enjoy the vibrant colors and flavors while impressing your guests with minimal effort!
Avocado Bruschetta
Editor’s Choice

Schar Dr Baguettes (Baquettes) Gluten Free, 12.3oz, Pack of 3, 12.3 Ounce

Filippo Berio Glaze with Balsamic Vinegar of Modena, 8.4 Ounce Plastic B…

5. Sweet Potato and Black Bean Bites

Get ready to impress your guests with these delightful Sweet Potato and Black Bean Bites! These little morsels pack a flavorful punch and are perfect for any party. The crispy outside and soft, savory filling make them a crowd favorite. Just roast the sweet potatoes until they’re tender, then mash them up and mix with black beans, spices, and a splash of lime juice for a zesty kick.
These bites are not just tasty; they’re also healthy! Serve them warm, and watch as everyone dives in, especially when you pair them with a creamy avocado sauce. They’re great for dipping and will leave your guests asking for more.
Recipe Overview:
– Servings: 4-6
– Prep Time: 15 minutes
– Cook Time: 30 minutes
– Total Time: 45 minutes
– Calories: Approximately 220 per serving
Nutritional Information:
– Calories: 220
– Protein: 6g
– Fat: 4g
– Carbohydrates: 40g
– Fiber: 8g
Ingredients:
– 2 medium sweet potatoes
– 1 can black beans (15 oz), rinsed and drained
– 1 teaspoon cumin
– Juice of 1 lime
– Salt and pepper to taste
– Olive oil for baking
Step-by-Step Instructions:
1. Preheat your oven to 400°F (200°C).
2. Roast the sweet potatoes in the oven until they’re tender (about 25 minutes).
3. Let them cool, then mash the sweet potatoes in a bowl.
4. Stir in the black beans, cumin, lime juice, salt, and pepper until everything is well mixed.
5. Shape the mixture into small patties and place them on a greased baking sheet.
6. Bake for 15 minutes or until they turn golden brown.
Top them with your avocado sauce for a delicious creamy contrast. These bites are perfect for snacking, making them an excellent choice for your next gathering.
Tips for Success:
– Experiment with spices to customize the flavor.
– Make them smaller for easy snacking.
– Pan-fry instead of bake for an extra crunch if you prefer!
– Add some cheese for a creamier filling everyone will love!
Sweet Potato and Black Bean Bites
Editor’s Choice

Amazon Basics Silicone Rectangular Baking Mat, Non-Stick Reusable Oven B…
6. Zucchini Fritters with Tzatziki

Zucchini fritters are the perfect finger food for your next gathering! These little bites are light, crispy, and packed with flavor. Imagine the satisfying crunch as you dip them into a cool tzatziki sauce. This refreshing dip, made from coconut yogurt, cucumber, and dill, adds a delightful contrast that makes each bite even more enjoyable.
To whip up these fritters, start by squeezing out the moisture from grated zucchini. This step is key to achieving that crispy texture. Then, combine the zucchini with gluten-free flour, garlic powder, salt, and pepper. Fry them until they turn a beautiful golden brown, and serve them hot with tzatziki on the side. This dish is comfort food at its best—both delicious and guilt-free!
Recipe Overview:
– Servings: 4-6
– Prep Time: 20 minutes
– Cook Time: 15 minutes
– Total Time: 35 minutes
– Calories: Approximately 150 per serving
Nutritional Information:
– Calories: 150
– Protein: 5g
– Fat: 8g
– Carbohydrates: 17g
– Fiber: 2g
Ingredients:
– 2 medium zucchinis, grated
– ½ cup gluten-free flour
– 1 teaspoon garlic powder
– Salt and pepper to taste
– Olive oil for frying
– For tzatziki: 1 cup coconut yogurt, ½ cucumber (grated), chopped dill
Step-by-Step Instructions:
1. Squeeze the grated zucchini to remove excess moisture.
2. In a bowl, mix the zucchini, gluten-free flour, garlic powder, salt, and pepper.
3. Heat olive oil in a frying pan over medium heat.
4. Drop spoonfuls of the mixture into the pan, flattening them slightly.
5. Fry until golden brown on both sides, about 3-4 minutes per side.
6. For the tzatziki, combine yogurt, grated cucumber, and dill in a bowl.
7. Serve the fritters warm with tzatziki on the side.
Tips:
– Use finely grated zucchini for a better texture.
– Add red pepper flakes to the mixture for a spicy kick.
– Want a healthier option? Bake them at 375°F instead of frying.
Now you’re ready to impress your friends with these tasty zucchini fritters! They’re not just easy to make but also a hit at any party!
Zucchini Fritters with Tzatziki
Editor’s Choice

CAROTE Nonstick Frying Pan Skillet,Non Stick Granite Fry Pan Egg Pan Ome…

Urbanstrive Cheese Grater With Container Box Grater Stainless Steel Grat…

Harmless Harvest Organic Unsweetened Plain Rich & Creamy Coconut Yogurt,…
7. Fruit Skewers with Coconut Dip

Add a splash of color and a hint of the tropics to your next gathering with delicious fruit skewers! These easy-to-make treats not only look stunning but also offer a refreshing burst of flavor. Imagine juicy pineapple, sweet strawberries, and cool melon, all threaded together for a vibrant display. Pair them with a creamy coconut dip that’s both simple and satisfying. Your guests will rave about this perfect combination of sweetness and creaminess!
Making these skewers is a breeze. They take just minutes to prepare and require no cooking—ideal for last-minute parties. Plus, they’re a healthier option that still feels indulgent. You can customize the fruit according to the season, ensuring the freshest taste and colors on your platter.
Here’s how to whip up these delightful skewers:
Recipe Overview:
– Servings: 4-6
– Prep Time: 10 minutes
– Total Time: 10 minutes
– Calories: Approximately 100 per serving
Nutritional Information:
– Calories: 100
– Protein: 1g
– Fat: 4g
– Carbohydrates: 20g
– Fiber: 2g
Ingredients:
– 1 cup pineapple chunks
– 1 cup strawberry halves
– 1 cup melon balls
– 1 cup coconut milk
– 2 tablespoons honey (or maple syrup for a vegan option)
Instructions:
1. Start by threading the pineapple, strawberries, and melon onto skewers, alternating for a colorful look.
2. In a separate bowl, mix together the coconut milk and honey until smooth and creamy.
3. Serve your beautiful fruit skewers with the coconut dip on the side for dipping.
Tips:
– Use seasonal fruits for the best flavors.
– Add a splash of rum to the coconut dip for an adult twist!
These fruit skewers are not only a hit with kids but also a great, light treat for adults. You’ll love how easy they are to make and how much everyone enjoys them. Perfect for summer barbecues or any celebration, they truly brighten up the snack table!
Fruit Skewers with Coconut Dip
Editor’s Choice

HOPELF 12″ Natural Bamboo Skewers for BBQ,Appetiser,Fruit,Cocktail,Kabob…

Thai Kitchen Gluten Free Unsweetened Coconut Milk, 13.66 fl oz (Pack of 12)

Nate’s 100% Pure, Raw & Unfiltered Honey – Award-Winning Taste, 32oz. Sq…
8. Spicy Cauliflower Bites

Craving a tasty snack that won’t leave you feeling guilty? Try these spicy cauliflower bites! They serve as a fantastic alternative to traditional chicken wings. Crispy on the outside and packed with flavor, these bites are sure to impress your guests. Pair them with a cool vegan ranch dip for a satisfying contrast that everyone will love.
Start by breaking a head of cauliflower into bite-sized florets. Toss them in a mix of gluten-free flour, spices, and plant-based milk until they’re well-coated. Bake at a high temperature until they turn golden brown and crispy. Not only are these bites delicious, but they’re also loaded with nutrients, making them a perfect choice for any gathering.
Recipe Overview:
– Servings: 4-6
– Prep Time: 15 minutes
– Cook Time: 30 minutes
– Total Time: 45 minutes
– Calories: About 180 per serving
Nutritional Information:
– Calories: 180
– Protein: 5g
– Fat: 7g
– Carbohydrates: 28g
– Fiber: 4g
Ingredients:
– 1 head cauliflower, cut into florets
– ½ cup gluten-free flour
– ½ cup plant-based milk
– 1 teaspoon cayenne pepper
– 1 teaspoon garlic powder
– Olive oil for baking
– For vegan ranch: 1 cup coconut yogurt, 2 tablespoons ranch seasoning
Step-by-Step Instructions:
1. Preheat your oven to 450°F (230°C).
2. In a bowl, mix gluten-free flour, plant-based milk, cayenne pepper, and garlic powder to create a batter.
3. Toss the cauliflower florets in the batter until they are fully coated.
4. Spread them on a baking sheet and drizzle with olive oil.
5. Bake for about 30 minutes until crispy and golden.
6. For the vegan ranch, combine coconut yogurt and ranch seasoning in a small bowl.
7. Serve these spicy bites with the ranch dip for a tasty treat!
Want to adjust the heat? Simply add more or less cayenne to suit your taste. For an extra crunch, you can broil them for the last 2-3 minutes of baking.
Storage Tip:
Have leftovers? Store them in an airtight container in the fridge for up to 2 days.
These spicy cauliflower bites are not just a snack; they’re a crowd-pleaser. Get ready to wow your friends at your next party!
Fun fact: Spicy cauliflower bites sneak in big flavor with roughly 85 calories per serving and 4 g of fiber. They’re a gluten-free, vegan-friendly alternative to wings and perfect for snack platter ideas and finger foods. Pair with a cool vegan ranch dip for contrast and crowd appeal.
Spicy Cauliflower Bites
Editor’s Choice

King Arthur Measure for Measure Gluten-Free Flour: All-Purpose 1:1 Subst…

“Better Than Yogurt” Make At Home Mix (Dairy and Soy Free!) (Coconut, 2-…

McCormick Garlic Ranch Crunchy Chicken Seasoning Mix, 1.25 oz (Pack of 12)
9. Quinoa Salad Cups

Imagine serving a dish that’s not only delicious but also nutritious. Quinoa salad cups do just that! These bite-sized delights combine the wholesome goodness of quinoa with fresh veggies, all nestled in crisp lettuce or endive leaves. They’re colorful, crunchy, and bursting with flavor, making them a hit at any gathering. Plus, they fit right into today’s health-conscious trends, as seen on popular food blogs and Pinterest boards.
To make these cups, start by mixing cooked quinoa with diced tomatoes, cucumbers, bell peppers, and a zesty lemon vinaigrette. The result is a vibrant salad that looks as good as it tastes. Just before serving, scoop this mixture into your leafy cups for a refreshing treat. Whether you’re hosting an outdoor barbecue or an indoor party, these quinoa salad cups will impress your guests and keep them coming back for more.
Here’s how to prepare them:
Ingredients:
– 1 cup cooked quinoa
– ½ cup diced tomatoes
– ½ cup diced cucumber
– ½ cup diced bell pepper
– 2 tablespoons lemon vinaigrette
– Mini lettuce or endive leaves for cups
Instructions:
1. In a large bowl, combine the cooked quinoa, diced tomatoes, cucumber, bell pepper, and lemon vinaigrette. Mix well until everything is evenly coated.
2. Carefully separate the mini lettuce or endive leaves to create your cups.
3. Spoon the quinoa mixture into each leaf just before serving to maintain their crunch.
4. Arrange the filled cups on a platter and enjoy!
Tips for Success:
– Customize with your favorite veggies for a personal touch.
– Add black beans for an extra protein boost.
– Prepare the quinoa salad a few hours ahead for the best flavors, but wait to fill the cups until serving time.
These quinoa salad cups are perfect for impressing friends and family while keeping it healthy and fun. They’re quick to make, easy to customize, and sure to be the star of your snack platter!
Quinoa Salad Cups
Editor’s Choice

Viva Naturals Organic Quinoa, 4 lb – Pre-Washed Whole Grain, Plant Prote…

organicgirl Organic Little Gems Salad Mix, 5 Oz (us)

Wish-Bone Extra Virgin Olive Oil Blend Lemon Herb Dressing, 15 FL oz
10. Chickpea Salad Lettuce Wraps

Chickpea salad lettuce wraps are the ultimate no-cook appetizer that packs a punch of flavor! These wraps combine protein-rich chickpeas, colorful veggies, and creamy vegan mayo, all tucked into crisp lettuce leaves. They are not only delicious but also fun to eat, making them a hit at any gathering. Plus, they’re a fantastic way to enjoy a plant-based dish that’s sure to impress your guests.
To make these tasty wraps, start by mashing a can of chickpeas in a bowl. This gives them a creamy base. Then, mix in diced celery, red onion, and a dollop of vegan mayo. For an extra kick, sprinkle in some paprika or your favorite spices. Once the mixture is ready, simply spoon it into fresh lettuce leaves. You’ll have a light and nutritious finger food that everyone will love.
Recipe Overview:
– Servings: 4-6
– Prep Time: 10 minutes
– Cook Time: 0 minutes
– Total Time: 10 minutes
– Calories: Approximately 150 per serving
Nutritional Information:
– Calories: 150
– Protein: 6g
– Fat: 7g
– Carbohydrates: 19g
– Fiber: 5g
Ingredients:
– 1 can chickpeas (15 oz), rinsed and drained
– ½ cup diced celery
– ¼ cup diced red onion
– ¼ cup vegan mayo
– Lettuce leaves for wraps
Step-by-Step Instructions:
1. In a bowl, mash the chickpeas with a fork or potato masher until creamy.
2. Stir in diced celery, red onion, and vegan mayo until everything is well combined.
3. Spoon the chickpea mixture into the center of each lettuce leaf to create your wraps.
4. Serve them fresh and enjoy!
Feel free to get creative!
– Add herbs like dill or parsley for extra flavor.
– Incorporate diced pickles for a satisfying crunch.
– Mix in diced bell peppers for a pop of color and taste.
Keep in mind that these wraps are best enjoyed fresh. They’re perfect for parties, picnics, or a quick snack at home. With just a few simple ingredients, you’ll have a colorful, tasty treat that everyone will adore!
Chickpea Salad Lettuce Wraps
Editor’s Choice

Garbanzo Beans, 5 Pounds (Chick Peas), USDA Certified Organic, Dried, No…

Hellmann’s Vegan Dressing and Spread Vegan 3 Ct for a Rich, Creamy Plant…

11. Roasted Beet Hummus

Get ready to impress your guests with a stunning bowl of roasted beet hummus! This vibrant dip is not only eye-catching with its beautiful pink hue but also packed with flavor and nutrition. The natural sweetness of roasted beets pairs perfectly with creamy tahini, zesty lemon, and a hint of garlic. It’s a delightful twist on classic hummus that will have everyone reaching for more.
Roasting the beets brings out their earthy sweetness and caramelizes their natural sugars. You’ll create a smooth, creamy dip that’s perfect for dipping fresh veggie sticks or gluten-free pita chips. To serve it up right, drizzle a little olive oil on top and sprinkle with sesame seeds or fresh herbs for a gourmet touch. This recipe is a hit at any gathering!
Here’s how to make it:
Recipe Overview:
– Servings: 4-6
– Prep Time: 15 minutes
– Cook Time: 30 minutes
– Total Time: 45 minutes
– Calories: Approximately 170 per serving
Nutritional Information:
– Calories: 170
– Protein: 6g
– Fat: 8g
– Carbohydrates: 22g
– Fiber: 5g
Ingredients:
– 2 medium beets, roasted and peeled
– 1 can chickpeas (15 oz), rinsed and drained
– ¼ cup tahini
– 1 clove garlic
– Juice of 1 lemon
– Olive oil for drizzling
Step-by-Step Instructions:
1. Preheat your oven to 400°F (200°C). Wrap each beet in foil.
2. Roast the beets for about 30-40 minutes until they are tender. Let them cool, then peel.
3. In a blender, combine the roasted beets, chickpeas, tahini, garlic, lemon juice, and a splash of olive oil.
4. Blend until smooth, adjusting the olive oil for your desired consistency.
5. Transfer to a serving bowl and drizzle with olive oil.
6. Serve with crunchy veggie sticks or gluten-free pita chips.
Want to kick it up a notch? Add a pinch of cumin for a warm, spicy twist. You can make this dip ahead of time and store it in the fridge for up to a week, making it a stress-free option for party planning.
Frequently Asked Questions:
– Can I use canned beets? Yes, canned beets can be a quick alternative, but they won’t have the same depth of flavor as roasted beets.
This roasted beet hummus is sure to be a crowd-pleaser—enjoy every colorful bite!
Roasted Beet Hummus
Editor’s Choice
Hamilton Beach Food Processor & Vegetable Chopper for Slicing, Shredding…

Simple Mills Veggie Pita Crackers, Himalayan Salt – Gluten Free, Vegan, …

AOZITA 17oz Glass Olive Oil Bottle Dispenser – 500ml Green Oil and Vineg…
12. Almond Butter Energy Bites

Indulge your sweet tooth without the guilt with these delightful Almond Butter Energy Bites. They’re a fantastic choice when you crave something tasty yet healthy. These no-bake snacks are not only quick to whip up but also packed with wholesome ingredients like oats, almond butter, and a hint of maple syrup. Serve them on a platter at your next gathering, and watch them disappear!
Imagine mixing rolled oats and creamy almond butter, sweetened with just the right amount of honey or maple syrup. Toss in some chocolate chips for that extra treat, and you have a snack that delights both kids and adults. Perfect for energy boosts during busy days, these bites are as nutritious as they are satisfying.
Recipe Overview:
– Servings: 12-15 bites
– Prep Time: 10 minutes
– Cook Time: 0 minutes
– Total Time: 10 minutes
– Calories: Approximately 120 per serving
Nutritional Information:
– Calories: 120
– Protein: 4g
– Fat: 6g
– Carbohydrates: 12g
– Fiber: 2g
Ingredients:
– 1 cup rolled oats
– ½ cup almond butter
– ¼ cup honey or maple syrup
– ¼ cup chocolate chips
Step-by-Step Instructions:
1. In a mixing bowl, combine the rolled oats, almond butter, honey (or maple syrup), and chocolate chips.
2. Stir until everything is well blended and sticks together.
3. Roll the mixture into 1-inch balls and place them on a parchment-lined baking sheet.
4. Chill the bites in the fridge for about 30 minutes to firm up.
5. Serve chilled and watch everyone enjoy this sweet treat!
Feel free to get creative! Customize your energy bites by adding dried fruits or seeds for extra flavor and crunch. Store any leftovers in an airtight container in the fridge for up to a week, making them a handy snack for any time.
Frequently Asked Questions:
– Can I use peanut butter instead? Absolutely! Peanut butter makes a delicious alternative.
With their easy preparation and delightful taste, these Almond Butter Energy Bites will quickly become a go-to snack at your gatherings.
Snack platter ideas come to life with these no-bake Almond Butter Energy Bites. Creamy almond butter meets oats and a touch of maple syrup for a bite you can whip up in minutes. Perfect for finger foods and easy appetizer recipes at gatherings.
Almond Butter Energy Bites
Editor’s Choice

365 by Whole Foods Market, Organic Creamy Almond Butter, 16 Ounce

Bob’s Red Mill Gluten Free Organic Extra Thick Rolled Oats, 32oz (Pack o…

Butternut Mountain Farm Pure Vermont Maple Syrup, Grade A, Dark Color, R…
13. Coconut Curry Chickpeas

Coconut curry chickpeas are a delightful and satisfying addition to your snack platter. Packed with flavor and nutrition, they combine creamy coconut milk with spicy curry and hearty chickpeas. This dish is perfect for dipping or adding to salads. Serve them warm in small cups or arrange them on a platter with crunchy veggie sticks for a colorful presentation that will impress your guests.
To make these tasty chickpeas, start by sautéing garlic and onions until they’re fragrant and golden. Then, add rinsed chickpeas and creamy coconut milk. Sprinkle in some curry powder and let it simmer until thick. These chickpeas are not only rich in protein but also bursting with flavor, making them a healthy finger food option everyone will love!
Recipe Overview:
– Servings: 4-6
– Prep Time: 10 minutes
– Cook Time: 20 minutes
– Total Time: 30 minutes
– Calories: About 200 per serving
Nutritional Information:
– Calories: 200
– Protein: 8g
– Fat: 11g
– Carbohydrates: 22g
– Fiber: 6g
Ingredients:
– 1 can chickpeas (15 oz), rinsed and drained
– 1 can coconut milk (13.5 oz)
– 1 small onion, chopped
– 2 cloves garlic, minced
– 1 tablespoon curry powder
– Olive oil for sautéing
Step-by-Step Instructions:
1. Heat olive oil in a pan over medium heat. Sauté the chopped onions until they turn translucent.
2. Add the minced garlic and cook for another minute until fragrant.
3. Stir in the rinsed chickpeas and coconut milk. Sprinkle in the curry powder.
4. Let the mixture simmer for 10-15 minutes, stirring occasionally until it thickens.
5. Serve warm in small cups or with crunchy veggie sticks for dipping.
Tips:
– Adjust the spice by adding more curry powder for a kick.
– Garnish with fresh cilantro for a refreshing touch.
Frequently Asked Questions:
– How long can I store leftovers? Keep them in an airtight container in the fridge for up to 3 days. Enjoy this delightful dish at your next gathering!
Coconut Curry Chickpeas
Editor’s Choice

Frontier Co-op Five Spice Powder, 1.92 oz – Seasoning Mix of Cinnamon, F…
Thai Kitchen Gluten Free Unsweetened Coconut Milk, 13.66 fl oz (Pack of 12)

365 by Whole Foods Market, Unsalted Garbanzo Beans, 15.5 Ounce (Pack of 4)
14. Caprese Salad Skewers

Caprese salad skewers are a fantastic way to bring a taste of Italy to your next party. These colorful bites are not only easy to prepare but also bursting with fresh flavors. Imagine the juicy cherry tomatoes, fragrant basil, and creamy mozzarella all coming together on a skewer. Drizzling them with balsamic reduction adds a sweet and tangy finish that will wow your guests.
To make these delightful skewers, you simply thread cherry tomatoes, fresh basil leaves, and mozzarella balls onto toothpicks. For an extra touch, drizzle them with balsamic reduction just before serving. This way, you keep the flavors bright and inviting. These skewers are perfect for any buffet or snack table, adding both color and taste.
Recipe Overview:
– Servings: 4-6
– Prep Time: 15 minutes
– Cook Time: 0 minutes
– Total Time: 15 minutes
– Calories: Approximately 90 per serving
Nutritional Information:
– Calories: 90
– Protein: 3g
– Fat: 5g
– Carbohydrates: 7g
– Fiber: 1g
Ingredients:
– 1 pint cherry tomatoes
– 1 cup vegan mozzarella balls
– Fresh basil leaves
– Balsamic reduction for drizzling
Step-by-Step Instructions:
1. Take each skewer and thread a cherry tomato, a basil leaf, and a mozzarella ball.
2. Keep adding ingredients until the skewer is filled.
3. Arrange the skewers on a platter. Drizzle with balsamic reduction just before serving.
Tips for the Perfect Skewers:
– Choose colorful tomatoes for a more vibrant display.
– Prepare the skewers ahead of time but wait to drizzle the balsamic until serving for maximum freshness.
– Mix and match ingredients based on what you have; you can even use olives or peppers for variety.
– Serve chilled for a refreshing appetizer that’s sure to please.
These Caprese salad skewers are a hit for any gathering. They’re simple, beautiful, and delicious. Your guests will love diving into these fresh bites, making your event even more memorable!
Caprese Salad Skewers
Editor’s Choice
HOPELF 12″ Natural Bamboo Skewers for BBQ,Appetiser,Fruit,Cocktail,Kabob…

Alessi Balsamic Vinegar Reduction, Autentico from Italy, Ideal on Capres…

Whole Foods Market, Fresh Mozzarella Vac Pack Balls, 8 oz
15. Baked Apple Nachos

Imagine a delightful twist on nachos that satisfies your sweet tooth and keeps things healthy. Baked apple nachos are the perfect treat for gatherings or cozy nights at home. They combine the crispness of fresh apples with the creamy goodness of almond butter. Top it off with your favorite nuts and a sprinkle of sweetness, and you have a snack that everyone will love. Pinterest is buzzing with these, and it’s easy to see why—they’re both fun and nutritious!
To make your baked apple nachos, start with just a few simple ingredients. This treat is budget-friendly, and you can swap in different toppings to suit your taste. Try using peanut butter instead of almond butter or mix in chocolate chips for a decadent twist. The warm, gooey apples paired with crunchy toppings create a snack that feels indulgent but is still good for you.
Recipe Overview:
– Servings: 4-6
– Prep Time: 10 minutes
– Cook Time: 10 minutes
– Total Time: 20 minutes
– Calories: Approximately 180 per serving
Nutritional Information:
– Calories: 180
– Protein: 4g
– Fat: 10g
– Carbohydrates: 22g
– Fiber: 4g
Ingredients:
– 2 large apples, thinly sliced
– ¼ cup almond butter
– ¼ cup chopped nuts (walnuts, almonds, or pecans)
– ¼ cup raisins or coconut flakes
Step-by-Step Instructions:
1. Preheat your oven to 350°F (175°C).
2. Line a baking sheet with parchment paper and arrange the apple slices.
3. Drizzle the almond butter over the apples, then sprinkle with nuts and raisins or coconut flakes.
4. Bake for 10 minutes or until the apples are tender.
5. Serve warm for a deliciously sweet and healthy dessert!
Tips for Customization:
– Experiment with different nut butters for unique flavors.
– Add a dash of cinnamon for a warm spice kick.
You can make these nachos ahead of time, but they taste best fresh out of the oven. Just warm them up for a quick snack that feels indulgent without the guilt. Enjoy your delicious baked apple nachos at your next party, and watch them disappear!
Baked apple nachos turn sweet cravings into snack platter ideas with a vegan, gluten-free twist. This quick, shareable treat stacks crisp apples with almond butter, nuts, and a touch of sweetness—perfect finger foods for any party. A simple, flavorful set of appetizer recipes you’ll want to reuse in every gathering.
Baked Apple Nachos
Editor’s Choice

MaraNatha Natural Creamy Almond Butter, No Stir, No Sugar or Salt Added,…

Reynolds Kitchens Unbleached Parchment Paper Roll, Non Stick Parchment P…

16. Sesame Seed Energy Balls

Get ready to boost your energy with these Sesame Seed Energy Balls! They’re the perfect snack to keep you fueled while satisfying your sweet cravings. Made with just a handful of simple ingredients, these bites are a breeze to whip up. Imagine mixing together creamy oats, crunchy sesame seeds, and a drizzle of sweet maple syrup, all tied together with a hint of vanilla. You’ll have a treat that’s not only delicious but also healthy!
These energy balls are perfect for parties. Their sweet and nutty flavors, combined with a chewy texture, make them irresistible. Serve them on a colorful platter, and watch your guests dive in! They’re a great finger food option that everyone can enjoy without feeling guilty.
Here’s how to make them:
Recipe Overview:
– Servings: 12-15 balls
– Prep Time: 10 minutes
– Cook Time: 0 minutes
– Total Time: 10 minutes
– Calories: Approximately 100 per serving
Nutritional Information (per ball):
– Calories: 100
– Protein: 3g
– Fat: 5g
– Carbohydrates: 12g
– Fiber: 2g
Ingredients:
– 1 cup oats
– ½ cup sesame seeds
– ¼ cup maple syrup
– 1 teaspoon vanilla extract
Step-by-Step Instructions:
1. In a mixing bowl, add oats, sesame seeds, maple syrup, and vanilla extract.
2. Stir everything together until it’s well mixed.
3. Roll the mixture into small balls, about the size of a tablespoon.
4. Place the balls on a baking sheet lined with parchment paper.
5. Chill them in the fridge for 30 minutes to set.
6. Serve and enjoy these delightful bites!
Want to add some flair? Roll them in shredded coconut or chopped nuts for extra texture and flavor! Store any leftovers in an airtight container in the fridge for up to a week.
Common Questions:
– Can I use different seeds? Absolutely! Feel free to swap in chia or flax seeds for a twist.
With these simple tips and delicious energy balls, you’re all set for your next gathering. Enjoy snacking smart!
Sesame Seed Energy Balls
Editor’s Choice
Hamilton Beach Food Processor & Vegetable Chopper for Slicing, Shredding…

Airtight Food Storage Containers with Lids, Vtopmart 24 pcs Plastic Kitc…
17. Vegan Spinach and Artichoke Dip

Looking for a crowd-pleasing dip that everyone can enjoy? Try this delicious vegan spinach and artichoke dip. It’s creamy, flavorful, and perfect for any gathering! Made with soaked cashews, this dip gives you that rich texture without any dairy. Blend it with fresh spinach, artichoke hearts, garlic, and a sprinkle of spices, and you’ve got a snack that will keep your guests coming back for more.
Warm and inviting, this dip pairs wonderfully with crunchy tortilla chips or fresh veggie sticks. It’s also great spread on gluten-free crackers or enjoyed straight from the bowl. Plus, you can easily adjust the flavors to suit your taste. Add some red pepper flakes for a spicy twist or serve it alongside a variety of dippers for an appealing spread.
Recipe Overview:
– Servings: 4-6
– Prep Time: 15 minutes
– Cook Time: 20 minutes
– Total Time: 35 minutes
– Calories: Approximately 250 per serving
Nutritional Information:
– Calories: 250
– Protein: 6g
– Fat: 15g
– Carbohydrates: 25g
– Fiber: 4g
Ingredients:
– 1 cup raw cashews (soaked for at least 2 hours)
– 1 cup fresh spinach
– 1 can artichoke hearts (15 oz), drained
– 2 cloves garlic
– ¼ cup nutritional yeast
– Salt and pepper to taste
Step-by-Step Instructions:
1. Soak the raw cashews in water for at least 2 hours, then drain them.
2. In a blender, combine the soaked cashews, spinach, artichokes, garlic, nutritional yeast, salt, and pepper.
3. Blend everything until you get a creamy, smooth texture.
4. Transfer the mixture to an oven-safe dish and bake at 350°F (175°C) for 20 minutes or until warm.
5. Serve with your favorite tortilla chips or fresh vegetable sticks.
Feel free to experiment! You can add crushed red pepper for some heat or even mix in other veggies. This vegan spinach and artichoke dip will surely impress your friends and keep your snack table vibrant and tasty! Enjoy this delightful treat at your next party!
Vegan Spinach and Artichoke Dip
Editor’s Choice

Ninja BL660 Professional Compact Smoothie & Food Processing Blender, 110…

Raw Organic JUMBO Cashew 1lb, 100% Natural, Fairtrade, Non-GMO

Late July Sea Salt Organic Tortilla Chips, 10.1 Oz Bag
18. Roasted Chickpeas

Roasted chickpeas are the snack you didn’t know you needed! These crunchy bites not only satisfy your cravings but also offer a healthy alternative to chips. With just a few ingredients, you can create a delicious snack that’s perfect for sharing or enjoying solo. Imagine the sound of that satisfying crunch as you bite into a perfectly roasted chickpea. You can season them any way you like, from zesty to sweet, making them a versatile addition to any party platter.
Let’s make these tasty treats! Start by rinsing and drying a can of chickpeas. Then, toss them in olive oil and your favorite spices—try garlic powder for savory goodness or cinnamon for a sweet twist. Spread them out on a baking sheet and let the oven work its magic. In just 30 minutes, you’ll have a crispy snack ready to munch on or sprinkle over salads for added texture. Plus, they’re gluten-free and packed with protein, making them a guilt-free treat for everyone!
Recipe Overview:
– Servings: 4-6
– Prep Time: 10 minutes
– Cook Time: 30 minutes
– Total Time: 40 minutes
– Calories: Approximately 180 per serving
Nutritional Information:
– Calories: 180
– Protein: 9g
– Fat: 5g
– Carbohydrates: 24g
– Fiber: 6g
Ingredients:
– 1 can chickpeas (15 oz), rinsed and drained
– 1 tablespoon olive oil
– 1 teaspoon paprika
– Salt to taste
Step-by-Step Instructions:
1. Preheat your oven to 400°F (200°C).
2. Rinse and dry the chickpeas thoroughly with a clean kitchen towel.
3. Toss the chickpeas in olive oil, paprika, and a pinch of salt until fully coated.
4. Spread them evenly on a baking sheet to ensure they roast evenly.
5. Bake for 30 minutes, stirring halfway through to get that perfect crunch.
6. Once golden and crispy, let them cool before serving. Enjoy as a snack or salad topper!
Feel free to experiment with different spices to find your perfect flavor combo. Store any leftovers in an airtight container to keep them crispy for up to a week.
Tips:
– Use chili powder for a spicy kick.
– Choose garlic powder for a savory flavor.
– Add a sprinkle of cinnamon for a sweet twist.
– Place in an airtight container for freshness.
These roasted chickpeas are sure to be a hit at your next gathering. They are not just tasty; they’re a fun way to incorporate healthy snacking into your life!
Roasted Chickpeas
Editor’s Choice
Amazon Basics Silicone Rectangular Baking Mat, Non-Stick Reusable Oven B…

Amazon Basics Electric Coffee Grinder, Coffee Bean and Spice Grinder, Wi…
Airtight Food Storage Containers with Lids, Vtopmart 24 pcs Plastic Kitc…
19. Vegan Stuffed Mushrooms

Vegan stuffed mushrooms are a delightful finger food that brings both flavor and nutrition to your table. Imagine juicy mushroom caps filled with a savory blend of sautéed garlic, fresh spinach, and crispy gluten-free breadcrumbs. These tasty treats are not only simple to make, but they also impress guests at any gathering. Plus, you can prepare them ahead of time, so you can enjoy the party more!
To create these delicious bites, start by removing the stems from large mushrooms. Finely chop the stems, then sauté them with minced garlic in a little olive oil until they soften. Next, toss in the chopped spinach until it wilts down. Combine this mixture with gluten-free breadcrumbs and your favorite seasonings. Finally, stuff the mixture into each mushroom cap and bake them until golden brown. Not only do they taste great, but they also provide a satisfying way to sneak in some veggies!
Recipe Overview:
– Servings: 4-6
– Prep Time: 20 minutes
– Cook Time: 25 minutes
– Total Time: 45 minutes
– Calories: About 150 per serving
Nutritional Information:
– Calories: 150
– Protein: 5g
– Fat: 7g
– Carbohydrates: 16g
– Fiber: 3g
Ingredients:
– 12 large mushrooms, stems removed
– 1 cup fresh spinach, chopped
– 2 cloves garlic, minced
– ½ cup gluten-free breadcrumbs
– Olive oil for sautéing
Step-by-Step Instructions:
1. Preheat your oven to 375°F (190°C).
2. Chop the mushroom stems finely. Sauté with garlic in olive oil until soft.
3. Add the chopped spinach and cook until wilted.
4. Mix the sautéed ingredients with gluten-free breadcrumbs in a bowl.
5. Stuff each mushroom cap with the mixture and place them on a baking sheet.
6. Bake for 25 minutes until they are golden brown and hot.
For an extra kick, sprinkle nutritional yeast on top before baking. You can make these stuffed mushrooms a day in advance and reheat them just before serving. They’re a perfect appetizer for any gathering, offering a delicious way to start the meal.
Frequently Asked Questions:
– Can I use different types of mushrooms? Yes! Smaller varieties like button mushrooms are also great options.
Enjoy crafting these tasty vegan stuffed mushrooms for your next party! They are sure to be a hit with everyone.
Vegan Stuffed Mushrooms
Editor’s Choice
Amazon Basics Silicone Rectangular Baking Mat, Non-Stick Reusable Oven B…

Aleia’s Gluten Free Plain Bread Crumbs – 13oz (1 Pack) – Breading for Ch…
20. Chocolate-Dipped Fruit

Treat your guests to a delightful experience with chocolate-dipped fruit! This simple dessert combines the sweetness of fresh fruit with the richness of melted dark chocolate. Imagine juicy strawberries, ripe bananas, and crisp apple slices, all beautifully coated in luscious chocolate. This treat not only looks elegant but also satisfies those sweet cravings in a healthier way. Plus, it’s a crowd-pleaser that adds a touch of class to any party!
To make this delicious snack, start by melting dark chocolate. You can do this in a microwave or a double boiler for a smooth finish. Once melted, let it cool just a bit before dipping your chosen fruit. After dipping, arrange the fruit on a platter and refrigerate until the chocolate sets. This dessert can be prepared a few hours in advance. It’s perfect for busy hosts!
Recipe Overview:
– Servings: 4-6
– Prep Time: 15 minutes
– Cook Time: 5 minutes
– Total Time: 20 minutes
– Calories: Approximately 150 per serving
Nutritional Information:
– Calories: 150
– Protein: 2g
– Fat: 9g
– Carbohydrates: 20g
– Fiber: 2g
Ingredients:
– 1 cup dark chocolate chips
– 1 cup fresh strawberries
– 1 banana, sliced
– 1 cup apple slices
Step-by-Step Instructions:
1. Melt dark chocolate in a microwave or double boiler until smooth.
2. Dip each piece of fruit into the melted chocolate, then place it on a parchment-lined baking sheet.
3. Chill in the refrigerator until the chocolate has set, about 15-30 minutes.
4. Serve on a platter for a stunning presentation!
Want to elevate your chocolate-dipped fruit? Add some crushed nuts or shredded coconut for extra texture. Use a mix of dark and milk chocolate if you prefer a sweeter bite. This dessert is not just tasty; it’s also visually appealing, making it a fantastic addition to your party snack table!
Tips for Making Chocolate-Dipped Fruit:
– Select ripe, fresh fruit for the best flavor.
– Choose high-quality chocolate for a rich taste.
– Pick seasonal fruits to highlight freshness.
– Store leftovers in the fridge for a quick sweet treat later!
With these tips, you’ll have a delightful dessert that’s both easy to make and sure to impress your guests! Enjoy this sweet addition to your next gathering!
Chocolate-Dipped Fruit
Editor’s Choice

365 by Whole Foods Market, Dark Chocolate Baking Chunks, 12 Ounce

200Pcs Parchment Paper,12×16 Inches Non-Stick Precut Parchment Paper She…

Double Boiler Pot Set, Stainless Steel Melting Pot with Silicone Spatula…
21. Savory Scones with Olive Tapenade

Savory scones make a fantastic addition to your snack platter. These delightful gluten-free bites, packed with aromatic herbs, pair perfectly with a zesty olive tapenade. Each fluffy scone delivers a burst of flavor, making them a hit at any gathering. Imagine serving them warm, straight from the oven, and watching your guests dive in!
To whip up these delicious scones, you’ll need gluten-free flour, olive oil, and your choice of herbs like rosemary or thyme. Bake them until they turn a lovely golden brown, and serve them with olive tapenade for dipping. These scones are not only tasty but also easy to prepare, making them an excellent option for your next party.
Recipe Overview:
– Servings: 4-6
– Prep Time: 15 minutes
– Cook Time: 20 minutes
– Total Time: 35 minutes
– Calories: About 220 per serving
Nutritional Information:
– Calories: 220
– Protein: 5g
– Fat: 10g
– Carbohydrates: 30g
– Fiber: 3g
Ingredients:
– 2 cups gluten-free flour
– ½ cup olive oil
– 1 tablespoon baking powder
– 1 teaspoon dried rosemary
– Salt to taste
Step-by-Step Instructions:
1. Preheat your oven to 400°F (200°C).
2. In a mixing bowl, combine the gluten-free flour, baking powder, rosemary, and salt.
3. Add the olive oil and mix until the texture resembles coarse crumbs.
4. Shape the dough into a disc and cut it into triangles.
5. Place on a baking sheet and bake for about 20 minutes, or until golden brown.
6. Serve warm with olive tapenade for a delicious dip.
For a flavor twist, add minced garlic to the dough. These scones can be made ahead of time. Just reheat them before serving for a warm, fresh experience.
Frequently Asked Questions:
– Can I freeze the scones? Yes, freeze them before baking for up to a month.
Enjoy these savory scones that will impress your guests and elevate your snack game!
Savory Scones with Olive Tapenade
Editor’s Choice

King Arthur, Measure for Measure Flour, Certified Gluten-Free, Non-GMO P…
Pompeian Robust Extra Virgin Olive Oil, Contains Polyphenols, First Cold…

Dried Rosemary Leaves, 3 oz. Premium All Natural Herbs and Spices for Me…
22. Veggie Spring Rolls

Veggie spring rolls are the perfect light appetizer for your next gathering. These delightful bites are not only colorful but also packed with fresh vegetables, making them a healthy choice. When served with a zesty dipping sauce, they become an irresistible finger food that your guests will love.
Imagine crisp carrots, cool cucumbers, and sweet bell peppers wrapped in a delicate rice paper shell. These vibrant rolls are not just pleasing to the eye but also refreshing, making them ideal for warm summer parties. Plus, they add a pop of color to your snack platter, catching everyone’s attention.
Ready to make your own? Here’s a simple recipe to whip up these tasty veggie spring rolls.
Recipe Overview:
– Servings: 4-6
– Prep Time: 20 minutes
– Cook Time: 0 minutes
– Total Time: 20 minutes
– Calories: Approximately 100 per serving
Nutritional Information:
– Calories: 100
– Protein: 2g
– Fat: 1g
– Carbohydrates: 20g
– Fiber: 3g
Ingredients:
– 10 rice paper wrappers
– 1 cup shredded carrots
– 1 cup cucumber slices
– 1 cup bell pepper strips
– Fresh mint and cilantro leaves
– Dipping sauce of choice (like soy or peanut)
Step-by-Step Instructions:
1. Soak each rice paper wrapper in warm water until soft and pliable.
2. Lay the wrapper flat on a clean surface. Start adding your fillings: layer carrots, cucumber, bell pepper, and herbs.
3. Roll the wrapper tightly, tucking in the sides as you go to secure the filling.
4. Repeat until you’ve used all your ingredients.
5. Serve these fresh with your favorite dipping sauce!
Pro Tips:
– Choose a mix of colorful veggies for a beautiful presentation.
– Prepare ahead and store in the refrigerator until you’re ready to serve for optimal texture.
– Add protein if you like! Tofu or shrimp can make these rolls more filling.
– Try different dips like hoisin or sweet chili for variety.
Enjoy these veggie spring rolls at your next event, and watch them disappear quickly! They are sure to impress your guests and keep things light and healthy.
Veggie Spring Rolls
Editor’s Choice

Soeos Rice Paper, White Rice Paper Wrappers, 1 Pack, 34 Sheets-Fresh Spr…

Smokehouse by Thoughtfully, Gourmet BBQ Sauce Sampler Variety Pack in Gl…
23. Crispy Rice Cakes with Avocado

Looking for a quick, delicious snack that impresses at any gathering? Try crispy rice cakes topped with creamy avocado! These little bites are not only easy to prepare, but they also offer a satisfying crunch and a burst of flavor. The mild taste of rice cakes pairs perfectly with rich avocado. You can customize each cake with toppings like chili flakes or sesame seeds, adding your unique twist. Pinterest is buzzing with these trendy snacks, making them a hit for parties or casual get-togethers.
You’ll love how simple they are to whip up. Just grab some rice cakes and ripe avocados, and you’re set! Consider adding fresh veggies like radish slices or cherry tomatoes to brighten the flavor. This snack is also gluten-free and packed with nutrients, making it a guilt-free choice for your guests. Plus, you can prepare the toppings ahead of time, saving you stress on the day of your event.
Recipe Overview:
– Servings: 4-6
– Prep Time: 10 minutes
– Cook Time: 0 minutes
– Total Time: 10 minutes
– Calories: Approximately 150 per serving
Nutritional Information:
– Calories: 150
– Protein: 3g
– Fat: 10g
– Carbohydrates: 14g
– Fiber: 5g
Ingredients:
– 6 rice cakes
– 2 ripe avocados
– Salt and pepper to taste
– Optional toppings: chili flakes, sesame seeds, sliced radishes, cherry tomatoes
Step-by-Step Instructions:
1. Cut the avocados in half, remove the pit, and scoop the flesh into a bowl. Mash it until creamy, then season with salt and pepper.
2. Spread a generous layer of the mashed avocado over each rice cake.
3. Top with optional ingredients like chili flakes for some heat or radish slices for crunch.
4. Serve immediately and watch them disappear!
Pro Tip: For an extra kick, add sliced jalapeños or a drizzle of sriracha. Enjoy these fresh for the best crunch!
Frequently Asked Questions:
– How long do these last? They are best enjoyed right away, but you can prepare the toppings a few hours in advance to save time.
Crispy Rice Cakes with Avocado
Editor’s Choice

Drizzilicious Mini Rice Cakes – Rice Crisps, Healthy Snack for Adults an…

52USA Premium Sichuan Chili Flakes(8 OZ), Ground Sichuan Red Chili Pepper
24. Vegan Cheese Platter

A vegan cheese platter makes a stunning centerpiece for your next gathering. It’s not just a treat for those who avoid dairy; it’s a feast for everyone’s taste buds. Picture an array of colorful vegan cheeses paired with crispy gluten-free crackers, fresh fruits, and crunchy nuts. This platter invites guests to explore different flavors and textures, creating an engaging snack experience.
You can easily create a visually appealing display. Use vibrant fruits like juicy grapes, sweet apple slices, and luscious figs to add pops of color. Complement the creamy cashew-based cheeses or savory almond spreads with a mix of walnuts and almonds for that perfect crunch. This finger food idea is not only beautiful but also caters to various dietary needs, making it a hit at any event.
Here’s how to make your own vegan cheese platter:
Ingredients:
– 2-3 varieties of assorted vegan cheeses
– 1 box of gluten-free crackers
– Fresh fruits (grapes, apple slices, figs)
– Mixed nuts (walnuts, almonds)
Instructions:
1. Start by arranging the assorted vegan cheeses on a large platter.
2. Fill in the gaps with gluten-free crackers, colorful fruits, and a handful of mixed nuts.
3. Serve with small utensils to make tasting easy and fun.
Remember to include a variety of textures, from creamy to crumbly cheeses. Adding both sweet and savory elements balances the flavors perfectly.
Tips for your platter:
– Choose a mix of creamy and firm cheeses for variety.
– Pick seasonal fruits for freshness and taste.
– Add herbs like rosemary or thyme for an aromatic touch.
– Place everything on a wooden board for a rustic feel.
Your guests will love the chance to mingle and create their own combinations, making it a memorable addition to your party. Enjoy the compliments as they savor each bite!
Vegan Cheese Platter
Editor’s Choice

Treeline Vegan Cheese Assortment – You CAN have it All!

Back to Nature Cheezy Square Crackers, Non-GMO, Plant-Based Cheese Flavo…

Emerald Nuts Mixed Nuts Variety Pack 18ct (1-Pack) , 100-Calorie Individ…
25. Chocolate Avocado Mousse

End your gathering on a deliciously sweet note with a rich and creamy chocolate avocado mousse. This dessert is a showstopper that will impress your guests while being vegan and gluten-free. Imagine indulging in a smooth, chocolatey treat that feels decadent but is made from wholesome ingredients. The blend of ripe avocados, cocoa powder, and a hint of maple syrup creates a delightful dessert that every chocolate lover will adore.
Preparing this mousse is a breeze. All you need to do is blend ripe avocados with cocoa powder, maple syrup, and a splash of vanilla extract until it’s perfectly smooth. Chill it for a while to let the flavors meld together, and serve it in cute little cups or ramekins. A sprinkle of fresh berries or chocolate shavings on top makes it look even more inviting. Your guests will be begging for the recipe!
Here’s how to make it:
Recipe Overview:
– Servings: 4-6
– Prep Time: 10 minutes
– Cook Time: 0 minutes
– Total Time: 10 minutes
– Calories: Approximately 200 per serving
Nutritional Information:
– Calories: 200
– Protein: 3g
– Fat: 14g
– Carbohydrates: 18g
– Fiber: 6g
Ingredients:
– 2 ripe avocados
– ¼ cup cocoa powder
– ¼ cup maple syrup
– 1 teaspoon vanilla extract
– Fresh berries for garnishing
Step-by-Step Instructions:
1. In a blender, combine the ripe avocados, cocoa powder, maple syrup, and vanilla extract.
2. Blend until the mixture is completely smooth and creamy.
3. Spoon the mousse into serving cups and chill in the fridge for at least 30 minutes.
4. Garnish with fresh berries just before serving.
Feel free to adjust the sweetness to match your taste! This mousse can be made a day ahead and stored in the fridge, making it a convenient choice for your next event.
Frequently Asked Questions:
– Can I use agave syrup instead of maple syrup? Yes, agave syrup is a great substitute for a similar taste and sweetness.
This chocolate avocado mousse is a fantastic way to end your meal, providing a rich flavor without the guilt. Enjoy the smiles on your guests’ faces as they savor every bite!
Chocolate Avocado Mousse
Editor’s Choice
Ninja BL660 Professional Compact Smoothie & Food Processing Blender, 110…

DOWAN Ramekins 4 oz Oven Safe for Creme Brulee Souffle, Porcelain Custar…

Amazon Fresh, Unsweetened Cocoa Powder, 8 Oz (Pack of 3)
Conclusion

Crafting the perfect snack platter is all about bringing together flavors, colors, and textures that appeal to your guests. With these 25 vegan and gluten-free snack platter ideas and finger food recipes, your next party will surely be a hit! From savory bites to sweet treats, there’s something here to please every palate.
Don’t forget to mix and match these ideas to create a spread that reflects your style and taste. Your friends and family will be delighted with your creativity and the deliciousness of these offerings!
Note: We aim to provide accurate product links, but some may occasionally expire or become unavailable. If this happens, please search directly on Amazon for the product or a suitable alternative.
This post contains Amazon affiliate links, meaning I may earn a small commission if you purchase through my links, at no extra cost to you.
Frequently Asked Questions
What Are Some Easy Vegan and Gluten-Free Snack Platter Ideas for Parties?
Planning a party and looking for easy vegan and gluten-free snack platter ideas? Consider options like hummus and veggie sticks, stuffed grape leaves, or roasted chickpeas. You can also create delightful fruit skewers or a colorful array of olives and nuts. These options are not only delicious but also cater to various dietary preferences, making your party a hit!
Can I Prepare Finger Food Appetizer Recipes in Advance?
Absolutely! Many finger food appetizer recipes can be prepared in advance to ease your party planning. Dishes like vegan pinwheels or stuffed peppers can be made a day ahead, allowing the flavors to meld beautifully. Just remember to store them properly in the fridge and bring them to room temperature before serving for the best taste!
What Are Some Unique Party Snacks That Will Impress My Guests?
To impress your guests, consider serving unique party snacks like zucchini fritters or miniature avocado toasts. You could also whip up spicy roasted cauliflower bites or sweet potato rounds topped with guacamole. These creative options will not only tantalize their taste buds but also spark conversation at your gathering!
How Do I Create a Balanced Snack Platter for a Buffet?
Creating a balanced snack platter for a buffet involves mixing flavors, textures, and colors. Include a variety of finger foods such as savory dips, crunchy vegetables, sweet fruits, and hearty grains. Aim for a blend of proteins, carbs, and healthy fats to ensure everyone finds something they love. Don’t forget to label items clearly, especially for dietary restrictions!
What Are Some Tips for Making Finger Foods That Appeal to Everyone?
To make finger foods that appeal to everyone, focus on familiar flavors with a twist. Choose a mix of vegan and gluten-free options to cater to different diets. Use colorful ingredients to enhance visual appeal and offer a variety of textures, like crunchy, creamy, and chewy. Finally, consider including a few classic favorites—like mini sliders or bruschetta—to please traditional palates as well!
Related Topics
snack platter ideas
finger food recipes
party snacks
vegan appetizers
gluten-free snacks
easy appetizers
buffet ideas
entertaining snacks
quick party food
healthy finger foods
simple snack recipes
holiday entertaining