Life can get hectic. Balancing work, family, and a million other commitments often leaves little time for cooking. If you’re like me, you sometimes find yourself craving a snack that’s quick, easy, and doesn’t require turning on the oven. That’s why I put together this list of 30+ quick and easy no-bake snack recipes that you can whip up in no time.
This post is perfect for busy people. Whether you’re a parent juggling kids, a student rushing between classes, or someone just trying to survive a packed workday, these recipes have your back. You want snacks that are both delicious and hassle-free, and that’s exactly what you’ll find here.
Each recipe in this collection is designed to save you time and effort. You’ll discover options that are not only simple but also healthy and satisfying. From energy bites to sweet treats and savory nibbles, you’ll have plenty of choices to fuel your day. Imagine enjoying a tasty snack without the stress of preparation—sounds great, right?
Let’s dive into these recipes that make snacking enjoyable and convenient. Say goodbye to those last-minute junk food grabs and hello to snacks that are tasty, quick, and ready when you need them. Grab your ingredients and let’s get started!
1. Peanut Butter Banana Bites

Do you ever find yourself in need of a quick, tasty snack? Look no further than these Peanut Butter Banana Bites! They satisfy your cravings and pack a nutritional punch. With healthy fats and potassium, they’re perfect for busy days when you need a boost. Plus, they take just 10 minutes to whip up!
Here’s what you need to get started:
Servings: 4
Prep Time: 10 minutes
Cook Time: 0 minutes
Total Time: 10 minutes
Calories: About 150 per serving
Nutrition Information:
– Protein: 4g
– Carbs: 20g
– Fats: 8g
Ingredients:
– 2 ripe bananas
– 1/4 cup peanut butter
– Optional: a sprinkle of granola or chocolate chips for extra texture
Instructions:
1. Start by slicing the bananas into thick rounds.
2. Spread a generous layer of peanut butter on each slice.
3. For a delightful crunch, sprinkle some granola or chocolate chips on top.
4. Enjoy them fresh, or pop them in the fridge for a cool snack later!
Want to mix things up? Try using almond butter instead of peanut butter, or drizzle some honey on top for added sweetness.
FAQs:
– Can I use other nut butters? Yes! Almond, cashew, or your favorite nut butter will work beautifully.
These bites are not just easy to make; they’re also a fantastic way to fuel your day. Perfect for school lunches or afternoon pick-me-ups, they make healthy snacking simple and enjoyable.
• Slice bananas for easy snacking
• Spread peanut butter generously
• Add granola or chocolate chips for crunch
• Store in the fridge for a grab-and-go treat
Enjoy your Peanut Butter Banana Bites anytime you need a quick energy boost!
Peanut Butter Banana Bites
Editor’s Choice

SKIPPY Natural Creamy Peanut Butter Spread Twin Pack 2-Pack, 5 LB

Cascadian Farm Organic Granola with No Added Sugar, Cinnamon Apple Cerea…

10 Pack Dishwasher Safe Reusable Bags, Leakproof Reusable Freezer Bags, …
2. No-Bake Granola Bars

Overview: Are you looking for a quick and tasty treat? No-bake granola bars are a lifesaver for busy days. They are easy to whip up and can be tailored to fit your family’s taste. Imagine grabbing a healthy snack that’s both satisfying and delicious!
Servings: 10 bars
Prep Time: 15 minutes
Cook Time: 0 minutes
Total Time: 15 minutes
Calories: Approximately 120 per bar
Nutrition Information:
– Protein: 3g
– Carbs: 18g
– Fats: 5g
Ingredients:
– 2 cups rolled oats
– 1 cup nut butter (peanut or almond)
– 1/3 cup honey or maple syrup
– 1/2 cup dried fruits (like cranberries or raisins)
– 1/4 cup nuts (chopped almonds or walnuts)
Instructions:
1. Start by mixing the rolled oats, nut butter, and honey in a large bowl. Stir well until everything is combined.
2. Gently fold in your choice of dried fruits and nuts for added flavor and crunch.
3. Press the mixture firmly into a lined baking dish. This helps the bars hold their shape.
4. Place in the refrigerator for at least one hour. Once set, cut into bars and enjoy your homemade snack!
Tips: Store these granola bars in an airtight container for up to a week. This keeps them fresh and tasty.
FAQs: Wondering if you can add chocolate chips? Go for it! Just mix them in at the end for a sweet twist.
These no-bake granola bars are perfect for busy mornings or a midday energy boost. You can create endless variations by swapping ingredients. Try adding seeds, coconut, or even a sprinkle of cinnamon. The best part? You get to control what goes in, making them a healthier choice for you and your family.
No-Bake Granola Bars
Editor’s Choice

40 Piece Food Storage Containers with Lids(20 Containers & 20 Lids), BPA…
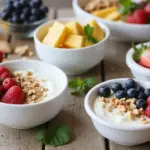
3. Yogurt Parfaits

Yogurt Parfaits: A Quick and Tasty Snack
Feeling hungry but short on time? Yogurt parfaits are here to save the day! These delicious snacks are not only quick to prepare but also packed with nutrients. By layering creamy yogurt with fresh fruits and crunchy granola, you create a treat that feels indulgent, yet supports your healthy lifestyle. Plus, they look beautiful in a glass, making them perfect for any occasion.
In just five minutes, you can whip up two servings of this delightful dish. It’s an easy choice for breakfast, a midday pick-me-up, or a sweet yet healthy dessert. The combination of flavors and textures will satisfy your cravings while keeping you energized.
Ingredients:
– 2 cups Greek yogurt (choose vanilla or plain)
– 1 cup mixed berries (like strawberries, blueberries, and raspberries)
– 1/2 cup granola
Instructions:
1. Start by adding a generous layer of Greek yogurt to your glass or bowl.
2. Top it with a layer of fresh mixed berries.
3. Sprinkle a layer of granola for that perfect crunch.
4. Repeat the layers until you use all your ingredients, finishing with a sprinkle of granola on top.
5. Enjoy your parfait right away, or cover it and chill it for a refreshing snack later.
Tips for a Perfect Parfait:
– Customize with your favorite fruits or nuts.
– Add a drizzle of honey or maple syrup for extra sweetness.
– Try using non-dairy yogurt, like coconut or almond, for a dairy-free option.
FAQs:
– Can I prepare this ahead of time? Yes, just layer the ingredients and chill to enjoy later!
– What if I don’t have granola? You can substitute with crushed nuts or seeds for a similar crunch.
Yogurt parfaits are a fantastic way to satisfy your hunger without the fuss. They’re quick, versatile, and bursting with flavor!
Yogurt Parfaits
Editor’s Choice


Nature Valley Protein Granola, Oats and Honey Granola, Resealable Snack …

4. Energy Bites

Overview: Are you looking for a quick energy boost during your busy days? These easy no-bake energy bites are your perfect solution! They are not only simple to make but also allow you to personalize them with flavors you love. Imagine a snack that satisfies your cravings and keeps you fueled for those afternoon slumps!
Servings: 12 bites
Prep Time: 10 minutes
Cook Time: 0 minutes
Total Time: 10 minutes
Calories: About 100 per bite
Nutrition Information:
– Protein: 3g
– Carbs: 12g
– Fats: 5g
Ingredients:
– 1 cup rolled oats
– 1/2 cup nut butter (like peanut or almond)
– 1/3 cup honey or maple syrup
– 1/2 cup chocolate chips or dried fruit
– 1/4 cup chia seeds (optional for added crunch)
Instructions:
1. In a mixing bowl, combine rolled oats, nut butter, honey, and your choice of chocolate chips or dried fruit. Stir until well blended.
2. Roll the mixture into small balls, about the size of a tablespoon.
3. Place the balls on a tray lined with parchment paper.
4. Refrigerate for about 30 minutes to firm them up.
5. Store the bites in an airtight container for easy, on-the-go snacking.
Tips: Want to switch it up? Add coconut flakes or nuts for a delightful twist!
FAQs: How long do these bites last? They can stay fresh in the fridge for up to a week, making them a great choice for meal prep. Enjoy these bites anytime you need a quick pick-me-up!
Energy Bites
Editor’s Choice

Bob’s Red Mill Gluten Free Organic Extra Thick Rolled Oats, 32oz (Pack o…


BetterBody Foods Organic Chia Seeds 2 lbs, 32 Oz, with Omega-3, Non-GMO,…
5. Apple Nachos

Discover the Joy of Apple Nachos
Tired of the same old snacks? Apple nachos are here to shake things up! They’re a delightful twist on traditional nachos, turning healthy fruit into a fun treat. Kids and adults alike will love this sweet and crunchy snack. Plus, it takes just five minutes to prepare, making it a perfect choice for busy days when you need something quick yet nutritious.
Imagine crisp apple slices topped with creamy nut butter, crunchy granola, and a sprinkle of chocolate chips. This snack not only satisfies your sweet tooth but also packs a nutritional punch. Each serving has about 180 calories, making it a guilt-free indulgence.
Ingredients:
– 2 apples, sliced
– 1/4 cup peanut butter or almond butter
– 1/4 cup granola
– 1/4 cup mini chocolate chips (optional)
– A drizzle of honey
Instructions:
1. Lay the apple slices on a plate in a single layer.
2. Drizzle your choice of nut butter over the slices.
3. Sprinkle granola and optional chocolate chips on top for added crunch and sweetness.
4. Finish with a light drizzle of honey to enhance the flavors.
5. Enjoy immediately for a deliciously satisfying snack!
Tips:
– Experiment with different nut butters for unique flavors.
– Mix in raisins or other dried fruits for extra texture.
– Swap apples for bananas or pears for a different fruity twist.
FAQs:
Can I use other fruits? Yes! Bananas and pears make tasty substitutes too. Enjoy the versatility of this snack while keeping it fresh and exciting!
Apple nachos are not just a snack; they are a fun way to bring healthy eating into your day. Perfect for after-school munchies or a quick treat before dinner, these nachos are sure to brighten your day.
Apple Nachos
Editor’s Choice

Fueled by AF Nut Butter Variety pack, Pistachio, Dubai, Maple Pecan nut …

Bear Naked Granola Cereal, Whole Grain Granola, Breakfast Snacks, To Go …

365 by Whole Foods Market, Mini Semi-Sweet Chocolate Baking Chips, 12 Ounce
6. Chocolate Avocado Pudding

Overview: Are you looking for a delicious dessert that’s healthy and quick to make? Try this Chocolate Avocado Pudding! You’ll be amazed at how creamy and rich it tastes. Plus, it’s loaded with good-for-you fats, making it perfect for kids who won’t even know they’re eating avocados!
Servings: 2
Prep Time: 10 minutes
Cook Time: 0 minutes
Total Time: 10 minutes
Calories: Approximately 150 per serving
Nutrition Information:
– Protein: 2g
– Carbs: 20g
– Fats: 9g
Ingredients:
– 1 ripe avocado
– 1/4 cup cocoa powder
– 1/4 cup honey or maple syrup
– 1/4 cup almond milk
– 1/2 teaspoon vanilla extract
Instructions:
1. Start by cutting the avocado in half and removing the pit. Scoop the flesh into your blender.
2. Add the cocoa powder, honey (or maple syrup), almond milk, and vanilla extract.
3. Blend everything until it’s smooth and creamy. You want that perfect texture!
4. Taste your pudding. If you want it sweeter, add a bit more honey or syrup.
5. Spoon the pudding into bowls or jars. Chill them in the fridge for about 30 minutes before serving.
Tips: Consider topping your pudding with fresh berries, a dollop of whipped cream, or even some nuts. This will not only add flavor but also make it visually appealing!
FAQs:
– Can I use regular milk? Yes! Any milk works, but almond milk keeps it healthier and dairy-free.
This dessert is not just delicious; it’s also a great way to sneak in some healthy fats. Enjoy your pudding knowing it’s both tasty and nutritious!
Chocolate Avocado Pudding
Editor’s Choice

Ninja BR201AMZ Professional Blender 2.0, 1200 Watts, Auto-iQ Program, To…

HERSHEY’S Natural Unsweetened Cocoa Powder Can, 8 oz

Nate’s 100% Pure, Raw & Unfiltered Honey – Award-Winning Taste, 32oz. Sq…
7. Trail Mix

Overview: Are you searching for a quick snack that’s both tasty and healthy? Trail mix is your answer! This classic snack is not only easy to make but also customizable. You can choose your favorite nuts, seeds, and dried fruits to create a mix that suits your taste perfectly. It’s a fun and satisfying option for busy days when you need a pick-me-up.
Servings: 4
Prep Time: 5 minutes
Cook Time: 0 minutes
Total Time: 5 minutes
Calories: Approx. 200 per serving
Nutrition Information:
– Protein: 6g
– Carbs: 24g
– Fats: 12g
Ingredients:
– 1 cup mixed nuts (like almonds, walnuts, and cashews)
– 1/2 cup dried fruit (such as raisins or cranberries)
– 1/2 cup dark chocolate chips
– 1/2 cup seeds (like pumpkin or sunflower)
Instructions:
1. Grab a large bowl and throw in all your ingredients.
2. Mix everything together until well combined.
3. Store your trail mix in an airtight container to keep it fresh.
4. Portion it into small bags for easy, on-the-go snacking!
Tips: Want to switch things up? Experiment with different nuts or dried fruits. You can even sprinkle in some spices like cinnamon or a pinch of sea salt for an extra flavor kick. This trail mix is not only easy to make but also budget-friendly, making it perfect for your busy lifestyle.
FAQs:
– How long does trail mix last? When stored properly in a cool, dry place, it can last for up to a month.
With this trail mix in your cupboard, you’ll always have a delicious snack ready when hunger strikes. Enjoy the crunch and flavor, and feel good about what you’re eating!
Fun fact: trail mix can be ready in under 5 minutes, a quick and easy snack recipe no bake. Customize with 3 core ingredients—nuts, seeds, and dried fruit—to give your kiddo a tasty, portable pick-me-up anytime.
Trail Mix
Editor’s Choice

Airtight Food Storage Containers with Lids, Vtopmart 24 pcs Plastic Kitc…

Emerald Nuts Mixed Nuts Variety Pack 18ct (1-Pack) , 100-Calorie Individ…

Oregon Farm Fresh Snacks Dried Fruit Mix – Snack Mix With Dried Cranberr…
8. Cottage Cheese with Fruit

Overview: Are you craving a snack that’s both tasty and packed with protein? Cottage cheese topped with fresh fruit is your answer! This delightful treat is not only refreshing, especially on hot days, but it also keeps you full and energized. It’s perfect for those busy moments when you need a quick, nutritious boost.
Servings: 1
Prep Time: 5 minutes
Cook Time: 0 minutes
Total Time: 5 minutes
Calories: About 120 per serving
Nutrition Information:
– Protein: 14g
– Carbs: 10g
– Fats: 4g
Ingredients:
– 1 cup cottage cheese
– 1/2 cup mixed fruit (try pineapple, blueberries, or strawberries)
– Optional: a drizzle of honey for sweetness
Instructions:
1. Grab a bowl and scoop in the cottage cheese.
2. Pile on your favorite mixed fruit.
3. If you like it a bit sweeter, drizzle honey on top.
4. Dig in and enjoy!
Tips: Choose low-fat or non-fat cottage cheese for a lighter option!
FAQs:
Can I use frozen fruit? Yes! Just let it thaw for a few minutes before topping.
This simple snack is not just quick; it’s also a fantastic way to satisfy your hunger while fueling your body. So why wait? Treat yourself to a bowl of cottage cheese with fruit today!
Cottage Cheese with Fruit
Editor’s Choice

Good Culture Cottage Cheese Organic 2% Low-Fat Classic, 16 Ounce

Anna and Sarah 2 Lbs Tropical Dried 6 Fruit Mix In Resealable Bag, 32 Oz
Nate’s 100% Pure, Raw & Unfiltered Honey – Award-Winning Taste, 32oz. Sq…
9. Frozen Yogurt Bark

Overview: Looking for a quick, refreshing snack that kids can help make? Try this Frozen Yogurt Bark! It’s a colorful, fruity treat that combines creamy yogurt with delicious berries and crunchy nuts. Perfect for busy days, this snack is not only fun to prepare, but it also packs a nutritious punch!
Servings: 4
Prep Time: 10 minutes
Cook Time: 0 minutes
Freezing Time: 2 hours
Calories: About 90 per serving
Nutrition Information:
– Protein: 5g
– Carbs: 12g
– Fats: 3g
Ingredients:
– 2 cups Greek yogurt (choose your favorite flavor)
– 1/2 cup mixed berries (like blueberries and strawberries)
– 1/4 cup chopped nuts (almonds or walnuts work well)
– Optional: drizzle of honey for extra sweetness
Instructions:
1. Line a baking sheet with parchment paper for easy removal.
2. Spread the Greek yogurt evenly across the sheet.
3. Sprinkle the mixed berries and chopped nuts all over the yogurt.
4. For a touch of sweetness, drizzle honey on top if you like.
5. Place the baking sheet in the freezer and let it freeze for at least 2 hours.
6. Once frozen, break the bark into pieces and enjoy!
Tips: Use seasonal fruits to enhance the flavor! This snack is easily customizable, so feel free to swap in your favorite toppings.
FAQs:
– How long does it last? Your Frozen Yogurt Bark can stay frozen for up to a month. Just keep it in an airtight container!
– Can I use non-dairy yogurt? Absolutely! This recipe works great with non-dairy yogurt options, too.
This Frozen Yogurt Bark is not just a tasty snack; it’s also a fun activity for the kids! Enjoy making it together, and savor the deliciousness as you cool down on a busy day.
Frozen Yogurt Bark
Editor’s Choice

Amazon Basics Silicone Rectangular Baking Mat, Non-Stick Reusable Oven B…

Ultimate Probiotic Yogurt Maker with Adjustable Time & Temp Control – Ma…
Airtight Food Storage Containers with Lids, Vtopmart 24 pcs Plastic Kitc…
10. Nut Butter and Rice Cake

Overview: If you’re looking for a quick snack that satisfies your cravings without the fuss, nut butter on a rice cake is a perfect choice! This light and crunchy treat serves as a blank canvas for your favorite flavors. You can whip it up in just a couple of minutes, making it ideal for busy days when you need something delicious and nutritious.
Imagine this: a crisp rice cake topped with creamy peanut or almond butter. You can make it even better by adding fresh fruit or a sprinkle of cinnamon for an extra kick. This snack is not only tasty but also packs a nutritional punch, giving you energy to power through your day.
Servings: 1
Prep Time: 2 minutes
Cook Time: 0 minutes
Total Time: 2 minutes
Calories: Approx. 100 per serving
Nutrition Information:
– Protein: 3g
– Carbs: 14g
– Fats: 4g
Ingredients:
– 1 rice cake
– 2 tablespoons nut butter (peanut or almond)
– Optional: sliced bananas, strawberries, or a sprinkle of cinnamon
Instructions:
1. Spread your favorite nut butter generously on the rice cake.
2. Top with sliced bananas or strawberries for extra flavor.
3. If you like, sprinkle a little cinnamon on top for a warm touch.
4. Enjoy your snack right away for a quick energy boost!
Tips: Don’t hesitate to try different nut butters. Cashew or sunflower seed butter can also add unique flavors to your snack! You can also switch up the toppings based on what you have on hand.
FAQs:
– Can I use flavored rice cakes? Yes! Flavored rice cakes can add a fun twist to your snack. Just pick a flavor that complements the nut butter for a tasty treat!
Nut Butter and Rice Cake
Editor’s Choice

Quaker Rice Crisps, 4 Flavor Sweet and Savory Variety Mix, 15 count

Barney Butter Peanut Butter, Bare Smooth, 16 Ounce Jar, Natural, No Stir…

True Organic Pure Ceylon Cinnamon Powder, 1 lb, Premium Grade, Gluten Fr…
11. Cherry Almond Energy Bites

Take a Snack Break with Cherry Almond Energy Bites!
Are you juggling a busy schedule and need a quick, nutritious snack? Look no further! Cherry Almond Energy Bites are your answer. These delightful little bites are bursting with flavor and energy, making them perfect for on-the-go munching. They’re not just tasty; they also introduce kids to new flavors in a fun way. Imagine a sweet cherry paired with crunchy almonds, all wrapped up in a bite-sized treat!
Servings: 10 bites
Prep Time: 15 minutes
Cook Time: 0 minutes
Total Time: 15 minutes
Calories: Approximately 90 per bite
Nutritional Information:
– Protein: 3g
– Carbs: 15g
– Fats: 4g
Ingredients:
– 1 cup pitted dates
– 1/2 cup almonds
– 1/4 cup dried cherries
– 1 tablespoon coconut flakes
How to Make Cherry Almond Energy Bites:
1. Start by placing the pitted dates into a food processor. Blend them until they form a smooth paste. This will be your sweet base!
2. Next, add the almonds, dried cherries, and coconut flakes to the mix. Blend until everything is well combined. You want a sticky, chunky mixture.
3. Now, roll the mixture into small balls, about the size of a golf ball. This step is fun and messy—get the kids involved!
4. Store your energy bites in the fridge for a quick, refreshing snack whenever you need it.
Pro Tip: Make a double batch and freeze some for later. These bites freeze well and are perfect for busy days!
FAQs:
– Can I use different nuts? Absolutely! Hazelnuts or walnuts are great substitutes, so feel free to mix it up!
– How long do they last? In the fridge, they stay fresh for about a week. In the freezer, enjoy them for up to three months!
With these Cherry Almond Energy Bites, you’ll have a delicious snack that fuels your day without taking much time to prepare. Enjoy every bite!
Busy days demand simple, tasty fuel. These Cherry Almond Energy Bites prove that quick and easy snack recipes no bake can be kid-friendly, portable, and delicious, great for school lunches or after-practice snacks. One bite, instant energy, zero fuss.
Cherry Almond Energy Bites
Editor’s Choice

Hamilton Beach Food Processor & Vegetable Chopper for Slicing, Shredding…

HOMBERKING 24pc Borosilicate Glass Food Storage Containers with Lids, Gl…
12. Veggie and Hummus Cups

Veggie and Hummus Cups: A Snack Delight!
Are you in need of a quick snack that’s healthy and fun? Look no further than Veggie and Hummus Cups! These colorful cups are perfect for dipping. Picture this: crisp carrots, crunchy cucumbers, and sweet bell peppers paired with creamy hummus. It’s a snack that not only satisfies but also packs a nutritious punch. Kids love the hands-on experience of dipping their veggies, making it an ideal snack for busy days.
Servings: 2
Prep Time: 10 minutes
Cook Time: 0 minutes
Total Time: 10 minutes
Calories: Approx. 100 per serving
Nutrition Information:
– Protein: 5g
– Carbs: 12g
– Fats: 3g
Ingredients:
– 1 cup hummus
– 1 carrot, cut into sticks
– 1 cucumber, cut into sticks
– 1 bell pepper, cut into strips
Instructions:
1. Layer hummus at the bottom of small cups or bowls.
2. Arrange the veggie sticks upright in the hummus.
3. Serve immediately for a fresh, colorful snack!
Tips:
– Experiment with different flavors of hummus, like roasted red pepper or garlic, to keep things exciting!
– Make it a meal by adding whole-grain pita bread on the side.
FAQs:
– Can I use store-bought hummus? Absolutely! It’s quick and convenient, perfect for those busy days.
These Veggie and Hummus Cups are not only easy to make but also a great way to sneak in some veggies. Perfect for after-school snacks or quick bites at work, they make healthy eating enjoyable! Enjoy your tasty creation!
Veggie and Hummus Cups
Editor’s Choice

RXRRXR 20PCS Double Compartment Condiment Container With Lids – Reusable…

Mezete Hummus Snack Pack with Breadsticks | Traditional Classic Hummus |…
13. Berry Smoothie Bowl

Overview: Looking for a quick, nutritious snack? A Berry Smoothie Bowl is your answer! It’s a delightful mix of fruits that not only looks amazing but tastes incredible too. Packed with vitamins and antioxidants, this bowl can brighten your day and give you a refreshing boost.
Servings: 1
Prep Time: 5 minutes
Cook Time: 0 minutes
Total Time: 5 minutes
Calories: Approx. 200 per serving
Nutrition Information:
– Protein: 5g
– Carbs: 30g
– Fats: 6g
Ingredients:
– 1 cup frozen mixed berries
– 1 ripe banana
– 1 cup almond milk
– Toppings: fresh berries, crunchy granola, and shredded coconut
Instructions:
1. Start by adding the frozen mixed berries, banana, and almond milk to your blender.
2. Blend until you achieve a smooth, creamy consistency.
3. Pour the smoothie into a bowl, creating a beautiful canvas for your toppings.
4. Top with fresh berries, a sprinkle of granola, and a dash of shredded coconut.
5. Dig in and enjoy your colorful, nutrient-rich bowl!
Tips: Feel free to swap out the toppings based on what you love or have available. Try adding nuts, seeds, or even a dollop of yogurt for extra flavor!
FAQs: Can I use fresh berries instead of frozen? Absolutely! Just toss in a handful of ice to keep it chilled.
This Berry Smoothie Bowl is not just delicious; it’s a feast for the eyes too. Get creative with your toppings to match your mood. Whether you want a quick breakfast or a refreshing afternoon snack, this bowl fits perfectly into your busy life.
• Use frozen berries for a thicker texture
• Choose almond milk for a dairy-free option
• Pick toppings that you love for a personalized touch
• Add a scoop of protein powder for an extra boost
Berry Smoothie Bowl
Editor’s Choice

Ninja BL660 Professional Compact Smoothie & Food Processing Blender, 110…

365 by Whole Foods Market, Organic Berry Blend, 32 Ounce
Nature Valley Protein Granola, Oats and Honey Granola, Resealable Snack …
14. Sliced Veggies and Ranch Dip

Overview: Looking for a quick and healthy snack? Sliced veggies with ranch dip are your answer! This tasty duo is crunchy and creamy, making it a favorite for kids and adults alike. It’s perfect for busy days when you want something nutritious without the hassle of cooking. Plus, it takes just five minutes to prepare!
Servings: 2
Prep Time: 5 minutes
Cook Time: 0 minutes
Total Time: 5 minutes
Calories: About 150 per serving
Nutrition Information:
– Protein: 3g
– Carbohydrates: 10g
– Fats: 8g
Ingredients:
– 1 cucumber, sliced
– 1 carrot, sliced
– 1 bell pepper, sliced
– 1/2 cup ranch dressing
Instructions:
1. Start by washing and slicing your veggies into sticks or rounds.
2. Arrange the cucumber, carrot, and bell pepper slices nicely on a plate.
3. Pour the ranch dressing into a small bowl for dipping.
4. Serve it up and enjoy crunching your way through this delightful snack!
Tips: Want to switch things up? Try making your own ranch dressing using Greek yogurt and herbs for a healthier option!
FAQs:
– Can I use other dips? Absolutely! Tzatziki or hummus are great alternatives that add different flavors.
– What other veggies work well? Celery sticks, cherry tomatoes, and radishes are also tasty choices!
This quick snack is not only delicious but also a colorful way to add more vegetables to your diet. So, when you feel those afternoon munchies creeping in, remember this easy recipe for a satisfying and nutritious treat!
Sliced Veggies and Ranch Dip
Editor’s Choice

OXO Good Grips Handheld Mandoline Slicer for Kitchen, Adjustable Vegetab…

Hidden Valley Original Ranch Salad Dressing and Seasoning Mix (16 oz.) I…

MACTANO 9 OZ Reusable Snack Containers with Lids, New Double Compartment…
15. Chocolate-Covered Pretzels

Discover a Sweet and Salty Treat: Chocolate-Covered Pretzels
Are you looking for a quick snack that satisfies both your sweet tooth and your craving for something crunchy? Chocolate-Covered Pretzels are your answer! These delightful snacks combine the perfect balance of salty pretzels and rich chocolate, making them irresistible. They’re not just for kids—adults love them too! They’re great for parties, movie nights, or just a midday pick-me-up.
In just 10 minutes, you can whip up a batch of these tasty bites. Plus, they require no baking! This simple recipe is budget-friendly and perfect for busy days when you want something fun and delicious without spending hours in the kitchen.
Ingredients:
– 2 cups pretzels
– 1 cup chocolate chips
– Optional: colorful sprinkles or crushed nuts
Instructions:
1. Start by melting the chocolate chips. You can do this in the microwave or over low heat on the stovetop. If using the microwave, heat in 30-second intervals, stirring in between, until smooth.
2. Once melted, dip each pretzel into the chocolate. Allow any excess chocolate to drip back into the bowl.
3. Place the dipped pretzels on a baking sheet lined with parchment paper.
4. If you want some extra flair, sprinkle crushed nuts or colorful sprinkles on top before the chocolate sets.
5. Let the pretzels cool at room temperature until the chocolate hardens. This usually takes about 30 minutes.
6. Enjoy your sweet and salty snack!
Storage Tips: Keep your Chocolate-Covered Pretzels in an airtight container. They stay fresh for up to a week, making them a perfect grab-and-go treat!
Whether you’re treating yourself or entertaining guests, these chocolate-covered pretzels are sure to impress. They’re simple, fun, and oh-so-delicious!
FAQs:
– How long do Chocolate-Covered Pretzels last? Up to a week in an airtight container.
– Can I use different types of chocolate? Absolutely! White, dark, or milk chocolate all work wonderfully.
Enjoy whipping up this delightful snack!
Chocolate-Covered Pretzels
Editor’s Choice

Pyrex Essentials (3-Piece) Glass Mixing Bowls Set For Prepping, Baking a…

Rubbermaid Brilliance 16-Cup Airtight Food Storage Container with Lid Cl…
16. Nutty Fruit Dip

Overview: Do you want to make healthy snacking fun and delicious? This creamy Nutty Fruit Dip is your answer! It transforms fresh fruits into a delightful treat that kids and adults will love. Plus, it’s super quick to whip up, making it perfect for your busy days.
Servings: 2
Prep Time: 5 minutes
Cook Time: 0 minutes
Total Time: 5 minutes
Calories: Approx. 150 per serving
Nutrition Information:
– Protein: 4g
– Carbs: 15g
– Fats: 9g
Ingredients:
– 1/2 cup Greek yogurt
– 2 tablespoons nut butter (like almond or peanut)
– 1 tablespoon honey
– Sliced fruits (such as apples, bananas, and strawberries) for dipping
Instructions:
1. In a small bowl, combine Greek yogurt, nut butter, and honey. Stir until the mixture is smooth and creamy.
2. Slice your favorite fruits and arrange them neatly on a platter.
3. Serve the dip alongside for a tasty and nutritious snack!
This dip isn’t just for fruits. You can also pair it with crunchy veggies like carrots or celery for a fun twist!
Tips: Feel free to experiment with different nut butters or add a sprinkle of cinnamon for extra flavor. This dip is versatile and adaptable!
FAQs:
– Is it good with other fruits? Absolutely! It pairs wonderfully with any fruit you have on hand.
This Nutty Fruit Dip not only makes healthy eating easy but also adds excitement to your snack time. Enjoy the creamy goodness while fueling your body with nutrients!
Nutty Fruit Dip
Editor’s Choice

365 By Whole Foods Market, Greek Yogurt, Plain Nonfat, 32 Ounce


Fruit Slicer Cup – Strawberry, Banana, Grape Cutter, Egg Slicer for Hard…
17. Oatmeal Cookies

Overview: If you’re looking for a quick and tasty snack, these no-bake oatmeal cookies are perfect for you! They satisfy your sweet tooth while being simple to make and healthier than many store-bought treats. Kids love them too, making them a great choice for busy families.
Servings: 12 cookies
Prep Time: 15 minutes
Cook Time: 0 minutes
Total Time: 15 minutes
Calories: About 70 per cookie
Nutrition Information:
– Protein: 3g
– Carbs: 10g
– Fats: 3g
Ingredients:
– 1 cup rolled oats
– 1/2 cup peanut butter
– 1/4 cup honey
– 1/4 cup chocolate chips
Instructions:
1. In a medium bowl, mix together the rolled oats, peanut butter, honey, and chocolate chips. Stir until everything is well combined.
2. Use a spoon to drop small amounts of the mixture onto a lined plate or baking sheet.
3. Place the cookies in the refrigerator for about 30 minutes to firm up.
4. Once set, enjoy these delicious snacks!
Tips: You can switch things up by adding raisins or chopped nuts for extra flavor and crunch!
FAQs: How long do these cookies last? Store them in an airtight container for up to 5 days. They make a perfect grab-and-go snack for busy days ahead!
Oatmeal Cookies
Editor’s Choice

Quaker Old Fashioned Rolled Oats, Non GMO Project Verified, Two 64oz Bag…
SKIPPY Natural Creamy Peanut Butter Spread Twin Pack 2-Pack, 5 LB
18. Fruit and Nut Energy Balls

Overview: Are you looking for a quick, nutritious snack that fits into your busy day? Look no further than Fruit and Nut Energy Balls! These delightful bites are packed with energy and flavor, making them the ideal pick-me-up when you need it most. Plus, they require no baking—just a little mixing and rolling, and you’re done!
Servings: 10 energy balls
Prep Time: 15 minutes
Cook Time: 0 minutes
Total Time: 15 minutes
Calories: Approximately 100 per ball
Nutrition Information:
– Protein: 4g
– Carbs: 14g
– Fats: 4g
Ingredients:
– 1 cup pitted dates
– 1/2 cup mixed nuts (like almonds and walnuts)
– 1/4 cup dried fruit (try apricots or cranberries)
– 1 tablespoon chia seeds (optional for added nutrition)
Instructions:
1. Start by placing the pitted dates, mixed nuts, and dried fruit into a food processor.
2. Blend everything until it forms a sticky, well-combined mixture.
3. Use your hands to roll the mixture into small balls, about the size of a golf ball.
4. Once formed, pop them in the refrigerator for a quick chill.
5. Store your energy balls in an airtight container in the fridge for easy snacking later!
Tips: Feel free to switch up the nuts or dried fruit to keep things interesting. You can even add a sprinkle of cinnamon for extra flavor!
FAQs:
Can you freeze these energy balls? Yes! They freeze beautifully for up to three months. Just grab one when you need a quick snack on the go!
Now you have a delicious and healthy snack at your fingertips, perfect for those hectic days. Enjoy the burst of energy whenever you need it!
Fruit and Nut Energy Balls
Editor’s Choice
Hamilton Beach Food Processor & Vegetable Chopper for Slicing, Shredding…
Airtight Food Storage Containers with Lids, Vtopmart 24 pcs Plastic Kitc…
BetterBody Foods Organic Chia Seeds 2 lbs, 32 Oz, with Omega-3, Non-GMO,…
19. Rice Cake with Cream Cheese and Veggies

Overview: Looking for a quick snack that satisfies your cravings without taking up too much time? Rice cakes topped with cream cheese and fresh veggies are the perfect solution! They are light, crunchy, and full of flavor. Plus, you can mix and match toppings to keep things interesting and cater to your taste.
Servings: 2
Prep Time: 5 minutes
Cook Time: 0 minutes
Total Time: 5 minutes
Calories: Around 120 per serving
Nutrition Information:
– Protein: 4g
– Carbs: 10g
– Fats: 7g
Ingredients:
– 2 rice cakes
– 1/4 cup cream cheese
– Sliced cucumbers, bell peppers, or cherry tomatoes for topping
Instructions:
1. Start by spreading cream cheese evenly over each rice cake.
2. Next, layer your favorite sliced vegetables on top for color and crunch.
3. Serve immediately and enjoy this delightful snack!
Tips: Want to change things up? Try flavored cream cheese, like herb or garlic, for extra zest!
FAQs:
– Can I use other spreads? Absolutely! Avocado spread works wonderfully too. It’s creamy and nutritious, making it a great alternative.
This easy recipe is perfect for busy days when you need a bite that’s both healthy and quick. Enjoy the crunch of the rice cake and the freshness of the veggies, and feel free to get creative with your toppings!
Rice Cake with Cream Cheese and Veggies
Editor’s Choice

Quaker Large Rice Cakes, Gluten Free, 3 Flavor Variety Pack, 6 Count

Duncan Hines Creamy Cream Cheese Frosting, 16 oz (Pack of 2)
OXO Good Grips Handheld Mandoline Slicer for Kitchen, Adjustable Vegetab…
20. Edamame with Sea Salt

Overview: If you’re looking for a quick, nutritious snack, edamame is a fantastic choice! These little green pods are not only fun to pop open, but they’re also packed with protein. Perfect for those busy days when you need a little pick-me-up, edamame with sea salt is a snack everyone can enjoy.
Servings: 2
Prep Time: 5 minutes
Cook Time: 0 minutes
Total Time: 5 minutes
Calories: Approximately 100 per serving
Nutrition Information:
– Protein: 9g
– Carbs: 10g
– Fats: 5g
Ingredients:
– 1 cup shelled edamame
– Sea salt to taste
Instructions:
1. Start by rinsing and draining the edamame.
2. Sprinkle sea salt over the pods.
3. Enjoy them chilled or at room temperature — it’s your choice!
4. Relish this protein-packed snack anytime you need a boost!
Tips: Squeeze a bit of lemon over the edamame for an extra zing! This simple addition brightens the flavor and makes it even more refreshing.
FAQs: Can you serve edamame warm? Absolutely! Warm edamame is delicious and can be enjoyed straight from the pot if you prefer that cozy vibe.
With just a few minutes of prep, you can have a healthy snack ready to go. Edamame is not just nutritious; it’s also versatile. Whether you’re at home, at work, or on the go, this snack fits perfectly into any lifestyle. Try it today and see how easy healthy snacking can be!
Edamame with Sea Salt
Editor’s Choice

365 by Whole Foods Market, Organic Green Peas No Salt Added, 16 Ounce, (…

Viva Doria Pure Sea Salt, Coarse Grain, 2 lb | Ideal For Salt Grinders

Zulay Kitchen Metal 2-in-1 Lemon Squeezer – Sturdy Max Extraction Hand J…
21. No-Bake Chocolate Energy Bites

Overview: If you’re looking for a quick and delicious snack that keeps your energy up, No-Bake Chocolate Energy Bites are your answer! These tasty little balls are not only simple to make, but they also offer a delightful chocolate flavor that kids and adults will adore. With just a few ingredients, you can whip them up in no time, making them perfect for your busy days.
Servings: 12 bites
Prep Time: 10 minutes
Cook Time: 0 minutes
Total Time: 10 minutes
Calories: About 90 per bite
Nutrition Information:
– Protein: 4g
– Carbs: 10g
– Fats: 5g
Ingredients:
– 1 cup rolled oats
– 1/2 cup cocoa powder
– 1/2 cup almond butter
– 1/4 cup honey
– 1/4 cup mini chocolate chips
Instructions:
1. In a large mixing bowl, combine the rolled oats, cocoa powder, almond butter, honey, and mini chocolate chips. Stir until everything is well mixed.
2. Use your hands to roll the mixture into small, bite-sized balls.
3. Place the balls on a plate and refrigerate for about 30 minutes to help them firm up.
4. Once set, enjoy these bites as a quick snack anytime you need a boost!
Tips: These bites are a fantastic option for lunchboxes or as an after-school treat! You can also customize them by adding nuts or dried fruits.
FAQs: Can I add protein powder? Absolutely! A scoop of your favorite protein powder can give these bites an extra nutritional boost without changing the flavor too much.
These No-Bake Chocolate Energy Bites are the perfect solution for when you need something sweet yet wholesome. They’re great for busy families and make snacking enjoyable without the hassle of baking. So grab your ingredients and get started today!
No-Bake Chocolate Energy Bites
Editor’s Choice
Quaker Old Fashioned Rolled Oats, Non GMO Project Verified, Two 64oz Bag…

365 by Whole Foods Market, Organic Creamy Almond Butter, 16 Ounce
365 by Whole Foods Market, Mini Semi-Sweet Chocolate Baking Chips, 12 Ounce
22. Sweet Potato Hummus

Sweet Potato Hummus: A Delicious and Nutritious Twist
If you’re looking for a quick and healthy snack, sweet potato hummus is your answer. This delightful dip combines the sweetness of roasted sweet potatoes with the creaminess of tahini. It’s not just tasty; it’s also packed with nutrients! You can dip crunchy veggies or spread it on your favorite crackers. Plus, it takes only 10 minutes to whip up, making it a lifesaver for busy days.
Imagine scooping this vibrant orange hummus with fresh carrot sticks or crispy pita chips. The flavors are rich, sweet, and savory all at once. This recipe is not only simple but also keeps well, making it perfect for meal prep. You can even enjoy it as a sandwich spread for an extra kick of flavor!
Ingredients:
– 1 cup cooked sweet potato
– 1/2 cup tahini
– 2 tablespoons lemon juice
– Salt and pepper to taste
Instructions:
1. Start by placing the cooked sweet potato in a food processor.
2. Add tahini, lemon juice, salt, and pepper.
3. Blend until the mixture is smooth and creamy.
4. Taste and adjust the seasoning if needed.
5. Serve with fresh veggie sticks or pita chips for dipping!
Storage Tips:
– This hummus can be stored in an airtight container in the fridge for up to a week.
– Want to keep it longer? Freeze it! It stays fresh for up to three months.
Enjoy this sweet potato hummus as a healthful snack or a tasty addition to your meals. It’s a fun and easy way to enjoy more veggies while satisfying your cravings. Dive in and savor every bite!
Sweet Potato Hummus
Editor’s Choice
Hamilton Beach Food Processor & Vegetable Chopper for Slicing, Shredding…

Ankou Airtight Food Storage Container Sets with Lids 6Pcs Pop Containers…

365 by Whole Foods Market, Organic Tahini, 16 Ounce
23. Peanut Butter Oatmeal

Overview: Are you searching for a quick snack that satisfies your cravings and fuels your day? Look no further! This Peanut Butter Oatmeal combines the best of breakfast and snack time. It’s simple, hearty, and bursting with nutty goodness. You can whip it up in just five minutes, making it a perfect choice for your busy lifestyle.
Servings: 2
Prep Time: 5 minutes
Cook Time: 0 minutes
Total Time: 5 minutes
Calories: Approximately 220 per serving
Nutrition Information:
– Protein: 6g
– Carbs: 25g
– Fats: 12g
Ingredients:
– 1 cup rolled oats
– 1/4 cup peanut butter
– 2 cups almond milk
– 1 tablespoon honey
Instructions:
1. In a mixing bowl, combine the rolled oats, peanut butter, almond milk, and honey.
2. Stir the mixture thoroughly until everything is well blended.
3. Enjoy your Peanut Butter Oatmeal warm or chilled, depending on your mood!
Tips:
– Add sliced bananas for a natural sweetness.
– Sprinkle cinnamon for a hint of spice.
– Experiment with different nuts or seeds for added crunch.
FAQs:
Can I use other nut butters? Yes, almond butter or cashew butter also work wonderfully!
This quick and easy snack not only fills you up but also provides a nutritious energy boost. Perfect for those hectic days when you need something satisfying without the wait. Enjoy this delightful treat anytime you want a pick-me-up!
Peanut Butter Oatmeal
Editor’s Choice
Bob’s Red Mill Gluten Free Organic Extra Thick Rolled Oats, 32oz (Pack o…
SKIPPY Natural Creamy Peanut Butter Spread Twin Pack 2-Pack, 5 LB

Califia Farms – Organic Unsweetened Almond Milk, 48 Oz, Dairy Free, Keto…
24. Cheesy Cauliflower Bites

Overview: Want to sneak some healthy veggies into your family’s snacks? Look no further than these delightful Cheesy Cauliflower Bites! They’re quick to whip up, no baking required, and kids adore their cheesy goodness. Plus, you’ll be serving up a snack that’s packed with fiber and nutrients.
Servings: 4
Prep Time: 10 minutes
Cook Time: 0 minutes
Total Time: 10 minutes
Calories: Approx. 50 per serving
Nutrition Information:
– Protein: 3g
– Carbs: 5g
– Fats: 3g
Ingredients:
– 2 cups cauliflower florets
– 1/2 cup shredded cheese (your favorite type)
– 1/4 cup breadcrumbs
– Salt and pepper to taste
Instructions:
1. Start by placing the cauliflower florets in a bowl. Add the shredded cheese, breadcrumbs, salt, and pepper. Mix everything until it’s well combined.
2. Now, form the mixture into small balls. This is where you can get creative—make them any size you like!
3. Chill the balls in the fridge for about 30 minutes. This helps them hold their shape.
4. Serve and enjoy these cheesy, crunchy bites! They’re perfect on their own or dipped in your favorite sauce.
Tips: Want to elevate the flavor? Pair these bites with a zesty dip, like ranch or marinara, for an extra layer of deliciousness!
FAQs:
– Can I use frozen cauliflower? Yes! Just make sure to thaw and drain it well before mixing.
These Cheesy Cauliflower Bites are a fantastic choice for busy days. They offer a quick, nutritious snack that satisfies cravings and keeps everyone happy. Enjoy making this easy recipe today!
Cheesy Cauliflower Bites
Editor’s Choice
Hamilton Beach Food Processor & Vegetable Chopper for Slicing, Shredding…

Reusable Snack Containers with Lids 20Pcs,New Snack Containers,Snackle B…
25. Coconut Macaroons

Sweet and Chewy Coconut Macaroons
Are you looking for a quick, no-bake snack that everyone will love? Look no further than these delicious Coconut Macaroons! They are sweet, chewy, and perfect for satisfying your sweet tooth without turning on the oven. Kids adore them, making them an ideal treat for parties or lunchboxes. In just 15 minutes, you can whip up a batch of these delightful snacks!
Ready to start? Here’s what you’ll need:
Ingredients:
– 2 cups shredded coconut
– 1/2 cup sweetened condensed milk
– 1 teaspoon vanilla extract
Instructions:
1. In a mixing bowl, combine the shredded coconut, sweetened condensed milk, and vanilla extract.
2. Stir the mixture until everything is well combined.
3. Using your hands, form small balls with the mixture and place them on a lined baking tray.
4. Refrigerate the balls for about 30 minutes, or until they are firm.
5. Enjoy your sweet treats!
Want to make them even more special? Tip: Dip each macaroon in melted chocolate for a rich, decadent touch!
FAQ:
Can you use unsweetened coconut? Absolutely! Just add a little extra sweetener to balance the flavor.
These Coconut Macaroons are not only easy to make, but they are also a wonderful way to add a homemade touch to your snack time. They’re budget-friendly and perfect for any occasion, making your kitchen feel warm and inviting. Enjoy making these with your family, and watch them disappear in no time!
Coconut Macaroons
Editor’s Choice

Umite Chef Mixing Bowls with Airtight Lids Set, 8PCS Stainless Steel Kha…

Wilton Candy Melts Melting Pot, Perfect for Dipping, Drizzling & Decorat…
26. Mini Caprese Skewers

Discover Mini Caprese Skewers
If you’re looking for a quick and delicious snack, Mini Caprese Skewers are your answer. These delightful bites combine juicy cherry tomatoes, creamy mozzarella, and fragrant basil. They’re not only refreshing but also a breeze to whip up, making them ideal for your busiest days. Plus, they look impressive on any platter, perfect for gatherings or just a snack at home.
Let’s get into how easy it is to make them. In just 10 minutes, you can create a tasty treat that offers a burst of flavors. With only a few ingredients, you can enjoy a snack that feels gourmet without the fuss.
Servings: 4
Prep Time: 10 minutes
Cook Time: 0 minutes
Total Time: 10 minutes
Calories: Approx. 100 per serving
Nutrition Information:
– Protein: 7g
– Carbs: 5g
– Fats: 6g
Ingredients:
– 1 cup cherry tomatoes
– 1 cup mozzarella balls
– Fresh basil leaves
– Balsamic glaze for drizzling
Instructions:
1. Grab small skewers and start threading. Place a cherry tomato first, then a mozzarella ball, followed by a basil leaf. Repeat until the skewer is filled.
2. Arrange the skewers on a beautiful platter.
3. Drizzle balsamic glaze over the top for that extra flavor kick.
4. Enjoy your fresh, vibrant bites!
Tips:
– Add a sprinkle of salt and pepper to elevate the taste!
– Experiment with different colors of tomatoes for a fun twist.
FAQs:
Can I use regular mozzarella? Absolutely! Just cut it into small cubes to fit on the skewers.
These Mini Caprese Skewers are not just easy; they’re also a crowd-pleaser. Whether you’re hosting friends or just treating yourself, they’re a fantastic choice. Get ready to enjoy a snack that’s as pleasing to the eyes as it is to your taste buds!
Mini Caprese Skewers
Editor’s Choice

300PCS Cocktail Picks Bamboo Skewers for Appetizers, FATLODA Paddle Wood…

365 by Whole Foods Market, Organic Balsamic Glaze, 8.45 Fl Oz (Pack of 2)

DELLING Large Serving Platter Set 16/14/12inch Large Serving Tray – Rect…
27. Pita and Hummus

Pita and hummus make for a delightful snack that’s both satisfying and easy to whip up. This combo gives you a crunchy, warm pita paired with creamy, flavorful hummus. It’s perfect for busy days when you need something quick yet delicious. You can enjoy it as a midday snack or serve it at gatherings. Plus, this snack stands out on social media, with colorful hummus varieties trending on platforms like Instagram.
To prepare this snack, you only need a few minutes and minimal ingredients. You can customize your hummus with different flavors, such as roasted red pepper or garlic, to keep things exciting. This simplicity makes it a great choice for anyone looking to eat healthy without spending too much time in the kitchen. Imagine dipping a warm pita triangle into smooth, rich hummus—it’s an experience that warms the heart.
Here’s how to make it:
Ingredients:
– 1 whole pita bread, cut into triangles
– 1 cup hummus (choose your favorite flavor)
Instructions:
1. Start by cutting the pita bread into triangles. Aim for about 8 pieces for easy dipping.
2. Place the pita triangles on a plate.
3. Serve with a generous bowl of hummus in the center for dipping.
4. Dive in and enjoy this simple yet tasty snack!
Tips:
– Experiment with different hummus flavors for a fun twist!
– Pair with sliced veggies for added crunch and nutrients.
– Whole wheat pita is a great option for extra fiber.
– Make it a meal by adding protein like grilled chicken or chickpeas.
This pita and hummus snack is not just healthy; it’s also versatile and full of flavor. It’s perfect for those hectic days when you need something quick and satisfying. Enjoy every bite!
Pita and Hummus
Editor’s Choice

Dave’s Killer Bread 21 Whole Grains & Seeds Thin-Sliced, Whole Grain Org…

Mezete Hummus Variety Pack | Authentic Middle Eastern | Free from Preser…
OXO Good Grips Handheld Mandoline Slicer for Kitchen, Adjustable Vegetab…
28. Zucchini Chips

Overview: Craving a crunchy snack that’s light and healthy? Zucchini chips are your answer! These delightful bites offer a satisfying crunch that kids and adults will love. They’re simple to make and perfect for those busy days when you need a quick treat without the guilt.
Servings: 4
Prep Time: 10 minutes
Cook Time: 0 minutes
Total Time: 10 minutes
Calories: Approx. 50 per serving
Nutrition Information:
– Protein: 1g
– Carbs: 8g
– Fats: 3g
Ingredients:
– 2 medium zucchinis
– 1 tablespoon olive oil
– Salt and pepper to taste
Instructions:
1. Start by thinly slicing the zucchinis using a sharp knife or a mandoline for uniformity.
2. Toss the slices in a bowl with olive oil, salt, and pepper until they’re nicely coated.
3. Spread the zucchini slices in a single layer on a baking sheet and pop them in the fridge for 30 minutes. This step helps them crisp up.
4. After chilling, grab a handful and enjoy the crunchy goodness!
Tips: Want an extra crunch? Try baking them in the oven at a low temperature until they’re crisp. They’ll turn out even more delicious!
FAQs: Can I bake them? Yes! Baking makes them even crispier. Just remember to keep an eye on them to prevent burning.
With these easy zucchini chips, you can enjoy a tasty snack that fits your busy lifestyle. They’re light, flavorful, and a great way to sneak in some veggies. So why not whip up a batch today?
Zucchini Chips
Editor’s Choice
OXO Good Grips Handheld Mandoline Slicer for Kitchen, Adjustable Vegetab…

GoodCook Everyday Nonstick Carbon Steel Baking Sheet Set, 3 Pack – Small…

YARRAMATE 16oz/470ml Glass Olive Oil Sprayer for Cooking with Stickers, …
29. Avocado Toast

Overview: Looking for a snack that’s quick, tasty, and healthy? Avocado toast is your answer! This classic delight is versatile and can be topped with many delicious ingredients. It’s perfect for breakfast, lunch, or an afternoon pick-me-up. Plus, it’s packed with nutrients to keep you energized throughout your busy day.
Servings: 1
Prep Time: 5 minutes
Cook Time: 0 minutes
Total Time: 5 minutes
Calories: About 200 per serving
Nutrition Information:
– Protein: 4g
– Carbs: 20g
– Fats: 14g
Ingredients:
– 1 slice whole-grain bread
– 1 ripe avocado
– Salt and pepper to taste
– Optional toppings: cherry tomatoes, radishes, feta cheese, or even a sprinkle of chili flakes for a kick!
Instructions:
1. Start by toasting your slice of whole-grain bread until it’s golden brown and crispy. This adds a delightful crunch!
2. While the bread is toasting, scoop the ripe avocado into a bowl. Use a fork to mash it up, then season it with a pinch of salt and pepper for flavor.
3. Spread the creamy avocado mixture generously over the toast. Don’t be shy!
4. Finally, add your favorite toppings. Cherry tomatoes bring sweetness, while feta adds a salty punch. Get creative!
Tips: Squeeze a bit of lemon juice over the avocado to keep it fresh and vibrant. It also adds a zesty flavor that brightens the dish!
FAQs:
– Can I use other types of bread? Absolutely! Try sourdough, rye, or gluten-free options to mix things up.
– How can I make it more filling? Add a poached egg on top for extra protein and richness.
Enjoy this simple yet nourishing snack that satisfies your cravings and fuels your busy days!
Avocado toast is a go-to quick and easy snack recipes no bake for busy days. Mash avocado, toast bread, and top with tomato or seeds for a kid-friendly bite in minutes.
Avocado Toast
Editor’s Choice

Dave’s Killer Bread 21 Whole Grains & Seeds Thin-Sliced, Whole Grain Org…
30. Muffin Tin Fruit Cups

Overview: Want a delightful snack that’s easy to prepare? Look no further than Muffin Tin Fruit Cups! These colorful cups are not only visually appealing but also packed with fresh flavor. They’re perfect for busy days when you need a quick, healthy treat. Plus, they make snacking fun for kids and adults alike!
Servings: 12 cups
Prep Time: 15 minutes
Cook Time: 0 minutes
Total Time: 15 minutes
Calories: About 40 per cup
Nutrition Information:
– Protein: 0.5g
– Carbs: 10g
– Fats: 0.2g
Ingredients:
– 2 cups assorted fruits (think berries, grapes, and melons)
– Optional: fresh mint leaves for a pop of color
Instructions:
1. Grab a muffin tin and line each cup with a cupcake liner.
2. Chop your favorite fruits into bite-sized pieces. Mix them up for a tasty assortment!
3. Fill each cupcake liner with the fruit mixture, packing them in nicely.
4. If you want to impress, add a mint leaf on top for garnish.
5. Serve these fruity delights immediately, or keep them chilled until snack time!
Tips: Keep it simple! Choose seasonal fruits for the best taste. You can also mix in some yogurt or a sprinkle of granola for added texture and flavor.
FAQs:
How long do they last? Store your Muffin Tin Fruit Cups in the fridge for up to two days. They’ll stay fresh and delicious!
These cups are not just snacks; they’re a fun way to enjoy healthy eating. So grab your favorite fruits and get started! They’re sure to brighten up any day.
Muffin Tin Fruit Cups
Editor’s Choice

Amazon Basics Nonstick Round Muffin Baking Pan, 12 Cups, Set of 2, Gray,…

Non-stick 200pcs Standard Cupcake Liners for Baking, Natural, Food-grade…

Vegetable Chopper,12-in-1 Multifunctional Food Chopper,Professional Onio…
Conclusion

Snacking doesn’t have to be complicated or unhealthy. With these 30+ quick and easy no-bake snack recipes, you can whip up delightful treats that are nutritious and kid-friendly. From energy bites to yogurt parfaits, there’s something for every palate. Creating these fun snacks not only gives your kids a healthy option but also encourages them to enjoy the process of making food. So roll up your sleeves, gather those ingredients, and start creating delicious memories in the kitchen!
Healthy snacking can actually be fun and exciting, and it doesn’t need to take much time. Check out these recipes again whenever you need inspiration for busy days!
Note: We aim to provide accurate product links, but some may occasionally expire or become unavailable. If this happens, please search directly on Amazon for the product or a suitable alternative.
This post contains Amazon affiliate links, meaning I may earn a small commission if you purchase through my links, at no extra cost to you.
Frequently Asked Questions
What Are Some Quick and Easy Snack Recipes No Bake That Kids Will Love?
Looking for quick and easy snack recipes no bake that your kids will actually enjoy? Try making peanut butter energy balls or yogurt parfaits with layers of fresh fruit and granola. Both options are simple and can be customized to fit your kids’ taste preferences. Plus, they’re perfect for busy days!
How Can I Make Healthy No Bake Snacks More Fun for Kids?
Making healthy no bake snacks fun can be a breeze! Get creative by letting your kids decorate fruit skewers with their favorite toppings or assemble their own DIY snack mixes with nuts, seeds, and dried fruits. This adds an element of play while keeping it nutritious and delicious!
What Ingredients Are Essential for Easy Snack Ideas Without Baking?
When it comes to easy snack ideas that don’t require baking, keep your pantry stocked with versatile ingredients like oats, nut butter, honey, and yogurt. These staples form the base for many no bake snacks and can be combined with fruits, seeds, or chocolate chips for added flavor and nutrition!
Can I Prepare No Bake Snacks in Advance for Busy Days?
Absolutely! Preparing no bake snacks in advance is a fantastic time-saver. Many recipes can be made ahead and stored in the fridge for several days. For instance, energy bars or frozen yogurt bites can be prepped on the weekend, ensuring you have quick snacks for busy days ready to go!
Are There Any Simple Snack Recipes That Are Both Healthy and Kid-Friendly?
Yes! There are plenty of simple snack recipes that are both healthy and kid-friendly. For instance, try banana oat pancakes, which require no baking and are a hit with kids. Another great option is cottage cheese with fruit, providing a tasty way to introduce protein and calcium into their diet while keeping it fun!
Related Topics
no bake snacks
quick snacks
easy snack recipes
healthy snacks
kids snacks
simple recipes
busy day meals
5-minute snacks
healthy no bake
snack ideas
no bake treats
family-friendly snacks