As the sun shines brighter and temperatures rise, our cravings for something cool and refreshing kick into high gear. Who doesn’t love a delicious scoop of ice cream on a hot day? But sometimes, we want a little more than just a cone. That’s why I created this post—to share 25 easy ice cream snack recipes that will make your dessert game a little more fun this summer.
If you’re a fellow ice cream lover, or perhaps a busy parent looking for quick and tasty treats, this collection is for you. You might find yourself juggling after-school snacks or hosting a summer gathering, and the last thing you want is to spend hours in the kitchen. I get it! You want something simple, delightful, and, most importantly, something that will impress your friends and family.
These recipes are not just easy; they’re also versatile and perfect for any occasion. You’ll discover treats that cater to various tastes, from classic flavors to fun, creative combinations. Plus, many of these snacks can be whipped up in no time, so you can enjoy your summer without breaking a sweat. Say goodbye to boring desserts and hello to cool, tasty treats that everyone will love.
Get ready to dive into a world of sweet possibilities. Whether you’re in the mood for something fruity, chocolatey, or a mix of both, I’ve got you covered. You’ll find options that can be tailored to your preferences and dietary needs. So grab your favorite ice cream and let’s create some memorable snacks together!
1. Banana Ice Cream Bites

These Banana Ice Cream Bites are the perfect treat for hot days. They’re not only cute but also healthy! With just a few simple steps, you can create a snack that satisfies your sweet tooth and gives you a boost of energy. Imagine biting into a cold, creamy banana coated in rich chocolate or tangy yogurt. It’s a delightful combination that you’ll crave again and again.
Start by slicing two ripe bananas into thick coins and laying them on a baking sheet. Freeze them for about two hours until they’re firm. Once they’re ready, dip each frozen slice in either yogurt or melted dark chocolate. For a crunch, sprinkle on some chopped nuts or shredded coconut. Place them back in the freezer for about an hour to set. Then, they’re ready to enjoy!
Recipe Overview:
– Servings: 12 bites
– Prep Time: 10 minutes
– Freeze Time: 2 hours 10 minutes
– Calories: About 60 per bite
Nutrition Information:
– Carbs: 15g
– Protein: 1g
– Fat: 3g
Ingredients List:
– 2 ripe bananas
– 1 cup yogurt or melted dark chocolate
– 1/4 cup chopped nuts or shredded coconut
Step-by-Step Instructions:
1. Slice the bananas into thick coins.
2. Freeze the banana slices for about 2 hours until solid.
3. Dip each frozen slice into yogurt or chocolate.
4. Sprinkle with nuts or coconut for extra texture.
5. Return to the freezer for another hour before serving.
Tips:
– Use parchment paper on the baking sheet to prevent sticking.
– Experiment with toppings like granola or mini chocolate chips for variety!
FAQs:
– Can I use other fruits? Yes! Try strawberries, peaches, or even apple slices.
– How long can they be stored? These bites can stay fresh in the freezer for up to a month.
Enjoy this fun, easy snack that’s both tasty and nutritious!
Banana Ice Cream Bites
Editor’s Choice

Amazon Basics Silicone Rectangular Baking Mat, Non-Stick Reusable Oven B…

Wilton Candy Melts Melting Pot, Perfect for Dipping, Drizzling & Decorat…

2. Yogurt and Berry Popsicles

Imagine indulging in a refreshing treat that’s not just delicious but also packed with nutrients. These Yogurt and Berry Popsicles are perfect for hot days when you crave something cool. They’re easy to make and offer a burst of flavor with every bite. You can even get creative by layering different berries for a stunning look that will impress your family and friends.
Making these popsicles at home is a fun project, especially for kids. Plus, they are a great way to sneak some protein and antioxidants into your diet. Not to mention, they are a fantastic alternative to store-bought snacks, which often contain too much sugar and artificial ingredients.
Recipe Overview:
– Servings: 6 popsicles
– Prep Time: 15 minutes
– Freeze Time: 4 hours
– Calories: Approximately 80 per popsicle
Nutrition Information:
– Carbs: 12g
– Protein: 3g
– Fat: 2g
Ingredients List:
– 2 cups Greek yogurt
– 1 cup mixed berries (strawberries, blueberries, raspberries)
– Sweetener of choice (like honey or agave, optional)
Step-by-Step Instructions:
1. Start by blending the Greek yogurt and berries in a blender until smooth.
2. Taste the mixture and add sweetener if desired.
3. Pour the colorful blend into popsicle molds, filling them about three-quarters full.
4. Insert sticks and freeze for at least 4 hours or until completely solid.
5. When ready to enjoy, run the molds under warm water for a few seconds to release the popsicles.
Tips:
– Use silicone molds for easier popsicle removal.
– Add a layer of granola between the yogurt and berries for extra crunch!
FAQs:
– Can I use frozen berries? Yes, just blend them directly from the freezer for a thick texture.
– How long do they last? You can keep them in the freezer for up to 2 months, making them a perfect make-ahead treat!
These popsicles not only cool you down but also make snack time healthier. So gather your ingredients and start blending! You’ll enjoy every fruity bite.
Yogurt and Berry Popsicles
Editor’s Choice

Miaowoof Homemade Popsicle Molds, 10-Cav Non-BPA Silicone Ice Pop Maker,…

nutribullet Personal Blender, Shakes, Smoothies, Food Prep, and Frozen B…

Nate’s Organic 100% Pure, Raw & Unfiltered Honey – USDA Certified Organi…
3. Coconut Milk Ice Cream

Treat yourself to a delightful Coconut Milk Ice Cream that’s both creamy and dairy-free! This indulgent dessert is easy to whip up and perfect for those hot days when you crave something cool and refreshing. Imagine a smooth, rich ice cream that melts in your mouth, with the tropical flavor of coconut dancing on your taste buds. Add some chocolate chips or fresh fruit to elevate the experience even more!
Here’s how you can make your own Coconut Milk Ice Cream at home. It takes just a few minutes to prepare, but you will need to allow some time for freezing. This recipe serves four, making it a great treat to share with friends or family.
Ingredients List:
– 1 can coconut milk
– 1/3 cup honey or maple syrup
– 1 tsp vanilla extract
– Optional: chocolate chips or fruit of your choice
Step-by-Step Instructions:
1. In a large mixing bowl, combine the coconut milk, sweetener, and vanilla extract. Mix well until smooth.
2. Pour the mixture into an ice cream maker, or if you don’t have one, use a shallow dish.
3. If using a dish, stir the mixture every 30 minutes for about 4 to 6 hours, until it becomes creamy and frozen.
4. If you want to add chocolate chips or fruit, fold them in during the last stirring.
Tips:
– Choose full-fat coconut milk for a creamier texture.
– A splash of rum can help keep the ice cream soft and scoopable.
FAQs:
– Can I make it without an ice cream maker? Yes! Just freeze the mixture and stir as directed.
– What other flavors can I try? Consider adding mint extract or citrus zest for a refreshing twist!
Enjoy making this Coconut Milk Ice Cream, and watch everyone come back for seconds!
Coconut Milk Ice Cream
Editor’s Choice

Cuisinart Ice Cream Maker Machine, 2-Quart Ice Cream, Sorbet and Frozen …

Thai Kitchen Gluten Free Unsweetened Coconut Milk, 13.66 fl oz (Pack of 12)

Ice Cream Scoop, 2PCS Nonstick Anti-Freeze Food grade PPR + rubber Ice C…
4. Healthy Peanut Butter Banana Ice Cream

Satisfy your sweet tooth with this Healthy Peanut Butter Banana Ice Cream. If you love peanut butter, this treat will feel like a dream come true! All you need are ripe bananas and peanut butter. Blend them together, and you’ll have a creamy dessert that feels indulgent but is actually good for you. For an extra kick, sprinkle in a bit of cinnamon!
Recipe Overview:
– Servings: 2
– Prep Time: 5 minutes
– Cook Time: 0 minutes
– Total Time: 5 minutes
– Calories: About 220 per serving
Nutritional Breakdown:
– Carbohydrates: 30g
– Protein: 5g
– Fat: 10g
Ingredients You’ll Need:
– 2 ripe bananas, frozen
– 2 tablespoons peanut butter
– Optional: a pinch of cinnamon for flavor
Simple Steps to Make Your Ice Cream:
1. Peel the bananas and freeze them overnight until solid. This is key for a smooth texture.
2. Place the frozen bananas and peanut butter into a food processor.
3. Blend everything together until it’s creamy. Don’t forget to scrape down the sides if needed.
4. You can serve it right away for a soft-serve style or freeze it for a firmer ice cream.
5. Get creative! Top with chocolate chips or chopped nuts for extra fun.
Helpful Tips:
– Make sure your bananas are very ripe. They’ll be sweeter and tastier.
– Feel free to swap out peanut butter for another nut butter if you want a change.
FAQs:
– Can I use fresh bananas? Fresh bananas won’t give you that creamy ice cream texture.
– How do I store leftovers? Keep it in an airtight container in the freezer for later enjoyment.
This Healthy Peanut Butter Banana Ice Cream is not just a dessert; it’s a quick snack that satisfies cravings without the guilt. Try it today and enjoy the creamy goodness!
Healthy Peanut Butter Banana Ice Cream
Editor’s Choice

Hamilton Beach Food Processor & Vegetable Chopper for Slicing, Shredding…

WMKGG Popsicle Silicone Molds Set, 2 PCS Ice Cream Molds with 50 Wooden …

Barney Butter Peanut Butter, Bare Smooth, 16 Ounce Jar, Natural, No Stir…
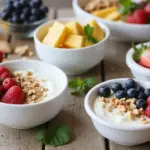
5. Fruit and Yogurt Parfait Cups

Whip up a delicious treat with Fruit and Yogurt Parfait Cups! These colorful cups are not just a feast for the eyes; they’re packed with nutrients, making them a fantastic choice for a summer snack. Imagine layers of creamy Greek yogurt, fresh fruits bursting with flavor, and a satisfying crunch from granola. You can make this delightful snack in just 10 minutes, and it’s perfect for any occasion, from brunch to a light dessert.
Here’s what you’ll need to create these tasty parfaits:
Ingredients:
– 2 cups Greek yogurt
– 2 cups mixed fruits (think berries, bananas, and kiwi)
– 1/2 cup granola
– Honey (optional, for sweetness)
Step-by-Step Instructions:
1. Grab some clear cups or glasses to show off your layers.
2. Start with a generous layer of Greek yogurt at the bottom.
3. Add a layer of your favorite mixed fruits.
4. Sprinkle granola on top of the fruit for a delightful crunch.
5. Repeat the layers until your cups are filled to the brim.
6. If you like, drizzle a little honey on top for extra sweetness.
7. Serve right away for the best taste and texture!
Tips:
– Choose a variety of colorful fruits to make your parfaits pop!
– To keep granola crunchy, add it just before serving.
FAQs:
– Can I use dairy-free yogurt? Absolutely! Any yogurt works well here.
– How long do these last in the fridge? They’re best enjoyed within 2 days.
Now you’re ready to impress your friends and family with these easy, healthy, and delicious Fruit and Yogurt Parfait Cups. Enjoy every bite!
Fruit and Yogurt Parfait Cups
Editor’s Choice

50Pcs Square Mini Plastic Dessert Cups,3.5Oz Clear Plastic Parfait Appet…

KIND Healthy Grains Clusters, Granola Variety Pack, Healthy Snacks, Good…

FAGE Total Greek Yogurt, 0% Nonfat, Plain, 32 oz
6. Avocado Chocolate Ice Cream

Indulge in the creamy goodness of Avocado Chocolate Ice Cream, a dessert that surprises with its rich flavor while being surprisingly healthy! This delightful treat uses ripe avocados as the main ingredient. Not only do they provide a smooth texture, but they also pack in healthy fats that your body will love. With the sweetness of maple syrup and the richness of cocoa powder, you won’t believe it’s dairy-free!
Here’s how you can whip up this delicious dessert in no time:
Recipe Overview:
– Servings: 4
– Prep Time: 10 minutes
– Cook Time: 0 minutes
– Total Time: 2 hours 10 minutes
– Calories: Approximately 200 per serving
Nutrition Information:
– Carbs: 18g
– Protein: 3g
– Fat: 14g
Ingredients:
– 2 ripe avocados
– 1/2 cup cocoa powder
– 1/2 cup maple syrup
– 1 tsp vanilla extract
– Pinch of salt
Instructions:
1. Start by cutting the avocados in half, removing the pit, and scooping the flesh into a blender.
2. Add cocoa powder, maple syrup, vanilla extract, and a pinch of salt.
3. Blend everything until smooth and creamy. Stop to scrape down the sides if needed.
4. Pour the mixture into a freezer-safe container. Freeze for about 2 hours.
5. Every 30 minutes, stir the mixture to help it freeze evenly. This will give you that perfect creamy texture.
6. Once it’s ready, scoop into bowls and enjoy your delicious treat!
Tips for Success:
– Use perfectly ripe avocados for the best flavor and texture.
– Feeling adventurous? Add chocolate chips for an extra chocolatey crunch!
FAQs:
– Can I substitute agave syrup for maple syrup? Yes, both sweeteners work wonderfully!
– How long can I keep this in the freezer? It stays fresh for up to 2 weeks.
This Avocado Chocolate Ice Cream is perfect for a hot day or a sweet treat after dinner. You get to enjoy a dessert that feels indulgent but is actually good for you. Enjoy your creation and impress your friends and family with this easy and healthy dessert!
Avocado Chocolate Ice Cream
Editor’s Choice

Ninja BL660 Professional Compact Smoothie & Food Processing Blender, 110…

Spring Chef Heavy Duty Ice Cream Scoop with Comfortable Handle – Profess…

Silicone Freezer Tray With Lid – Soup Freezer Container molds – Large Ic…
7. Watermelon Sorbet

Beat the heat with a delicious Watermelon Sorbet! This refreshing treat is bursting with the natural sweetness of ripe watermelon. It’s super simple to whip up, making it a perfect dessert for those hot summer days. Plus, it’s guilt-free—no added sugars needed!
Here’s what you need to know about making this delightful sorbet:
Recipe Overview:
– Servings: 4
– Prep Time: 5 minutes
– Freeze Time: 4 hours
– Total Time: 4 hours 5 minutes
– Calories: About 50 per serving
Nutritional Information:
– Carbs: 12g
– Protein: 1g
– Fat: 0g
Ingredients:
– 4 cups cubed watermelon
– Juice of 1 lime
– Optional: Fresh mint leaves for garnish
How to Make Watermelon Sorbet:
1. Start by blending the watermelon cubes and lime juice in a blender until smooth. This creates a vibrant mix full of flavor.
2. Pour the mixture into a container and freeze for about 4 hours or until it’s solid.
3. When ready to serve, scrape the sorbet with a fork to create a light, fluffy texture.
4. Scoop into bowls and add a few mint leaves on top for a pop of color and freshness.
Tips for Perfection:
– Choose very ripe watermelon for extra sweetness.
– Mix in a splash of coconut water for a tropical twist!
FAQs:
– Can I use other fruits? Absolutely! Berries like strawberries or blueberries also work wonderfully.
– How long can I keep it in the freezer? It stays fresh for up to 2 weeks in the freezer, if it lasts that long!
Enjoy this Watermelon Sorbet as a cool summer treat that’s easy to make and delightful to eat. You’ll love how refreshing it is!
Watermelon Sorbet
Editor’s Choice
Ninja BL660 Professional Compact Smoothie & Food Processing Blender, 110…

KitchenAid Classic Ice Cream Scoop, 8.6 inches, Black
![Freshware Food Storage Containers [36 Set] 16 oz Plastic Deli Containers...](https://m.media-amazon.com/images/I/71Og+vW9IGL._AC_UL320_.jpg "25 Easy Ice Cream Snack Recipes for Cool Desserts 48")
Freshware Food Storage Containers [36 Set] 16 oz Plastic Deli Containers…
8. Nut Butter Swirl Ice Cream

Do you crave a cool, creamy treat that’s both delicious and simple to make? Nut Butter Swirl Ice Cream is your answer! This delightful dessert combines the sweetness of frozen bananas with the rich flavor of your favorite nut butter. Imagine spoonfuls of smooth, creamy goodness swirling with nutty flavors—perfect for satisfying your sweet tooth while packing in some protein.
Let’s dive into how to whip this up in no time! You only need a few basic ingredients, and it takes just minutes to prepare. This treat is not only a hit for kids but also a great pick-me-up for adults. Plus, it’s guilt-free, making it a go-to option for those warm days when you need something cool and refreshing.
Recipe Overview:
– Servings: 4
– Prep Time: 5 minutes
– Cook Time: 0 minutes
– Total Time: 5 minutes
– Calories: Approximately 200 per serving
Nutrition Information:
– Carbs: 25g
– Protein: 5g
– Fat: 10g
Ingredients List:
– 2 frozen bananas
– 4 tablespoons nut butter (almond, peanut, or cashew work great!)
– Optional: chopped nuts for topping
Step-by-Step Instructions:
1. Start by placing the frozen bananas in a food processor. Blend until you achieve a smooth, ice cream-like texture.
2. Next, add your favorite nut butter. Pulse the processor a few times to create swirls of nutty goodness throughout the banana mixture.
3. You can enjoy your ice cream right away for a soft-serve texture! If you prefer a firmer treat, transfer it to a container and freeze for about an hour.
4. Before serving, sprinkle some chopped nuts on top for an extra crunch!
Tips:
– Use crunchy nut butter for a delightful texture contrast.
– Experiment with different nut butters to find your favorite flavor.
FAQs:
– Can I use fresh bananas? No, frozen bananas are key for that creamy texture.
– How long can I store this ice cream? It keeps well in the freezer for up to a week.
With just a few ingredients, Nut Butter Swirl Ice Cream brings a smile to your face and a delicious treat to your table. It’s perfect for a quick dessert or a summertime snack. Dive in, and enjoy every creamy, nutty bite!
Fun fact: Nut Butter Swirl Ice Cream can be whipped in under 5 minutes with just frozen bananas and your favorite nut butter. It’s one of the easy ice cream snack recipes you can customize with cocoa, peanut, or almond butter.
Nut Butter Swirl Ice Cream
Editor’s Choice
Hamilton Beach Food Processor & Vegetable Chopper for Slicing, Shredding…

Squirrel’s Nut Butter All Natural Anti Chafe Salve, Tub, 8oz

9. Chocolate-Dipped Fruit

Chocolate-Dipped Fruit makes a delightful snack that combines sweetness with health. Picture juicy strawberries, ripe bananas, or crisp apple slices, all dressed in a rich coat of dark chocolate. This treat is not only eye-catching but also packed with vitamins, making it a guilt-free indulgence. Pinterest is buzzing with ideas for creative variations, so let your imagination run wild!
Ready to make your own? This recipe is easy, quick, and budget-friendly. You don’t need fancy ingredients or a lot of time. Just grab some fresh fruit and dark chocolate from your kitchen. The result? A refreshing snack perfect for parties, movie nights, or a hot day. You’ll enjoy a sweet taste without the heavy calories, making every bite feel special.
Recipe Overview:
– Servings: 12 pieces
– Prep Time: 10 minutes
– Cook Time: 0 minutes
– Total Time: 1 hour 10 minutes
– Calories: About 70 per piece
Nutrition Information:
– Carbs: 10g
– Protein: 1g
– Fat: 4g
Ingredients List:
– 2 cups mixed fruits (like strawberries, bananas, and apples)
– 1 cup dark chocolate chips
– 1 tsp coconut oil (optional, for smoothness)
Step-by-Step Instructions:
1. Melt the dark chocolate and coconut oil in a microwave or double boiler until smooth.
2. Dip each piece of fruit into the melted chocolate, covering it completely.
3. Place the chocolate-covered fruits on a baking sheet lined with parchment paper.
4. Freeze for about 1 hour or until the chocolate hardens.
5. Serve and enjoy this refreshing treat!
Tips:
– Choose toppings like chopped nuts or colorful sprinkles before freezing for extra flair.
– Store leftovers in an airtight container in the freezer for a quick snack later.
FAQs:
– Can I use milk chocolate? Yes, but dark chocolate is a healthier option.
– What fruits are best for dipping? Strawberries, bananas, and apple slices are top picks!
Enjoy this simple and delightful treat that brings joy and health together in every bite!
Fun fact: Chocolate-dipped fruit turns everyday fruit into a festive, vitamin-packed treat—perfect for busy families. When you’re chasing easy ice cream snack recipes, this combo proves you can indulge without guilt, in minutes, with everyday ingredients.
Chocolate-Dipped Fruit
Editor’s Choice

Enjoy Life Baking Dark Chocolate Morsels, Dairy Free, Soy Free, Nut Free…

Fruit Slicer Cup – Strawberry, Banana, Grape Cutter, Egg Slicer for Hard…
10. No-Churn Strawberry Ice Cream

Indulge in a scoop of summer with this easy No-Churn Strawberry Ice Cream! You don’t need an ice cream maker to whip up this delightful treat. Just blend ripe strawberries with heavy cream and sweetened condensed milk, and you’re all set for a delicious dessert. This creamy, fruity ice cream captures the essence of fresh strawberries, making it perfect for hot days or any occasion.
Recipe Overview:
– Servings: 4
– Prep Time: 15 minutes
– Freeze Time: 6 hours
– Calories: About 200 per serving
Nutrition Information:
– Carbs: 25g
– Protein: 4g
– Fat: 10g
Ingredients List:
– 2 cups ripe strawberries, hulled and sliced
– 1 cup heavy cream
– 1 cup sweetened condensed milk
– 1 tsp vanilla extract
Step-by-Step Instructions:
1. Start by pureeing the strawberries in a blender until smooth. You want a vibrant, sweet mixture that highlights the fruit’s flavor.
2. In a separate bowl, whip the heavy cream until soft peaks form. This adds a light, airy texture to your ice cream.
3. Gently fold the strawberry puree and sweetened condensed milk into the whipped cream. Be careful not to deflate the cream too much; you want to keep it fluffy.
4. Pour the creamy mixture into a suitable container. You can use a loaf pan or any freezer-safe dish.
5. Freeze for at least 6 hours, or until the ice cream is firm. Once ready, scoop it out and enjoy!
Tips:
– Use fresh, ripe strawberries for the best flavor and sweetness.
– For a beautiful presentation, swirl some extra strawberry sauce into the mixture before freezing.
FAQs:
– Can I use frozen strawberries? Yes, but fresh strawberries provide the best taste and texture.
– How long can this ice cream last? It will stay fresh for up to 2 weeks in the freezer, but you might eat it all before then!
This No-Churn Strawberry Ice Cream is not just simple; it’s a fun way to enjoy your summer. You can easily customize it by adding chunks of chocolate or other fruits for extra flavor. With this recipe, you’ll have a delightful treat that’s sure to impress friends and family alike!
No-Churn Strawberry Ice Cream
Editor’s Choice
Ninja BL660 Professional Compact Smoothie & Food Processing Blender, 110…
Freshware Food Storage Containers [36 Set] 16 oz Plastic Deli Containers…

Whisks for Cooking, 3 Pack Stainless Steel Whisk for Blending, Whisking,…
11. Honey Lime Fruit Salad

Brighten your day with a delightful Honey Lime Fruit Salad! This refreshing dish bursts with colors and flavors, making it the perfect snack for summer days. The sweet honey-lime dressing adds a zesty kick, elevating your favorite fruits. Whether you’re at a picnic or just enjoying a sunny afternoon, this salad is a cool treat you’ll love.
Recipe Overview:
– Servings: 4
– Prep Time: 10 minutes
– Cook Time: 0 minutes
– Total Time: 10 minutes
– Calories: About 100 per serving
Nutrition Information:
– Carbs: 25g
– Protein: 1g
– Fat: 0g
Ingredients List:
– 2 cups of mixed fresh fruits (like berries, melon, and kiwi)
– 1 tablespoon of honey
– Juice from 1 lime
Step-by-Step Instructions:
1. Start by washing and chopping your fruits into bite-sized pieces.
2. In a large mixing bowl, combine all the fruits.
3. In a small bowl, whisk together the honey and lime juice until smooth.
4. Drizzle the dressing over the fruits, then gently toss everything together to coat.
5. Serve it chilled for the best taste, and enjoy your refreshing snack!
Tips for the Best Salad:
– Choose Seasonal Fruits: They taste better and are often more affordable.
– Add Fresh Mint Leaves: A sprinkle of mint can enhance the freshness.
– Experiment with Flavors: Try adding a touch of cinnamon or a splash of coconut water for a twist.
FAQs:
– Can I make it in advance? Yes, but keep the dressing separate until you’re ready to serve.
– How long does it last in the fridge? It’s best eaten within two days for optimal freshness.
This Honey Lime Fruit Salad is not just delicious. It’s also a fun way to enjoy healthy fruits. Perfect for gatherings or just a quick pick-me-up, this recipe will keep you cool and satisfied all summer long!
Honey Lime Fruit Salad
Editor’s Choice

Vegetable Chopper,12-in-1 Multifunctional Food Chopper,Professional Onio…

Umite Chef Mixing Bowls with Airtight Lids Set, 8PCS Stainless Steel Kha…

Hunnibi 8oz No Drip Glass Honey Dispenser with Plastic Top – Honeycomb-S…
12. Chocolate Avocado Mousse

Treat yourself to a delightful and healthier dessert with Chocolate Avocado Mousse! This creamy treat combines ripe avocados with rich cocoa and a hint of sweetness. It’s a perfect snack or dessert that will surprise your taste buds and impress your friends. Plus, it’s quick to make, so you can enjoy this indulgence any time!
Recipe Overview:
– Servings: 4
– Prep Time: 10 minutes
– Total Time: 10 minutes
– Calories: About 180 per serving
Nutritional Information:
– Carbs: 15g
– Protein: 3g
– Fat: 12g
Ingredients:
– 2 ripe avocados
– 1/2 cup cocoa powder
– 1/4 cup honey or agave syrup
– 1 tsp vanilla extract
– Pinch of salt
Instructions:
1. Scoop the avocados into a blender. Add cocoa powder, honey (or agave), vanilla, and salt.
2. Blend all the ingredients until you achieve a smooth and creamy texture.
3. Taste and adjust sweetness if needed. Serve it right away or chill for 30 minutes for a cooler experience.
4. Garnish with whipped cream or fresh berries to make it even more tempting!
Handy Tips:
– Use ripe avocados for the best texture. They should feel soft when you squeeze them gently.
– Want to add depth? Mix in a splash of espresso to elevate the chocolate flavor!
FAQs:
– Can I substitute the sweetener? Yes! Maple syrup is a great alternative.
– How long will it last? It keeps well in the fridge for up to 2 days.
This Chocolate Avocado Mousse is not just delicious; it’s also packed with healthy fats and nutrients. It’s a fantastic way to satisfy your sweet tooth without guilt. Enjoy this simple yet scrumptious recipe at your next gathering or as a midday treat!
Chocolate Avocado Mousse
Editor’s Choice

Amazon Fresh, Unsweetened Cocoa Powder, 8 Oz (Pack of 3)

Ninja BL660 Professional Compact Smoothie & Food Processing Blender, 110…
13. Peanut Butter Banana Smoothie Bowl

Start your day off right with a delightful Peanut Butter Banana Smoothie Bowl! This creamy treat blends ripe bananas, almond milk, and rich peanut butter into a thick, satisfying bowl of goodness. You get the best of both worlds: a nutritious breakfast that tastes like dessert. Top it with crunchy granola and fresh fruit for an added burst of flavor and texture.
Recipe Overview:
– Servings: 2
– Prep Time: 5 minutes
– Cook Time: 0 minutes
– Total Time: 5 minutes
– Calories: About 300 per serving
Nutritional Information:
– Carbs: 40g
– Protein: 9g
– Fat: 12g
Ingredients:
– 2 frozen bananas
– 1 cup almond milk (or any milk you prefer)
– 2 tbsp peanut butter
– Optional toppings: granola, sliced bananas, chia seeds, or berries
Instructions:
1. Start by adding the frozen bananas, almond milk, and peanut butter to a blender. Blend until smooth and creamy.
2. Pour the mixture into two bowls.
3. Decorate the top with granola, sliced bananas, chia seeds, or your favorite berries.
4. Dig in right away for a refreshing breakfast that feels indulgent!
Handy Tips:
– Use unsweetened almond milk for less sugar.
– Opt for any nut butter if you’re out of peanut butter.
– Freeze your bananas overnight for the perfect texture.
FAQs:
– Can I skip the peanut butter? Absolutely! Try a different nut butter or yogurt instead.
– How do I make it less sweet? Use less banana or choose unsweetened milk.
This smoothie bowl is not just a breakfast; it’s an experience. It’s quick, easy, and satisfying, making it perfect for busy mornings or lazy weekends. Enjoy the creamy goodness while knowing you’re fueling your body right!
Peanut Butter Banana Smoothie Bowl
Editor’s Choice
Ninja BL660 Professional Compact Smoothie & Food Processing Blender, 110…

Nature Valley Protein Granola, Oats and Honey Granola, Resealable Snack …

BetterBody Foods Organic Chia Seeds 2 lbs, 32 Oz, with Omega-3, Non-GMO,…
14. Berry Chia Seed Pudding

Berry Chia Seed Pudding is a fun and healthy dessert that you can prepare ahead of time. This creamy treat combines chia seeds with almond milk and berry puree, creating a delicious snack that packs a nutritional punch. Best of all, kids adore it, making it a perfect choice for family gatherings or a quiet evening at home.
Prepare this pudding the night before, and you’ll have a delightful breakfast or dessert ready to go in the morning. The chia seeds swell and thicken the mixture, resulting in a smooth, pudding-like texture. Plus, it’s a fantastic way to sneak some superfoods into your family’s diet!
Recipe Overview:
– Servings: 4
– Prep Time: 10 minutes
– Cook Time: 0 minutes
– Total Time: 8 hours 10 minutes
– Calories: Approximately 120 per serving
Nutrition Information:
– Carbs: 15g
– Protein: 3g
– Fat: 6g
Ingredients List:
– 1/2 cup chia seeds
– 2 cups almond milk
– 1 cup mixed berries (pureed)
– 2 tbsp honey (optional)
Step-by-Step Instructions:
1. In a mixing bowl, combine chia seeds and almond milk. Stir well.
2. Add the berry puree and honey if you want some sweetness. Mix until smooth.
3. Cover the bowl and place it in the refrigerator overnight.
4. The next morning, stir the pudding and serve it in bowls or jars.
5. Top with fresh berries for a beautiful presentation before serving.
Tips:
– Use coconut milk for a creamier texture.
– Adjust the sweetness with honey or agave to meet your taste!
FAQs:
– Can I use different fruits? Absolutely! Any fruit puree works well.
– How long can I store it? This pudding lasts up to 5 days in the fridge, making it great for meal prep!
This Berry Chia Seed Pudding is not just tasty; it’s also an easy way to incorporate healthy ingredients into your diet. Enjoy it anytime you need a quick snack or a sweet treat!
Berry Chia Seed Pudding
Editor’s Choice

Garden of Life Chia Seeds 100% Organic for Smoothies, Pudding – Raw Orga…

Silk Shelf-Stable Almond Milk, Unsweetened Vanilla, Dairy-Free, Vegan, N…

BLACKBERRY REÀL, Blackberry Puree Infused Syrup, 16.9 FL OZ Squeezable B…
15. Mango Coconut Ice Cream

Escape to a sunny beach with this delicious Mango Coconut Ice Cream! This easy no-churn recipe combines sweet, ripe mangoes with creamy coconut milk, making it the perfect treat for those hot summer days. Imagine spooning into a bowl of this refreshing dessert, where every bite is like a mini-vacation. Plus, it’s so simple to make that you’ll want to whip it up again and again!
Here’s what you need to create this tropical delight:
Recipe Overview:
– Servings: 4
– Prep Time: 10 minutes
– Freeze Time: 6 hours
– Calories: About 170 per serving
Nutrition Information:
– Carbs: 28g
– Protein: 2g
– Fat: 7g
Ingredients:
– 2 ripe mangoes, peeled and diced
– 1 can (13.5 oz) of coconut milk
– 1/4 cup honey or your favorite sweetener
Step-by-Step Instructions:
1. Blend the diced mangoes in a blender until smooth. You want a nice, creamy texture.
2. In a mixing bowl, combine the mango puree with the coconut milk and honey. Stir well to blend all the flavors.
3. Pour the mixture into a freezer-safe container. Cover it tightly.
4. Freeze the ice cream for about 6 hours. To keep it creamy, stir the mixture every hour while it’s freezing.
5. Once ready, scoop it out and enjoy! You’ve just made a taste of the tropics.
Helpful Tips:
– Choose ripe mangoes for the sweetest flavor. The more yellow they are, the better!
– For a delightful crunch, top your ice cream with toasted coconut flakes or fresh fruit.
FAQs:
– Can I use frozen mango? Yes! Just blend it straight from the freezer for a chilled treat.
– What can I substitute for honey? Agave syrup or maple syrup both work great.
Now, you’re ready to impress friends and family with this delightful Mango Coconut Ice Cream! Enjoy every creamy, fruity bite while soaking up the sun.
Mango Coconut Ice Cream
Editor’s Choice

Ninja BR201AMZ Professional Blender 2.0, 1200 Watts, Auto-iQ Program, To…
Silicone Freezer Tray With Lid – Soup Freezer Container molds – Large Ic…

Yupik Organic Toasted Desiccated Coconut Chips, 16 Oz, Non-GMO, Vegan, G…
16. Cinnamon Roll Ice Cream Sandwiches

Get ready to indulge in a sweet treat that will take your dessert game to the next level! Cinnamon Roll Ice Cream Sandwiches combine two of your favorites in one delicious bite. Imagine soft, gooey cinnamon rolls filled with creamy ice cream, all rolled in crunchy nuts or colorful sprinkles. It’s a fun dessert that’s easy to make and perfect for any occasion.
Here’s how to whip up these delightful sandwiches in no time. You can use store-bought cinnamon rolls or make your own from scratch. Either way, the result will be a delightful treat that your family and friends will love. Plus, they’re customizable! Choose your favorite ice cream flavor to make them uniquely yours.
Recipe Overview:
– Servings: 4
– Prep Time: 15 minutes
– Cook Time: 0 minutes
– Total Time: 15 minutes
– Calories: Approximately 350 per sandwich
Nutrition Information:
– Carbs: 50g
– Protein: 5g
– Fat: 15g
Ingredients List:
– 4 cinnamon rolls
– 2 cups of ice cream (your favorite flavor)
– Optional: nuts or sprinkles for coating
Step-by-Step Instructions:
1. Bake the cinnamon rolls according to the package instructions. Let them cool for a few minutes.
2. Carefully slice each roll in half horizontally. This will create a top and bottom for your sandwich.
3. Scoop a generous amount of ice cream onto the bottom half of each roll and press the top half down gently.
4. Roll the edges in chopped nuts or colorful sprinkles for some added crunch and fun.
5. Serve immediately and enjoy your creation!
Tips:
– Use soft serve ice cream for easier filling. It spreads like a dream!
– Want a little extra sweetness? Mix cinnamon with sugar for a special coating.
FAQs:
– Can I use leftover cinnamon rolls? Yes! This is a fantastic way to enjoy them.
– What ice cream flavors work best? Classic vanilla or tangy cream cheese are excellent choices.
With these easy Cinnamon Roll Ice Cream Sandwiches, you’ll have a crowd-pleaser dessert that’s simple to make and packed with flavor. Enjoy every delicious bite!
Cinnamon Roll Ice Cream Sandwiches
Editor’s Choice

Wilton Ever-Glide Non-Stick Round Pan – Bake Delicious Cinnamon Rolls, C…
Spring Chef Heavy Duty Ice Cream Scoop with Comfortable Handle – Profess…

Sprinkles For Cake Decorating, Cupcake, Cookies, Ice Cream Topper, 6 Pac…
17. Frozen Yogurt Bark

Enjoy a refreshing treat with Frozen Yogurt Bark! This delightful snack is simple to make and perfect for satisfying your sweet tooth while keeping things healthy. All you need is Greek yogurt and your choice of toppings. Think colorful fruits, crunchy nuts, or even a drizzle of chocolate. Pinterest is buzzing with this trend, making it a fun way to enjoy yogurt without the fuss.
To create your Frozen Yogurt Bark, gather a few ingredients and get ready for a tasty adventure. Best of all, it’s budget-friendly and can be customized to fit your taste. You can feel good about this snack because it’s low in calories and high in flavor. Perfect for those hot summer days or whenever you need a cool dessert!
Recipe Overview:
– Servings: 6
– Prep Time: 10 minutes
– Freeze Time: 3 hours
– Calories: About 100 per serving
Ingredients:
– 2 cups Greek yogurt
– 1/2 cup mixed toppings (berries, nuts, chocolate chips)
– Optional: drizzle of honey
Instructions:
1. Line a baking sheet with parchment paper.
2. Spread the Greek yogurt evenly on the sheet.
3. Sprinkle your favorite toppings over the yogurt.
4. Freeze for about 3 hours or until solid.
5. Break into pieces and enjoy!
6. Store leftovers in an airtight container in the freezer.
Tips:
– Choose a mix of toppings for a burst of flavors.
– Try flavored yogurt to switch things up!
FAQs:
– Can I use non-dairy yogurt? Yes! Any yogurt will work well.
– How long does it last in the freezer? It can stay fresh for up to a month in an airtight container.
Frozen Yogurt Bark is perfect for parties, snacks, or even as an after-dinner treat. Dive into this fun recipe and enjoy a guilt-free dessert that’s sure to please everyone!
Fun fact: Frozen Yogurt Bark turns simple ingredients into a 2-ingredient snack that’s part of the 25 easy ice cream snack recipes. One cup of Greek yogurt has about 10g protein, plus fruits and nuts for fiber. Freeze, break, and enjoy—it’s kid-friendly and quick!
Frozen Yogurt Bark
Editor’s Choice
Amazon Basics Silicone Rectangular Baking Mat, Non-Stick Reusable Oven B…

Ankou Airtight Food Storage Container Sets with Lids 6Pcs Pop Containers…

Ultimate Probiotic Yogurt Maker with Adjustable Time & Temp Control – Ma…
18. Matcha Green Tea Ice Cream

Indulge in the refreshing flavor of Matcha Green Tea Ice Cream! This delightful dessert not only cools you down on a hot day, but it also packs a punch with antioxidants. Imagine the smooth, creamy texture melting in your mouth, paired with the unique taste of matcha. It’s a perfect treat that’s simple to make and even simpler to enjoy!
Ready to whip up this delicious dessert? Here’s what you’ll need:
Ingredients:
– 1 can of coconut milk
– 2 tablespoons of matcha powder
– 1/4 cup of honey or your favorite sweetener
– 1 teaspoon of vanilla extract
Instructions:
1. In a mixing bowl, combine the coconut milk, matcha powder, honey, and vanilla. Whisk until everything is well blended.
2. Pour the mixture into an ice cream maker. If you don’t have one, use a shallow dish instead.
3. If using a dish, stir the mixture every 30 minutes for about 2 hours until it’s creamy.
4. Serve in bowls and top with shaved chocolate or shredded coconut for an extra touch!
Tips:
– Adjust the sweetness to match your taste.
– Opt for high-quality matcha for maximum flavor.
FAQs:
– Can I make it without an ice cream maker? Yes! Just use the stirring method in a shallow dish.
– How long does it last in the freezer? Up to 2 weeks, but it’s so tasty, you probably won’t have any left!
This Matcha Green Tea Ice Cream is not just a treat; it’s a unique way to enjoy a classic dessert. Perfect for impressing friends or treating yourself, the vibrant green color and rich taste make it a standout choice. Enjoy the delightful combination of healthy and delicious today!
Matcha Green Tea Ice Cream
Editor’s Choice

Cuisinart Ice Cream Maker Machine, 1.5 Quart Double Insulated Machine, S…

Naoki Matcha Superior Ceremonial Blend – Authentic Japanese First Harves…

Simply Asia Unsweetened Coconut Milk, 13.66 fl oz – One 13.66 Ounce Can …
19. Pineapple Coconut Whip

Treat yourself to a refreshing escape with this delightful Pineapple Coconut Whip! This fluffy dessert combines the sweet, juicy flavor of fresh pineapple with rich, creamy coconut. It’s like a mini tropical vacation in a bowl! Perfect for hot summer days, this treat is simple to make and will leave your friends and family in awe.
Recipe Overview:
– Servings: 4
– Prep Time: 10 minutes
– Cook Time: 0 minutes
– Total Time: 10 minutes
– Calories: About 120 per serving
Nutrition Information:
– Carbs: 15g
– Protein: 1g
– Fat: 6g
Ingredients List:
– 2 cups fresh pineapple, diced
– 1 cup coconut cream
– Optional: shredded coconut for garnish
Step-by-Step Instructions:
1. Start by adding the diced pineapple and coconut cream to your blender.
2. Blend until the mixture is smooth and fluffy, about 1-2 minutes.
3. For a firmer texture, chill it in the fridge for about 30 minutes.
4. Serve immediately and sprinkle with shredded coconut for a crunchy finish.
Tips for Perfection:
– Choose ripe pineapple for maximum sweetness and flavor.
– Add a splash of lime juice to brighten the flavors and give a zesty kick!
FAQs:
– Can I use canned pineapple? Yes, but fresh pineapple delivers a much brighter taste.
– How long does it last in the fridge? It’s best enjoyed fresh but can last up to 2 days in the fridge.
This Pineapple Coconut Whip is not just easy to make; it’s also a crowd-pleaser. You’ll love how quickly you can whip it up, and it’s a fantastic way to cool down. Enjoy the taste of the tropics right from your kitchen!
Pineapple Coconut Whip
Editor’s Choice
Ninja BL660 Professional Compact Smoothie & Food Processing Blender, 110…

Coco Reàl, Cream of Coconut, 16.9 FL OZ Squeezable Bottle, Individually …
![Pineapple Corer, [Upgraded, Reinforced, Thicker Blade] Newness Premium P...](https://m.media-amazon.com/images/I/71Vvy8BmU3L._AC_UL320_.jpg "25 Easy Ice Cream Snack Recipes for Cool Desserts 130")
Pineapple Corer, [Upgraded, Reinforced, Thicker Blade] Newness Premium P…
20. Oatmeal Cookie Ice Cream Sandwiches

Indulge in the joy of homemade Oatmeal Cookie Ice Cream Sandwiches! These treats combine soft, chewy oatmeal cookies with your favorite ice cream flavor, creating a dessert that’s loved by both kids and adults. They’re the perfect way to cool down on a hot day, and you can customize them to match your taste. Picture biting into a warm cookie with a creamy ice cream center—pure bliss!
Let’s get started on crafting these delicious sandwiches. You only need a few ingredients, and they come together quickly. This recipe is not just easy; it’s also a fantastic activity to do with the kids. Plus, you can use store-bought cookie dough if you’re short on time. Let’s break down the details.
Recipe Overview:
– Servings: 6
– Prep Time: 15 minutes
– Cook Time: 10 minutes
– Total Time: 25 minutes
– Calories: Approximately 250 per sandwich
Nutrition Information:
– Carbs: 38g
– Protein: 5g
– Fat: 10g
Ingredients List:
– 1 batch oatmeal cookie dough (homemade or store-bought)
– 2 cups ice cream (choose your favorite flavor)
Step-by-Step Instructions:
1. Preheat your oven and prepare the oatmeal cookie dough as directed.
2. Bake the cookies until they’re golden brown, then let them cool completely.
3. Take one cookie and place a scoop of ice cream on top. Add another cookie to create a sandwich.
4. Freeze the sandwiches for about 30 minutes to set the ice cream.
5. Serve and enjoy these delightful creations!
Tips:
– Use a mini ice cream scoop for perfectly sized portions.
– Add chocolate chips to the cookie dough for an extra delicious twist!
FAQs:
– Can I use store-bought cookie dough? Yes, that makes it super convenient!
– Can I make them vegan? Absolutely! Just switch to vegan cookie dough and ice cream.
These Oatmeal Cookie Ice Cream Sandwiches are not just a treat; they’re an experience. Perfect for parties or a simple dessert at home, you’ll love how easy they are to make and enjoy. So gather your ingredients and get ready for a sweet adventure!
Oatmeal Cookie Ice Cream Sandwiches
Editor’s Choice

Ice Cream Scoop, 18/8 Stainless Steel Cookie Scoop, Cookie Scoops for Ba…

Betty Crocker Oatmeal Cookies, Cookie Baking Mix, 17.5 oz

Silicone Baking Mat, 3 Pack Reusable Baking Mat, Non-Stick, Food Safe Si…
21. Cherry Vanilla Frozen Yogurt

Ready for a cool treat that’s both creamy and refreshing? Try this Cherry Vanilla Frozen Yogurt! It’s a delightful twist on regular yogurt, combining sweet cherries with smooth vanilla. Perfect for hot days, this frozen delight will leave you feeling refreshed and satisfied.
Recipe Overview:
– Servings: 4
– Prep Time: 10 minutes
– Cook Time: 0 minutes
– Total Time: 4 hours 10 minutes
– Calories: About 150 per serving
Nutrition Information:
– Carbs: 20g
– Protein: 5g
– Fat: 2g
Ingredients List:
– 2 cups vanilla yogurt
– 1 cup cherries, pitted
Step-by-Step Instructions:
1. First, blend the cherries until they are smooth. You can use fresh or frozen cherries for this recipe.
2. In a bowl, mix the cherry puree with the vanilla yogurt until combined. This is where the magic happens!
3. Pour the mixture into your ice cream maker. If you don’t have one, use a shallow dish.
4. Freeze the yogurt for about 4 hours. Stir it every hour to keep it creamy.
5. Scoop into bowls and enjoy your homemade treat!
Tips:
– Use fresh or frozen cherries based on what you have.
– For a fun twist, mix in dark chocolate chips before freezing!
– This yogurt can stay in the freezer for up to 2 weeks.
FAQs:
– Can I use Greek yogurt? Absolutely! It adds a nice tangy flavor.
– How long does it last in the freezer? It’s best enjoyed within two weeks for optimal freshness.
This Cherry Vanilla Frozen Yogurt is not only easy to make but also a healthier dessert choice. It’s a perfect way to indulge without the guilt. So, gather your ingredients and dive into this delicious recipe today!
Cherry Vanilla Frozen Yogurt
Editor’s Choice

Cuisinart Ice Cream Maker Machine, 1.5 Quart Double Insulated Machine, S…

Chobani® Low-Fat Vanilla Greek Yogurt, Mixed Berry on the Bottom 5.3oz 4…

22. Mixed Berry Ice Cream

Indulge in a refreshing treat with Mixed Berry Ice Cream! This delightful dessert bursts with the vibrant flavors of strawberries, blueberries, and raspberries. Not only is it colorful and fun, but it’s also nutritious, making it a hit with kids and adults alike. Plus, it’s packed with antioxidants to keep you feeling great!
Recipe Overview:
– Servings: 4
– Prep Time: 10 minutes
– Freeze Time: 4 hours
– Calories: About 180 per serving
Nutrition Information:
– Carbs: 25g
– Protein: 3g
– Fat: 7g
Ingredients List:
– 2 cups mixed berries (strawberries, blueberries, raspberries)
– 1 cup heavy cream
– 1/4 cup sugar or your favorite sweetener
Step-by-Step Instructions:
1. Start by blending the mixed berries, cream, and sweetener in a blender until smooth. Enjoy the sweet aroma as you mix!
2. Pour the mixture into a container and freeze for about 4 hours. It’s best to stir it every hour for that creamy texture.
3. When it’s ready, scoop it into bowls and serve. Watch your family’s faces light up with joy!
Tips:
– Add a splash of milk for extra creaminess.
– Use fresh berries for the best taste. Frozen berries work too; just blend them straight from the freezer!
FAQs:
– Can I use frozen berries? Yes, frozen berries blend wonderfully!
– How long does it last in the freezer? Enjoy your ice cream for up to 2 weeks!
This Mixed Berry Ice Cream is not just a dessert; it’s a simple way to enjoy healthy ingredients while satisfying your sweet tooth. Dive into this treat and celebrate the flavors of summer all year round!
Mixed Berry Ice Cream
Editor’s Choice
Ninja BL660 Professional Compact Smoothie & Food Processing Blender, 110…
Cuisinart Ice Cream Maker Machine, 1.5 Quart Double Insulated Machine, S…
Ice Cream Scoop, 2PCS Nonstick Anti-Freeze Food grade PPR + rubber Ice C…
23. Chocolate Chip Cookie Dough Ice Cream

Dive into a delightful treat with Chocolate Chip Cookie Dough Ice Cream! This recipe mixes creamy goodness with chewy cookie dough bites, giving you that nostalgic flavor you crave. Best of all, it’s a no-churn recipe, so you can whip it up without any special equipment!
Recipe Overview:
– Servings: 4
– Prep Time: 15 minutes
– Cook Time: 0 minutes
– Total Time: 6 hours 15 minutes
– Calories: About 300 per serving
Nutrition Information:
– Carbs: 30g
– Protein: 4g
– Fat: 15g
Ingredients List:
– 1 cup heavy cream
– 1/2 cup sweetened condensed milk
– 1/2 cup mini chocolate chips
– 1/4 cup cookie dough pieces
Step-by-Step Instructions:
1. Start by whipping the heavy cream in a mixing bowl until soft peaks form. This makes your ice cream light and fluffy.
2. Carefully fold in the sweetened condensed milk, mini chocolate chips, and cookie dough pieces. Take your time with this step to keep the mixture airy.
3. Transfer the mixture into a container. Cover and freeze for at least 6 hours, or until solid.
4. Once frozen, scoop out servings and enjoy your homemade delight!
Tips:
– Use pre-made cookie dough for a quick option. It saves time and tastes great!
– Want to customize? Try adding different flavors to your cookie dough, like peanut butter or butterscotch chips!
FAQs:
– How long will this last in the freezer? It’s best enjoyed fresh, but it can last up to 2 weeks in the freezer.
– Can I use dark chocolate instead? Yes! Dark chocolate adds a rich flavor that pairs well with the creamy base.
Treat yourself to this easy and delicious Chocolate Chip Cookie Dough Ice Cream. It’s perfect for hot days or any time you’re craving something sweet!
Chocolate Chip Cookie Dough Ice Cream
Editor’s Choice
Umite Chef Mixing Bowls with Airtight Lids Set, 8PCS Stainless Steel Kha…

5 Pieces Silicone Spatula Set, Food Grade Rubber Spatula, Upgrade Strong…
Spring Chef Heavy Duty Ice Cream Scoop with Comfortable Handle – Profess…
24. Raspberry Sorbet

Raspberry Sorbet is the ultimate cool-down treat for hot days. It’s light, refreshing, and bursting with the sweet-tart flavor of fresh raspberries. With just a few ingredients and a little patience, you can whip up this delightful dessert. Plus, it looks stunning when served, making it perfect for gatherings or a simple family dessert.
Here’s how to make it:
Recipe Overview:
– Servings: 4
– Prep Time: 5 minutes
– Cook Time: 0 minutes
– Total Time: 4 hours 5 minutes
– Calories: Approximately 60 per serving
Nutrition Information:
– Carbs: 15g
– Protein: 1g
– Fat: 0g
Ingredients List:
– 2 cups fresh raspberries
– 1/4 cup sugar or your favorite sweetener
– Juice of 1 lemon
Step-by-Step Instructions:
1. Start by blending the fresh raspberries and lemon juice until smooth.
2. Gradually stir in the sugar until it fully dissolves.
3. Pour the mixture into a container and freeze it for about 4 hours.
4. Once frozen, scrape the sorbet with a fork to achieve a fluffy texture.
5. Serve your sorbet in elegant bowls and enjoy every spoonful!
Tips:
– Pick ripe raspberries for maximum flavor.
– Add a sprig of fresh mint on top for a beautiful garnish and extra freshness.
FAQs:
– Can I use frozen raspberries? Yes! Just blend them without thawing for a similar taste.
– How long can I store it? Your homemade sorbet can last up to 2 weeks in the freezer, but good luck keeping it around that long!
This Raspberry Sorbet is not just a treat; it’s a way to relish summer’s sweetness. Try making it this weekend and watch how quickly it becomes a family favorite!
Raspberry Sorbet
Editor’s Choice
Ninja BL660 Professional Compact Smoothie & Food Processing Blender, 110…
Cuisinart Ice Cream Maker Machine, 1.5 Quart Double Insulated Machine, S…

R-Kay 6 Oz Clear Plastic Small Bowls – 50 Pack Disposable Heavy Duty Des…
25. Chocolate-Covered Banana Pops

Treat yourself to the delightful taste of Chocolate-Covered Banana Pops! These fun snacks are not just delicious but also a fantastic way to enjoy fruit. Perfect for a summer day, you can whip these up in no time. They make a great family activity and offer a sweet treat that everyone can feel good about.
Imagine biting into a creamy banana slice covered in rich chocolate. It’s a flavor combo that kids and adults love! Plus, these pops are easy to customize with your favorite toppings. Pinterest users are raving about them, and for good reason!
Ready to make your own? Here’s how:
Recipe Overview:
– Servings: 12 pops
– Prep Time: 15 minutes
– Cook Time: 0 minutes
– Total Time: 1 hour 15 minutes
– Calories: Approximately 100 per pop
Nutrition Information:
– Carbs: 15g
– Protein: 1g
– Fat: 4g
Ingredients List:
– 3 ripe bananas
– 1 cup dark chocolate chips
– 1 tbsp coconut oil (optional)
Step-by-Step Instructions:
1. Slice the bananas into thick rounds for easy dipping.
2. Melt the chocolate chips and coconut oil together in a microwave-safe bowl or double boiler until smooth.
3. Dip each banana slice into the melted chocolate, ensuring it’s fully coated.
4. Place the coated slices on a parchment-lined tray.
5. Insert a stick into each piece, then freeze them for about 1 hour until firm.
6. Serve these delightful pops and enjoy every bite!
Tips:
– Use dark chocolate for a healthier treat.
– Try adding toppings like crushed nuts or colorful sprinkles before freezing for extra fun!
FAQs:
– Can I use milk chocolate? Yes, but remember, dark chocolate is a healthier choice.
– How long do they last in the freezer? They stay fresh for up to a week.
With just a few simple steps, you can create these tasty Chocolate-Covered Banana Pops. They are not only easy to make but also a healthy dessert option that’s perfect for warm days. Enjoy the smiles they bring!
Chocolate-Covered Banana Pops
Editor’s Choice
Wilton Candy Melts Melting Pot, Perfect for Dipping, Drizzling & Decorat…

Popsicle Molds Set 6 Pieces Ice Popsicle Maker-BPA Free,Easy-Release Ice…
Conclusion

With these 25 easy ice cream snack recipes, summer will never be the same! Whether you’re looking for healthy treats or indulgent desserts, these recipes provide a delightful balance of flavor and fun for everyone.
Get your kids involved in the kitchen and make some sweet memories together. The joy of creating delicious treats is just as satisfying as enjoying them. Dive into the world of icy delights as the warm weather rolls in and savor every moment!
Note: We aim to provide accurate product links, but some may occasionally expire or become unavailable. If this happens, please search directly on Amazon for the product or a suitable alternative.
This post contains Amazon affiliate links, meaning I may earn a small commission if you purchase through my links, at no extra cost to you.
Frequently Asked Questions
What Are Some Easy Ice Cream Snack Recipes I Can Make at Home?
There are tons of easy ice cream snack recipes that you can whip up right in your kitchen! Think about no-churn ice cream recipes, which are perfect for those hot summer days. You can create fun combinations like banana and peanut butter ice cream or strawberry yogurt pops. These quick frozen treats are not only simple but also delicious and refreshing!
How Can I Make Healthy Ice Cream Snacks for Kids?
Making healthy ice cream snacks for kids is a breeze! Use ingredients like frozen fruits, yogurt, and natural sweeteners to create tasty treats. For example, blend frozen mango with Greek yogurt for a creamy, fruity ice cream. You can also get creative with homemade ice cream toppings, like crushed nuts or dark chocolate chips, to add some extra flair!
What Are Some No-Churn Ice Cream Recipes That Are Kids-Friendly?
No-churn ice cream recipes are fantastic because they require minimal effort! A favorite among kids is vanilla ice cream with cookie crumbles. Just mix heavy cream, sweetened condensed milk, and vanilla extract, then fold in crushed cookies before freezing. It’s a hit for summer dessert ideas that kids will love and get involved in making!
Can I Use Alternative Ingredients to Make Ice Cream Healthier?
Absolutely! You can easily swap out traditional ingredients for healthier options in your ice cream recipes. For instance, try using coconut milk instead of heavy cream for a dairy-free version, or opt for honey or maple syrup instead of sugar. This way, you can enjoy delicious ice cream snacks while keeping them nutritious and kid-friendly!
What Are Some Quick Frozen Treats I Can Prepare in Advance?
Quick frozen treats are perfect for those busy days! You can prepare yogurt-covered fruit bites or frozen banana pops in advance. Just dip slices of banana in yogurt, freeze them, and enjoy a refreshing snack anytime. These treats are not only easy to make but also a great way to get kids excited about healthy snacks during the summer!
Related Topics
easy ice cream snacks
no-churn ice cream
healthy desserts
summer treats
quick frozen desserts
kids-friendly recipes
homemade toppings
simple snacks
fun summer recipes
make-at-home ice cream
frozen treats for kids
easy dessert ideas