Eating healthy can sometimes feel like a challenge, especially if you have picky eaters at home. I created this post because I understand how hard it can be to find snacks that everyone will enjoy. There’s nothing worse than putting time and effort into a snack, only to have it met with scrunched noses and dramatic “yucks.” After going through that more times than I can count, I decided it was time to share some tasty options that even the pickiest of eaters will love.
If you’re a parent, caregiver, or anyone living with picky eaters, this post is for you. You want to provide snacks that are not only healthy but also appealing to those who tend to turn their noses up at anything green or unfamiliar. You need options that keep your loved ones satisfied and nourished without the daily battle over what goes into their mouths. Trust me, I’ve been there!
In this blog post, you’ll find 30+ healthy snack recipes that are simple, fun, and absolutely delicious. Each recipe is designed with picky eaters in mind, so you won’t have to worry about a snack being pushed aside. Whether it’s crunchy, creamy, or sweet, there’s something here for everyone. Plus, these snacks are easy to prepare, making them perfect for busy days when you need something quick and nutritious.
So, get ready to discover snacks that will brighten your kitchen and keep everyone happy. With these recipes, you’ll not only have a variety of tasty options at your fingertips but also feel good knowing you’re serving up something healthy. Let’s dive in and turn snack time into a joyful experience for picky eaters everywhere!
1. Apple and Almond Butter Sandwiches

Snack time can be a challenge, especially with picky eaters. But here’s a fun and healthy option: Apple and Almond Butter Sandwiches! These delicious bites combine the crispness of fresh apples with the creamy texture of almond butter. The sweetness of the apple pairs perfectly with the nutty flavor, making it a favorite for kids and adults alike. Plus, they are gluten-free and quick to prepare, so you can whip them up in no time!
Overview
– Servings: 2
– Prep Time: 5 minutes
– Total Time: 5 minutes
– Calories: Approximately 200
Nutritional Information
– Protein: 4g
– Carbohydrates: 30g
– Healthy Fats: 12g
– Fiber: 5g
Ingredients
– 1 large apple
– 2 tablespoons almond butter
– Optional: cinnamon for sprinkling
Instructions
1. Start by washing and coring the apple, then slice it into thin rounds.
2. Spread a tablespoon of almond butter on one side of each apple slice.
3. Pair the slices together to create a sandwich, with the almond butter facing inward.
4. If you like, sprinkle a bit of cinnamon on the apple slices for added flavor.
5. Serve these snacks immediately, or pack them for a tasty on-the-go treat!
Tips
– Choose your favorite nut or seed butter, like peanut or sunflower seed butter, for variety.
– Prevent browning by dipping the apple slices in lemon juice before putting them together.
FAQ
– Can I use another fruit? Yes! Pears and bananas also make great substitutes.
Let your kids get involved in making these sandwiches. They’ll love picking their favorite fruits and spreading the almond butter, making snack time both fun and healthy!

SCRUMPTIOUSLY SMOOTH: Contains a 10-ounce jar of classic, smooth and spreadable Barney Bare Smooth Almond Butter with NO added sugar or salt. We blanch fresh almonds in small batches to remove gritty skins for an ultra-smooth, creamy texture

Pure almond butter made with 100% almonds

CRISPY BISCUIT SANDWICHES: Wholesome, creamy almond butter biscuits made with whole grain oats; A must-have for an on-the-go snack or in a lunch box
Apple and Almond Butter Sandwiches
Editor’s Choice

Spread The Love UNSALTED CRUNCH Almond Butter, All Natural, Vegan, Glute…

KitchenAid KE305OHERA Classic Fruit Slicer, One Size, Red

Simply Organic Ceylon Ground Cinnamon, 2.08 Ounce, Non-GMO Organic Cinna…
2. Veggie Sticks with Hummus

Veggie sticks with hummus are a fantastic snack option for picky eaters. Kids love the crunch, while the creamy hummus adds a delightful twist. Picture vibrant bell peppers, crisp cucumbers, and sweet carrots all lined up on a plate. Their bright colors make this snack not only tasty but also visually appealing. You can find variations of hummus that add exciting flavors, making vegetables much more inviting.
To whip up this healthy snack, you don’t need much time. Simply chop your favorite veggies and serve them with hummus at the center of the table. If you want to keep it budget-friendly, use store-bought hummus or make your own with just a few ingredients. This simple act of dipping encourages kids to engage with their food and explore different flavor combinations, making snack time fun!
Ingredients List
– 1 cup assorted veggie sticks (carrots, cucumbers, bell peppers)
– 1 cup hummus (store-bought or homemade)
Step-by-Step Instructions
1. Wash the vegetables and peel them if necessary.
2. Cut the veggies into sticks — think about 4 inches long.
3. Place the veggie sticks in a bowl or on a plate.
4. Serve with a bowl of hummus in the center.
5. Invite kids to dip their veggies and mix flavors as they like.
Tips
– Choose different hummus flavors like roasted garlic or spicy red pepper for variety.
– Cut the veggies into fun shapes, like stars or hearts, to grab kids’ attention.
FAQ
– Can I prep this snack ahead of time?
Absolutely! Just store the veggie sticks in an airtight container in the fridge to keep them fresh.
Enjoy watching your kids dive into this colorful snack while they explore new tastes and textures. This crunchy and creamy combination is sure to be a favorite in your home!

SWEET STRAWBERRY FLAVOR: Enjoy the taste of fresh strawberries and creamy coconut. With no added sugar (not a low-calorie food, see nutritional facts) and zero artificial ingredients, our organic kids' snacks are the perfect healthy treat.

Twisted fruit bites are way too good to be this good; Open a pouch of Pure Organic Blueberry Raspberry or Peach Mango snacks for a combo of flavors in one tasty treat
MIXED BERRY OATY BITES: Beech-Nut Oaty Bites are a deliciously chewy, bite-sized snack for toddlers made with fruit and 8 grams of whole grains per serving. Great for self-feeding and snacking on the go, Oaty Bites are softer than traditional granola bites, making them easier for young toddlers to chew.
Veggie Sticks with Hummus
Editor’s Choice


Food Processor Electric Food Chopper Vegetable Chopper Slicer Chopp, Sli…

Bento Box Adult Lunch Box, Containers for Adults Men Women with 4 Compar…
3. Banana Oatmeal Cookies

Banana oatmeal cookies are a delightful way to turn overripe bananas into a healthy snack your kids will love! These cookies are naturally sweetened and full of chewy oats, making them both tasty and filling. Plus, they’re simple to whip up, so your little helpers can join in the fun of baking!
Imagine the warm scent of freshly baked cookies wafting through your kitchen. With just a few ingredients, you can create a delicious treat that serves as a quick snack or a fun dessert. Let’s dive into how to make these easy banana oatmeal cookies!
Ingredients List
– 2 ripe bananas, mashed
– 1 cup rolled oats
– Optional: a handful of chocolate chips or dried fruits
Step-by-Step Instructions
1. Preheat your oven to 350°F (175°C).
2. In a mixing bowl, mash the bananas until smooth.
3. Stir in the rolled oats until well combined.
4. If you like, add chocolate chips or dried fruits and mix thoroughly.
5. Scoop tablespoon-sized portions onto a baking sheet lined with parchment paper.
6. Bake for about 15 minutes or until the edges turn golden brown.
7. Let the cookies cool before enjoying!
Tips for Success
– Add a pinch of cinnamon or a splash of vanilla extract for extra flavor.
– Store your cookies in an airtight container to keep them fresh for up to a week.
FAQ
– Can I freeze these cookies? Absolutely! They freeze well for up to three months. Just thaw them when you’re ready to enjoy a tasty snack.
These banana oatmeal cookies are not just another treat. They offer a healthy energy boost, making them perfect for after school or before sports. Enjoy baking and sharing this wholesome snack with your family!

Includes 16 (0.53oz) bags of bared Baked Crunchy Fruit

100% REAL FRUIT: That’s it. Organic Fruit Crunchables deliver the pure, natural taste of real fruit. These snacks are ideal for kids ages 2+ and adults

KID-FRIENDLY: This crispy, gooey snack bar makes a delicious snack that littles will love
Banana Oatmeal Cookies
Editor’s Choice

Amazon Basics Silicone Rectangular Baking Mat, Non-Stick Reusable Oven B…

Cookie Scoop Set, Include 1 Tbsp/2 Tbsp/3 Tbsp, Cookie Scoops for Baking…

Umite Chef Mixing Bowls with Airtight Lids Set, 8PCS Stainless Steel Kha…
4. Yogurt Parfaits

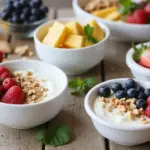
Yogurt parfaits are a fun and healthy snack that even picky eaters can enjoy. They’re colorful, tasty, and packed with nutrients. You can easily customize each parfait with your kids’ favorite ingredients. Imagine creamy yogurt layered with juicy berries, crunchy granola, and maybe a sprinkle of nuts. The combination of flavors and textures makes these parfaits a hit!
Let’s get into how to make these delightful treats. You can whip them up in just five minutes, making them perfect for busy afternoons or quick breakfasts. Plus, they’re great for teaching kids about healthy eating. You can involve them in the process and let them choose their favorite toppings!
Overview
– Servings: 2
– Prep Time: 5 minutes
– Total Time: 5 minutes
– Calories: Approximately 150
Nutritional Information
– Protein: 10g
– Carbohydrates: 20g
– Healthy Fats: 5g
– Fiber: 3g
Ingredients
– 1 cup yogurt (Greek or plant-based)
– ½ cup mixed berries (strawberries, blueberries, raspberries)
– ¼ cup granola
Instructions
1. Start by adding half of the yogurt into a clear glass or bowl.
2. Layer in half of the mixed berries on top of the yogurt.
3. Sprinkle a layer of granola over the berries.
4. Repeat the layering process with the remaining yogurt, berries, and granola.
5. Serve right away for a refreshing and satisfying snack!
Tips
– Use seasonal fruits for the best taste and freshness.
– Get creative! Let your kids build their own parfaits with their favorite toppings.
FAQ
– Can I use frozen fruits? Yes! Just let them thaw a bit for better texture.
Yogurt parfaits not only satisfy sweet cravings but also offer a delicious way to sneak in nutrients. They’re a fantastic option for breakfast or a quick snack that feels special. Enjoy making and sharing these with your family!


Melty kids multivitamin: Renzo’s sugar-free dissolvable melty tabs are a healthy, melty and delicious way for kids to get the vitamins they need; say goodbye to sugary kids multivitamin gummies and yucky liquids with sugar-free kids vitamins

Yogurt Parfaits
Editor’s Choice


Nature Valley Protein Granola, Oats and Honey Granola, Resealable Snack …

Sun-Maid Dried Mixed Berries – 15 oz Resealable Bag – Dried Cranberries,…
5. Avocado Toast Bites

Avocado toast bites are a delightful twist on a timeless favorite. Kids adore these tasty little snacks that are both fun to eat and healthy. You simply spread creamy mashed avocado on whole-grain bread and cut it into playful shapes. Add colorful toppings like cherry tomatoes or radishes to make each bite even more inviting. Not only are these bites delicious, but they also provide essential healthy fats for your growing children.
Overview
– Servings: 2
– Prep Time: 10 minutes
– Total Time: 10 minutes
– Calories: Approximately 180
Nutritional Information
– Protein: 4g
– Carbohydrates: 20g
– Healthy Fats: 10g
– Fiber: 6g
Ingredients List
– 2 slices whole-grain bread
– 1 ripe avocado
– Cherry tomatoes or radishes, sliced
Step-by-Step Instructions
1. Toast the bread slices until they’re golden brown and crisp.
2. In a bowl, mash the ripe avocado with a fork until it’s smooth. If you like, add a pinch of salt for flavor.
3. Generously spread the mashed avocado on each slice of toast.
4. Use cookie cutters to create fun shapes from the toast for an exciting presentation.
5. Top each piece with slices of vibrant cherry tomatoes or crunchy radishes for a colorful touch.
6. Serve them as finger foods for a delightful snack!
Tips
– Squeeze a bit of lemon juice into the avocado to brighten the flavor and slow down browning.
– Get creative with toppings! Try adding shredded carrots or cucumber slices for extra crunch.
FAQ
– Can I use gluten-free bread?
Absolutely! Any type of bread works well for this recipe.
Avocado toast bites are not just trendy; they’re a hit at snack time. With their rich flavors and nutritious ingredients, they make for the perfect guilt-free treat for kids and adults alike!


Premium Stainless Steel:Made of 18/8 stainless steel, easy to clean, dishwasher safe, rust-proof. High quailty material making them strong so they keep their shape and long usage time.

Avocado Toast Bites
Editor’s Choice

Halloween Cookie Cutters Set – 12 Pieces Stainless Steel Halloween Cooki…


Dave’s Killer Bread 21 Whole Grains & Seeds Thin-Sliced, Whole Grain Org…
6. Sweet Potato Fries

Sweet potato fries are a fantastic way to make snack time healthier. Kids love their natural sweetness and crispy texture. Plus, you can easily customize these fries to match any flavor preference. Baking them gives you that satisfying crunch without the extra oil. You’ll find that these are not just a hit with kids but adults will enjoy them too!
Overview
– Servings: 4
– Prep Time: 15 minutes
– Cook Time: 25 minutes
– Total Time: 40 minutes
– Calories: Approximately 150
Nutritional Information
– Protein: 2g
– Carbohydrates: 27g
– Healthy Fats: 5g
– Fiber: 4g
Ingredients List
– 2 large sweet potatoes
– 1 tablespoon olive oil
– Salt and pepper to taste
– Optional: paprika or garlic powder for an extra kick
Step-by-Step Instructions
1. Preheat your oven to 425°F (220°C). This helps get the fries nice and crispy.
2. Peel the sweet potatoes and slice them into fry shapes. Aim for uniform thickness for even cooking.
3. In a bowl, mix the sweet potato fries with olive oil, salt, pepper, and any spices you like. Paprika adds a nice smoky flavor if you want to spice things up!
4. Spread the fries in a single layer on a baking sheet. Don’t overcrowd them; this helps them crisp up.
5. Bake for about 25 minutes, flipping halfway through for even browning. They should be golden and crunchy when done.
6. Serve them warm with your favorite dipping sauce, like ketchup or yogurt dip!
Tips
– Soak the fries in water for 30 minutes before baking. This tricks them into getting extra crispy!
– Choose different seasonings to keep things fun. Try cinnamon for a sweet twist or chili powder for heat.
FAQ
– Can I use other root vegetables?
Yes, carrots and parsnips also work wonderfully in this recipe!
These sweet potato fries are a delicious and nutritious option that even picky eaters will appreciate. They’re easy to make and perfect for any snack time!

10 individual squeeze packs (1.15oz each) of Justin's naturally delicious Honey Peanut Butter, perfect for on-the-go

Includes ten 1.15-Ounce Squeeze Packs of Classic Peanut Butter Spread, made with only two ingredients in a convient package with incredible texture and taste. Our squeeze packs are ready to enjoy at home or on-the-go wherever the day takes you. Squeeze on toast, fruit, or right out of the pack into your mouth!

ONLY ONE INGREDIENT: The only ingredient you will find in our Almond Butter is 100% organic, pure almonds—no additives of any kind and never palm oil. Simplicity at its best.
Sweet Potato Fries
Editor’s Choice

SupMaKin Safe Mandoline Slicer for Kitchen, Potato Slicer for Chips, Veg…

GoodCook Everyday Nonstick Carbon Steel Baking Sheet Set, 3 Pack – Small…

TrendPlain 16oz/470ml Glass Olive Oil Sprayer for Cooking – 2 in 1 Olive…
7. Cheesy Cauliflower Bites

Cheesy cauliflower bites are the ultimate solution for parents struggling to get their little ones to eat more veggies. These scrumptious, bite-sized snacks satisfy cheesy cravings while sneaking in the goodness of cauliflower. Plus, they’re easy to make and even more fun to eat! Your kids will love these crispy treats, and you’ll love how simple they are to whip up.
Let’s dive into the details of this delicious recipe. You’ll need just a handful of ingredients. With a prep time of only 10 minutes and a cooking time of 20 minutes, you’ll have a healthy snack ready in no time. Here’s what you need:
Ingredients List
– 1 head cauliflower, cut into florets
– 1 cup shredded cheese (cheddar is a favorite)
– 1/2 cup breadcrumbs
– 1 egg
– Salt and pepper to taste
Step-by-Step Instructions
1. Preheat your oven to 400°F (200°C).
2. Steam the cauliflower florets until tender, about 5-7 minutes.
3. In a large bowl, mix together the steamed cauliflower, cheese, breadcrumbs, egg, salt, and pepper until well combined.
4. Form small balls from the mixture and place them on a baking sheet lined with parchment paper.
5. Bake for 20 minutes or until they turn golden brown.
6. Let them cool slightly before serving.
These bites can be made ahead of time. If you’re busy, freeze them before baking. Just pop them in the oven when you’re ready for a quick snack.
Tips
– Choose different cheeses for unique flavors.
– Serve with marinara sauce for a fun dipping option.
With cheesy cauliflower bites, you can transform the way your kids see vegetables. They’ll love the taste, and you’ll love knowing they’re eating something healthy. Enjoy these snacks at any time of the day!

DELICIOUSLY fun snack for kids and grown-ups

12 BARS VARIETY PACK: We’re packing 2 REAL fruit servings in a delicious, chewy fruit bar that delights your taste buds and provides your body the daily nutrition it needs. No preservatives, added sugar, concentrates or purees. Just 100% delicious.

Cheesy Cauliflower Bites
Editor’s Choice
Amazon Basics Silicone Rectangular Baking Mat, Non-Stick Reusable Oven B…

Vegetable Steamer Basket, Premium Stainless Steel Veggie Steamer Basket …

Urbanstrive Cheese Grater With Container Box Grater Stainless Steel Grat…
8. Energy Bites

Energy bites are the ultimate grab-and-go snack for busy kids. They’re easy to whip up and packed with nutrition. Imagine a tasty treat made from wholesome oats, creamy nut butter, and a dash of honey. These delightful bites not only satisfy sweet cravings but also deliver a quick energy boost when kids need it most. Get your kids involved in the kitchen for a fun bonding moment as you make these no-bake goodies together!
Overview
– Servings: 12
– Prep Time: 15 minutes
– Total Time: 15 minutes
– Calories: About 100 per bite
Nutritional Information
– Protein: 3g
– Carbohydrates: 12g
– Healthy Fats: 5g
– Fiber: 2g
Ingredients List
– 1 cup rolled oats
– 1/2 cup nut butter (peanut or almond)
– 1/4 cup honey or maple syrup
– 1/4 cup mini chocolate chips or dried fruits
Step-by-Step Instructions
1. In a large mixing bowl, combine the rolled oats, nut butter, honey, and chocolate chips or dried fruits. Stir until everything is well incorporated.
2. With clean hands, roll the mixture into small balls, about the size of a tablespoon.
3. Place the energy bites on a baking sheet lined with parchment paper.
4. Refrigerate for about 30 minutes to let them firm up.
5. Store your energy bites in an airtight container in the fridge for a quick and tasty snack anytime!
Tips
– Add extras like chia seeds or shredded coconut for extra flavor and nutrition.
– Adjust the size of the bites based on your kids’ preferences; smaller bites are easy for little hands to grab!
FAQ
– How long do they last in the fridge? These energy bites can last up to a week, making them a perfect make-ahead snack!
These energy bites are not just delicious; they’re also a fantastic choice for after school or as a pre-workout snack. Enjoy the fun of making them together, and watch your kids devour this healthy treat!

40 CT SNACK BOX - Contains 40 Ct of 0.8oz Snack Packs of Welch's Fruit Snacks in delicious Berries 'N Cherries flavor in a standard cardboard box

FRUIT IS OUR ONLY INGREDIENT: Finally, a real fruit snack that kids of all ages love, made with 100% apples That’s it Apple Crunchable are perfect for children aged 2 and up, healthy snacks for kids.

60 CT SNACK BOX - Contains 60Ct of 0.8oz Snack Packs of Welch's Fruit Snacks in a delicious combo of Mixed Fruit & Strawberry flavors
Energy Bites
Editor’s Choice

Quaker Old Fashioned Rolled Oats, Non GMO Project Verified, Two 64oz Bag…


Nate’s 100% Pure, Raw & Unfiltered Honey – Award-Winning Taste, 32oz. Sq…
9. Cucumber Sushi Rolls

Who says sushi has to be complicated? Cucumber sushi rolls are a simple and enjoyable way to introduce healthy snacks to your picky eaters. By using fresh cucumbers as the base, you can fill them with creamy cheese and their favorite veggies or meats. This crunchy treat not only tastes great but also gets your kids involved in the kitchen!
Here’s a quick overview of this fun recipe:
Overview
– Servings: 4
– Prep Time: 10 minutes
– Total Time: 10 minutes
– Calories: Approximately 80
Nutritional Information
– Protein: 4g
– Carbohydrates: 6g
– Healthy Fats: 5g
– Fiber: 2g
Ingredients List
– 1 large cucumber
– 1/2 cup cream cheese
– 1/2 cup assorted fillings (like sliced bell peppers, carrots, or turkey)
Step-by-Step Instructions
1. Slice the cucumber in half lengthwise and scoop out the seeds to create a hollow tube.
2. Spread cream cheese evenly inside the cucumber halves.
3. Add the assorted veggies or deli meat, pressing gently to pack it in.
4. Slice into bite-sized pieces for easy handling.
5. Serve as finger foods for a playful sushi experience!
Tips
– Choose a mix of colorful fillings to make the rolls visually appealing.
– Drizzle a little soy sauce or sprinkle sesame seeds on top for extra flavor.
FAQ
– Can I prepare these in advance? Yes, wrap them tightly in plastic wrap and refrigerate until you’re ready to serve!
Cucumber sushi rolls offer a delightful way for kids to explore new flavors while having fun in the kitchen. These fresh, crunchy bites are not just snacks; they are perfect for sparking creativity and encouraging healthy eating habits!


Cucumber Sushi Rolls
Editor’s Choice
Bento Box Adult Lunch Box, Containers for Adults Men Women with 4 Compar…

Butter Knives 4 Pieces Stainless Steel Cheese Butter Spreader Knife Set …
10. Peanut Butter Banana Smoothie

Whip up a delightful Peanut Butter Banana Smoothie that your picky eaters will adore! This smoothie is not just a treat; it’s a powerhouse of nutrition. The creamy blend of peanut butter and ripe bananas creates a sweet, satisfying flavor that kids crave. Plus, it’s quick to make, making it a perfect option for breakfast or a snack. You can even sneak in some spinach for an extra boost of vitamins without altering the taste!
Overview
– Servings: 2
– Prep Time: 5 minutes
– Total Time: 5 minutes
– Calories: About 250
Nutritional Information
– Protein: 8g
– Carbohydrates: 30g
– Healthy Fats: 10g
– Fiber: 3g
Ingredients List
– 2 ripe bananas
– 2 tablespoons peanut butter
– 1 cup almond milk or any plant-based milk
– Optional: a handful of spinach or a scoop of protein powder
Step-by-Step Instructions
1. Slice the ripe bananas and add them to your blender.
2. Spoon in the peanut butter and pour in the almond milk.
3. If you’re feeling adventurous, toss in a handful of fresh spinach or a scoop of protein powder for added nutrition.
4. Blend everything until it’s smooth and creamy.
5. Pour into glasses and enjoy immediately!
Tips
– Freeze your bananas beforehand for a frosty, thicker smoothie.
– Top with sliced bananas or a drizzle of honey to add a sweet finish.
FAQ
– Can I make this ahead of time?
While it’s best fresh, you can keep it in the fridge for a few hours if needed.
This Peanut Butter Banana Smoothie is a delicious way to keep your kids energized and happy throughout their busy day!

✅【Food Grade Stainless Steel】The numbers cookie cutter are made of food grade stainless steel, not harm for body. These cutters are reusable, Not easy to bend and deform, no rough edges and welds, can make cookies with your kids.

Four Leaf Clover Design For Festive Fun: Celebrate St. Patrick’s Day or Irish-themed gatherings with this charming 3-piece shamrock cookie cutter set for cookies, sandwiches, and more, each St Patricks day clover mold brings a lucky touch to your table
Peanut Butter Banana Smoothie
Editor’s Choice

Ninja BL660 Professional Compact Smoothie & Food Processing Blender, 110…

PBfit 30 Ounce Classic Peanut Butter Powder, Powdered Peanut Butter Spre…

Orgain Organic Vegan Protein + 50 Superfoods Powder, Creamy Chocolate Fu…
11. Frozen Yogurt Bark

Frozen yogurt bark is a delightful treat that your kids can make all on their own! It’s cool, creamy, and perfect for those hot summer days. Imagine spreading a layer of yogurt on a baking sheet and letting your little ones sprinkle their favorite toppings. You can use colorful berries, crunchy granola, or even a sweet drizzle of honey. Once frozen, break it into fun pieces. This snack not only satisfies their sweet tooth but also packs a nutritious punch!
Here’s how you can whip it up:
Overview
– Servings: 4
– Prep Time: 15 minutes
– Freeze Time: 2 hours
– Total Time: 2 hours 15 minutes
– Calories: Approximately 120
Nutritional Information
– Protein: 6g
– Carbohydrates: 15g
– Healthy Fats: 3g
– Fiber: 2g
Ingredients
– 2 cups yogurt (any flavor you like)
– 1/2 cup assorted toppings (think berries, granola, nuts)
Instructions
1. Start by lining a baking sheet with parchment paper.
2. Spread the yogurt evenly across the sheet, making a nice layer.
3. Let your kids sprinkle their favorite toppings over the yogurt.
4. Place the baking sheet in the freezer for at least 2 hours until it’s solid.
5. Once frozen, break it into fun, bite-sized pieces and serve!
Tips for Making It Extra Special
– Choose Greek yogurt for a protein boost.
– Try mixing different yogurt flavors for variety.
FAQ
– How long will it last? Store the bark in an airtight container in the freezer for up to a month.
This frozen yogurt bark is not just a snack; it’s an opportunity for your kids to get creative in the kitchen. Enjoy making this cool treat together!
Frozen Yogurt Bark
Editor’s Choice

FAGE Total Greek Yogurt, 0% Nonfat, Plain, 32 oz


Reynolds Kitchens Unbleached Parchment Paper Roll, Non Stick Parchment P…
12. Whole Wheat Pita Chips

Whole wheat pita chips are a fantastic snack that even picky eaters will enjoy. These crunchy delights are easy to whip up at home, and the best part? They’re baked, not fried, making them a healthier option. Imagine dipping these crispy chips into creamy guacamole or tangy yogurt. Kids will love the fun of dipping, and you’ll love how simple they are to make!
Let’s get started! First, here’s what you’ll need:
Ingredients:
– 4 whole wheat pitas
– 2 tablespoons olive oil
– Salt to taste
– Optional: garlic powder or your favorite herbs for extra flavor
Instructions:
1. Preheat your oven to 375°F (190°C).
2. Cut each whole wheat pita into triangles. Think of making pizza slices!
3. Toss the pita pieces in olive oil and sprinkle with salt. For a flavor boost, add garlic powder or herbs.
4. Spread the pita pieces on a baking sheet in a single layer.
5. Bake for about 15 minutes or until they’re golden and crispy.
6. Let them cool a bit before serving with your favorite dip.
Storage Tips:
– Store any leftovers in an airtight container to keep them crispy for days.
– Experiment with different spices like paprika or Italian seasoning for new flavors.
FAQs:
– Can I make these in advance? Yes! They stay fresh for a few days, making them perfect for snack prep.
Making these pita chips can be a fun activity with your kids. They’ll enjoy helping out, and you’ll get a healthy snack that everyone can feel good about. So, gather your ingredients and get ready for a crunchy treat that’s sure to please!
Whole Wheat Pita Chips
Editor’s Choice

Joseph’s Bakery Whole Wheat Pita Bread, 1-Pack, Fresh Baked (4 Pitas per…

Pompeian USDA Certified Organic Extra Virgin Olive Oil Non-Stick Cooking…

The Spice Lab Complete Organic Spices and Seasonings Set – 30 Jar Spice …
13. Stuffed Mini Peppers

Stuffed mini peppers are a delightful way to sneak some healthy veggies into your child’s snack routine. These bright, colorful bites can be filled with a variety of tasty ingredients. Picture creamy cheese, zesty hummus, or even flavorful bean dips. Kids love their fun size and vibrant colors, making them perfect for little hands. Plus, they’re incredibly easy to prepare, turning snack time into a mini cooking adventure!
Recipe Overview
– Servings: 4
– Prep Time: 10 minutes
– Total Time: 10 minutes
– Calories: About 100
Nutritional Highlights
– Protein: 3g
– Carbohydrates: 10g
– Healthy Fats: 6g
– Fiber: 2g
Ingredients
– 12 mini sweet peppers
– 1/2 cup cream cheese or hummus
– Optional: herbs or spices for extra flavor
How to Make Stuffed Mini Peppers
1. Start by washing the mini peppers. Slice them in half and remove the seeds.
2. In a mixing bowl, blend your cream cheese or hummus with any herbs or spices you like.
3. Spoon the mixture into each pepper half, filling them generously.
4. Chill in the fridge for a refreshing touch before serving.
Helpful Tips
– Choose colorful peppers to make the snack visually appealing.
– Serve with toothpicks for added fun and easy handling.
Frequently Asked Questions
Can I use different fillings?
Absolutely! You can get creative with your choices. Try different dips or even shredded chicken for a twist!
These stuffed mini peppers are more than just a healthy snack. They’re a colorful burst of flavor that will excite your kids and keep them energized throughout the day!
Stuffed Mini Peppers
Editor’s Choice

CHGCRAFT 36Pcs 3Colors Mini Artificial Bell Peppers Miniature Sweet Pepp…

Pace Medium Queso Blanco Cheese Dip, 15 oz (Pack of 2)

Mezete Hummus Variety Pack | Authentic Middle Eastern | Free from Preser…
14. Oatmeal Pancakes

Oatmeal pancakes are a fantastic option for anyone looking to please picky eaters while serving up a nutritious meal. These fluffy delights are not only tasty but also packed with fiber and protein. Imagine starting your day with a warm plate of pancakes topped with fresh fruit and a drizzle of maple syrup. It’s a breakfast that feels like a treat but is healthy enough for everyday enjoyment!
Here’s how to whip up this quick and healthy dish. You’ll need just a few simple ingredients that you likely already have at home. Plus, they’re easy to prepare, making them a great choice for busy mornings or a fun snack any time of day. Let’s break down the recipe so you can get cooking!
Ingredients
– 1 cup rolled oats
– 1 cup milk (choose dairy or a plant-based option)
– 1 egg
– 1 teaspoon baking powder
– Optional: your favorite fruits for topping
Instructions
1. Start by blending the oats, milk, egg, and baking powder until smooth.
2. Heat a non-stick skillet over medium heat.
3. Pour the batter into the skillet, making pancakes of your desired size.
4. Cook until bubbles form on the surface, then flip and cook until golden brown.
5. Serve warm, topped with fruits or a drizzle of syrup.
Tips
– Add mashed bananas or berries to the batter for extra sweetness.
– Freeze leftovers! Just reheat them when you’re ready to eat.
FAQ
– Can I make these gluten-free? Absolutely! Just use gluten-free oats for a safe option.
These oatmeal pancakes are not just a snack; they’re a versatile meal that kids will adore at breakfast, lunch, or even dinner. Enjoy this simple recipe that brings health and flavor together!
Oatmeal Pancakes
Editor’s Choice

CAROTE Nonstick Frying Pan Skillet,Non Stick Granite Fry Pan Egg Pan Ome…
Quaker Old Fashioned Rolled Oats, Non GMO Project Verified, Two 64oz Bag…
Ninja BL660 Professional Compact Smoothie & Food Processing Blender, 110…
15. Chocolate Avocado Mousse

Indulge in a delightful treat that’s not only delicious but also nutritious! Chocolate avocado mousse is a game-changer for kids who turn their noses up at healthy snacks. This creamy dessert combines the rich taste of chocolate with the goodness of ripe avocados. The best part? They won’t even know they’re eating something good for them!
Overview
– Servings: 4
– Prep Time: 10 minutes
– Total Time: 10 minutes
– Calories: About 150
Nutritional Information
– Protein: 2g
– Carbohydrates: 18g
– Healthy Fats: 9g
– Fiber: 5g
Ingredients
– 2 ripe avocados
– 1/4 cup cocoa powder
– 1/4 cup honey or maple syrup
– 1 teaspoon vanilla extract
How to Make It
1. Start by scooping the ripe avocados into a blender or food processor. Blend until smooth.
2. Add the cocoa powder, honey, and vanilla extract to the avocados.
3. Blend everything until it’s creamy and well mixed.
4. Spoon the mousse into small serving dishes. Chill them in the fridge for a while.
5. Before serving, top with fresh berries or nuts for an extra touch!
Pro Tips
– Use ripe avocados for the best texture and flavor.
– This mousse stays fresh in the fridge for a couple of days, making it perfect for meal prep.
FAQs
– Can I use other sweeteners?
Absolutely! Try agave or stevia for a different taste.
This chocolate avocado mousse is a fun way to sneak in healthy ingredients. Kids will love the creamy texture and chocolatey flavor, making it a go-to snack they’ll request time and again. Enjoy this guilt-free dessert that’s sure to impress!
Chocolate Avocado Mousse
Editor’s Choice

HERSHEY’S Natural Unsweetened Cocoa Powder Can, 8 oz

Hamilton Beach Food Processor & Vegetable Chopper for Slicing, Shredding…

50 Pack (100-Piece) 24 oz Meal Prep Containers Reusable with Lids, Sturd…
16. Rice Cake Sandwiches

Imagine snack time made easy and fun with rice cake sandwiches! These delicious bites are perfect for picky eaters and let kids explore their taste buds. Start with a crunchy rice cake as your base. Spread their favorite toppings, like creamy nut butter, smooth cream cheese, or even creamy avocado. Then pile on some fresh fruit slices or sprinkle granola for that delightful crunch. It’s a snack that’s not just tasty, but also sparks creativity in the kitchen!
Overview
– Servings: 2
– Prep Time: 5 minutes
– Total Time: 5 minutes
– Calories: About 150
Nutritional Information
– Protein: 4g
– Carbohydrates: 20g
– Healthy Fats: 6g
– Fiber: 3g
Ingredients List
– 2 plain rice cakes
– 2 tablespoons nut butter (like almond or peanut) or cream cheese
– Slices of fruit (banana, apple, or strawberries)
Step-by-Step Instructions
1. Take one rice cake and generously spread nut butter or cream cheese on top.
2. Layer slices of your chosen fruit on the spread.
3. Place another rice cake on top to create a sandwich.
4. Crunch into it and enjoy your quick snack!
Tips
– Mix it up! Try different toppings to keep snack time exciting.
– Invite kids to create their own combinations. It makes for a fun activity!
FAQ
– Can I use flavored rice cakes?
Absolutely! Flavored rice cakes can add a delicious twist to your sandwiches.
These rice cake sandwiches are not just a quick fix; they’re a nutritious option that encourages creativity and fun at snack time! Enjoy the crunch and variety that makes every bite special.
Rice Cake Sandwiches
Editor’s Choice

Quaker Large Rice Cakes, Gluten Free, 3 Flavor Variety Pack, 6 Count

Justin’s Classic Almond Butter, Only Two Ingredients, No Stir, Gluten-fr…

17. Spinach and Cheese Quesadillas

If you’re struggling to find snacks that picky eaters will enjoy, spinach and cheese quesadillas are here to save the day! These delicious bites combine gooey melted cheese with fresh spinach, making them both tasty and nutritious. Kids love to dip them in salsa or guacamole, adding a fun twist to snack time!
Here’s how to whip up these easy quesadillas:
Ingredients List
– 4 whole-wheat tortillas
– 1 cup fresh spinach, chopped
– 1 cup shredded cheese (cheddar or mozzarella)
Step-by-Step Instructions
1. Heat a non-stick skillet over medium heat.
2. Place one tortilla in the skillet and sprinkle half of the cheese and spinach on one side.
3. Fold the tortilla in half and cook for 2-3 minutes on each side until golden brown.
4. Repeat with the remaining tortillas.
5. Cut each quesadilla into wedges and serve with salsa or guacamole.
Tips
– Add cooked chicken or black beans for extra protein.
– Try mixing different cheeses for a flavor boost!
You can even customize these quesadillas to suit your child’s taste. Use different veggies or spices to keep things interesting. They are quick to make and packed with nutrients, making them perfect for after-school snacking or lunchboxes. With just a few ingredients and simple steps, you can create a snack that satisfies even the pickiest of eaters!
Stuck with picky eaters? Spinach and cheese quesadillas prove that healthy snack recipes for picky eaters can be delicious. Chop spinach fine, melt it with cheddar, and serve with salsa—watch them dip, smile, and ask for seconds.
Spinach and Cheese Quesadillas
Editor’s Choice
CAROTE Nonstick Frying Pan Skillet,Non Stick Granite Fry Pan Egg Pan Ome…

Mission 10 Inch Carb Balance Whole Wheat Tortillas LARGE Burrito 8 ct 20…

365 by Whole Foods Market Shredded Mexican Blend, 8 OZ
18. Tomato and Cucumber Salad

Imagine a snack that’s not only tasty but also bursts with color and nutrition. The Tomato and Cucumber Salad is just that! This simple dish combines juicy tomatoes with crunchy cucumbers, creating a refreshing experience for your taste buds. Perfect for picky eaters, it looks as good as it tastes, making it a winner for both kids and adults alike.
Overview
– Servings: 4
– Prep Time: 10 minutes
– Total Time: 10 minutes
– Calories: About 80
Nutritional Information
– Protein: 2g
– Carbohydrates: 9g
– Healthy Fats: 4g
– Fiber: 2g
Ingredients List
– 2 large tomatoes, diced
– 1 cucumber, diced
– 1 tablespoon olive oil
– 1 tablespoon apple cider vinegar
– Salt and pepper to taste
Step-by-Step Instructions
1. Start by placing the diced tomatoes and cucumber in a large mixing bowl.
2. Drizzle olive oil and apple cider vinegar over the veggies to add flavor.
3. Sprinkle with salt and pepper to taste.
4. Gently toss the ingredients together until everything is well coated.
5. Serve immediately, or chill it in the fridge for a refreshing twist!
Tips
– Add feta cheese for a salty kick.
– Choose colorful cherry tomatoes for extra appeal.
FAQ
– Can I prepare this in advance?
Yes, but it tastes best when fresh!
This salad is not just a snack; it’s a fun way to introduce healthy eating. You can enjoy it on its own or pair it with whole-grain crackers for a satisfying crunch. Make your next snack time a hit with this easy-to-make, delicious salad!
Tomato and Cucumber Salad
Editor’s Choice

AOZITA 17oz Glass Olive Oil Bottle Dispenser – 500ml Green Oil and Vineg…

OXO Good Grips Salad Spinner | Lettuce Spinner | Fruit Washer | Fruit Wa…
![Bamboo Cutting Boards for Kitchen [Set of 3] Wood Cutting Board for Chop...](https://m.media-amazon.com/images/I/81gLwPfpWbL._AC_UL320_.jpg "30+ Healthy Snack Recipes for Picky Eaters 125")
Bamboo Cutting Boards for Kitchen [Set of 3] Wood Cutting Board for Chop…
19. Quinoa Salad Cups

Quinoa salad cups are a fun and healthy way to satisfy picky eaters! These colorful snacks use bell peppers as cups, making them not only nutritious but also exciting to eat. Packed with protein and fiber, these cups are perfect for kids who might shy away from traditional salads. Imagine your little ones munching on bright red, yellow, and green peppers filled with a tasty quinoa mixture. What a great way to make veggies appealing!
Preparing quinoa salad cups is simple and quick. You can whip them up in just 30 minutes. Plus, they are budget-friendly, using ingredients you might already have at home. You can keep them fresh in the fridge, making them perfect for after-school snacks or lunchboxes. Making healthy choices fun helps kids develop good eating habits, setting them up for a lifetime of health.
Ingredients:
– 1 cup cooked quinoa
– 2 bell peppers (any colors you like), halved and seeded
– 1/2 cup black beans, rinsed and drained
– 1/4 cup corn (canned or frozen, thawed)
– 1 tablespoon lime juice
Instructions:
1. First, cook the quinoa according to package directions and allow it to cool.
2. In a mixing bowl, combine the cooled quinoa, black beans, corn, and lime juice. Stir well to mix.
3. Next, take your bell pepper halves and stuff them generously with the quinoa mixture.
4. If you like, drizzle a little extra lime juice over the top for added flavor.
5. Serve these colorful cups chilled or at room temperature for a delightful snack!
Tips:
– Choose a mix of bell pepper colors for a vibrant display.
– Feel free to swap in any veggies your kids enjoy, like diced cucumbers or cherry tomatoes.
FAQ:
– Can I make these ahead of time? Yes! They store well in the fridge for up to a day, making meal prep easy.
These quinoa salad cups are a hit, combining taste and nutrition in a fun, hands-on way. Your kids will love making and eating them, ensuring snack time is both healthy and enjoyable!
Quinoa Salad Cups
Editor’s Choice
Bamboo Cutting Boards for Kitchen [Set of 3] Wood Cutting Board for Chop…

50 Pack (100-Piece) 32 oz Meal Prep Containers Reusable with Lids 3-Comp…

20. Apple Nachos

Are you looking for a fun, healthy snack that even picky eaters will enjoy? Look no further than apple nachos! This creative twist on a traditional snack combines the sweetness of apples with crunchy toppings. It’s an easy way to make snack time exciting. Plus, your kids can help prepare these colorful nachos, making it a great activity for playdates or family time.
Start with two large apples. Slice them into thin rounds and arrange them on a plate. Next, grab your favorite nut butter, whether it’s creamy peanut or smooth almond, and drizzle it generously over the apple slices. Now comes the fun part—sprinkle some granola on top for that perfect crunch. If you want to sweeten the deal, a light drizzle of honey adds just the right touch. Serve these vibrant nachos right away for a delightful, healthy treat!
Ingredients:
– 2 large apples
– 1/4 cup nut butter (peanut or almond)
– 1/4 cup granola
– Optional: honey for drizzling
Instructions:
1. Slice the apples into rounds and place them on a large plate.
2. Drizzle your choice of nut butter over the apple slices.
3. Evenly sprinkle granola on top for added texture.
4. If desired, drizzle honey for an extra sweetness.
5. Enjoy immediately for a fun and nutritious snack!
Tips:
– Choose a variety of apples for different flavors.
– Let kids choose their own toppings for a personal touch.
– Make it a competition to see who can create the most colorful nachos!
These apple nachos are not only tasty but packed with nutrients, making them perfect for any time of day. Whether it’s an after-school snack or a party treat, they’re sure to bring smiles all around!
Apple Nachos
Editor’s Choice


Yupik Granola Cereal, Chunky Berry Patch, 2.2 lb, a granola mix of oats,…

Hunnibi 8oz No Drip Glass Honey Dispenser with Plastic Top – Honeycomb-S…
21. Broccoli and Cheese Bites

Imagine a snack that makes vegetables fun to eat! Broccoli and cheese bites are the perfect solution for picky eaters. These bite-sized treats blend crunchy broccoli with gooey cheese and crispy breadcrumbs, making them a hit for kids and adults alike. Bake them to a golden perfection, and you have a tasty snack or appetizer that everyone will love.
Here’s how to whip up this easy recipe in no time. You only need a few ingredients, and the prep is a breeze. Plus, this dish is a fantastic way to sneak in some greens into your family’s diet. These broccoli and cheese bites are not just delicious; they’re also packed with nutrients.
Ingredients:
– 2 cups broccoli florets, steamed
– 1/2 cup shredded cheese (choose your favorite)
– 1/2 cup breadcrumbs
– 1 egg
Instructions:
1. Preheat your oven to 375°F (190°C).
2. In a mixing bowl, mash the steamed broccoli with a fork until slightly chunky.
3. Stir in the shredded cheese, breadcrumbs, and egg until everything is well combined.
4. Shape the mixture into small bites and place them on a lined baking sheet.
5. Bake for 15 minutes or until they turn golden brown.
6. Let them cool for a few minutes before serving.
Tips:
– Serve with ranch or marinara sauce for extra flavor.
– Experiment with different cheese types like cheddar or mozzarella to keep things interesting!
FAQ:
– Can you make these ahead of time? Yes! Freeze them before baking for a quick snack later.
With these broccoli and cheese bites, you’ll turn snack time into a delightful experience. They make a great side dish or a fun party appetizer. Enjoy the smiles on your kids’ faces as they munch on their veggies!
Broccoli and Cheese Bites
Editor’s Choice
Amazon Basics Silicone Rectangular Baking Mat, Non-Stick Reusable Oven B…
GoodCook Everyday Nonstick Carbon Steel Baking Sheet Set, 3 Pack – Small…
22. Coconut Chia Pudding

Coconut chia pudding is a deliciously creamy dessert that is both simple to make and incredibly satisfying. You’ll love how chia seeds transform into a delightful pudding when soaked in coconut milk. This treat is perfect as a breakfast option or a healthy snack. Add your favorite fruits on top for a burst of flavor and extra nutrients that kids will enjoy!
Overview
– Servings: 4
– Prep Time: 5 minutes
– Refrigeration Time: 4 hours (or overnight)
– Total Time: 4 hours 5 minutes
– Calories: Approximately 120
Nutritional Information
– Protein: 3g
– Carbohydrates: 10g
– Healthy Fats: 8g
– Fiber: 5g
Ingredients List
– 1/2 cup chia seeds
– 2 cups coconut milk
– 2 tablespoons maple syrup or honey
– Optional: fresh or frozen fruits for topping
Step-by-Step Instructions
1. In a mixing bowl, combine chia seeds, coconut milk, and maple syrup. Make sure to mix well to prevent clumping.
2. Cover the bowl and refrigerate for at least 4 hours, or overnight for a thicker texture.
3. Once it’s set, stir the pudding again to make it smooth. Serve it in cups and top with your favorite fruits.
Tips for Success
– Try using different types of milk, like almond or oat, to change up the flavor.
– Add toppings like nuts, granola, or coconut flakes for extra crunch.
FAQ
– Can you make this in advance? Yes! It’s fantastic for meal prepping. Just store it in the fridge and grab it when you need a quick snack.
This coconut chia pudding is not just a tasty treat; it’s a fun way to sneak in healthy fats and fiber into your kids’ diets. Enjoy this simple recipe and watch your picky eaters delight in every spoonful!
Coconut Chia Pudding
Editor’s Choice

BetterBody Foods Organic Chia Seeds 2 lbs, 32 Oz, with Omega-3, Non-GMO,…

365 by Whole Foods Market, Organic Coconut Milk, 13.5 Fl Oz

Butternut Mountain Farm Pure Vermont Maple Syrup, Grade A, Dark Color, R…
23. Honeydew Melon Pizza

Imagine transforming a simple fruit into a delightful snack that feels like a treat! The honeydew melon pizza is just that—a fun twist that kids and picky eaters will love. This creative dish uses honeydew melon slices as a base. Top them with yogurt, colorful fruits, and crunchy granola. Not only is it healthy, but it also makes snack time exciting and special!
Overview
– Servings: 2
– Prep Time: 10 minutes
– Total Time: 10 minutes
– Calories: Approximately 150
Nutritional Information
– Protein: 5g
– Carbohydrates: 25g
– Healthy Fats: 3g
– Fiber: 2g
Ingredients List
– 1 honeydew melon, sliced into rounds
– 1/2 cup yogurt (choose your favorite flavor)
– 1/4 cup assorted fruits (like berries and bananas)
– 2 tablespoons granola
Step-by-Step Instructions
1. Slice the honeydew melon into rounds, creating your “pizza” crust.
2. Spread a generous layer of yogurt over each melon slice.
3. Decorate with assorted fruits and sprinkle granola on top.
4. Cut the slices into wedges and enjoy!
Tips
– Try Different Melons: Experiment with cantaloupe or other melons for variety.
– Involve Kids: Let your kids decorate their slices. It makes the snack even more fun!
FAQ
– Can I use other types of yogurt?
Absolutely! Any flavor you like will taste great!
This honeydew melon pizza is not just a healthy option; it’s a treat for the eyes and taste buds. Perfect for playdates or casual gatherings, it brings a splash of color and joy to snack time!
Honeydew Melon Pizza
Editor’s Choice

Melon Slicer Cutter And Seed Remover, For Watermelon, Honeydew, Cantalou…

KIND Healthy Grains Clusters, Granola Variety Pack, Healthy Snacks, Good…
24. Grapes and Cheese Kabobs

Grapes and cheese kabobs make snacking a delightful experience for kids. The sweet burst of grapes paired with creamy cheese creates a fun flavor combination. Plus, the colorful skewers are visually exciting and easy to grab. These portable treats are perfect for lunchboxes, picnics, or after-school snacks. You can customize them to suit your child’s tastes too!
Overview
– Servings: 2
– Prep Time: 5 minutes
– Total Time: 5 minutes
– Calories: Approximately 150
Nutritional Information
– Protein: 5g
– Carbohydrates: 20g
– Healthy Fats: 6g
– Fiber: 1g
Ingredients List
– 1 cup grapes (choose green or red for variety)
– 1 cup cheese cubes (opt for cheddar or mozzarella)
Step-by-Step Instructions
1. Grab some small skewers or toothpicks.
2. Start by threading a grape onto the skewer.
3. Follow with a cheese cube.
4. Alternate between grapes and cheese until the skewer is filled to your liking.
5. Serve immediately or store in the fridge for a quick snack later.
Tips
– Mix different cheeses for a flavor explosion. Try pepper jack for a kick!
– Use colorful grapes—they not only look great but also add variety!
– Involve your kids in the assembly process. They’ll love creating their own kabobs.
– Add other ingredients like turkey slices or cucumber for a twist.
These kabobs are not just easy to prepare; they also make healthy eating fun! Kids can get creative and choose their favorite combinations, making snack time something they look forward to.
Grapes and Cheese Kabobs
Editor’s Choice

ALINK 100-Pack Cocktail Picks, Colorful Pearl Fancy Toothpicks for Appet…

Kaasaggio Originale Cubes Gouda Cheese, 8 Ounce (Pack Of 1)

Pack of 3 Berry Containers for Fridge, Grape Storage Containers for Frid…
25. Mini Whole Wheat Muffins

Mini whole wheat muffins are a fantastic choice when you’re looking for a quick and healthy snack! These little bites are not only tasty but also packed with nutrition. You can easily customize them with your favorite fruits or veggies, making them perfect for picky eaters. Whether you grab one on your way out the door or enjoy them with breakfast, these muffins fit seamlessly into any busy lifestyle.
Here’s what you need to know before you start:
Overview
– Servings: 12 muffins
– Prep Time: 10 minutes
– Cook Time: 15 minutes
– Total Time: 25 minutes
– Calories: About 80 per muffin
Nutritional Information
– Protein: 3g
– Carbohydrates: 12g
– Healthy Fats: 3g
– Fiber: 2g
Ingredients List
– 1 cup whole wheat flour
– 1/2 cup applesauce
– 1/4 cup honey or maple syrup
– 1/2 teaspoon baking soda
– 1 egg
– Optional: blueberries, shredded carrots, or other add-ins
Step-by-Step Instructions
1. Preheat your oven to 350°F (175°C) and grease a mini muffin tin.
2. In a bowl, mix the flour, applesauce, honey, baking soda, and egg until smooth.
3. Add in any optional ingredients like blueberries or shredded carrots if you like.
4. Spoon the batter into the muffin tin, filling each cup about two-thirds full.
5. Bake for 15 minutes or until a toothpick inserted comes out clean.
6. Allow the muffins to cool before removing them from the tin.
Tips
– Make a double batch, then freeze them for quick snacks later.
– Try different add-ins for unique flavors each time!
FAQ
– Can I use regular flour?
Yes, but whole wheat flour gives extra fiber and nutrients.
These mini muffins are versatile and a hit with kids, making them an ideal choice for busy families. Enjoy them anytime for a delicious and nutritious treat!
Mini Whole Wheat Muffins
Editor’s Choice

Silicone Muffin Pan Mini 24 Cups Cupcake Pan, Nonstick Food Grade Silico…

Gold Medal Premium Quality All Natural Whole Wheat Flour For Baking, 5 l…

365 by Whole Foods Market, Organic Unsweetened Applesauce 12 Pack, 3.2 O…
26. Zucchini Fritters

Zucchini fritters are a fantastic way to sneak veggies into your kids’ snacks. These little delights are crispy on the outside and tender on the inside, making them almost irresistible. Serve them warm with a dollop of yogurt or your child’s favorite dip for a nutritious treat that they’ll love!
Ingredients List:
– 2 medium zucchinis, grated
– 1/2 cup breadcrumbs
– 1 egg
– 1/2 cup shredded cheese
– Salt and pepper to taste
– Oil for frying
Step-by-Step Instructions:
1. Start by grating the zucchinis. Then, squeeze out any excess moisture using a clean kitchen towel.
2. In a mixing bowl, combine the grated zucchini, breadcrumbs, egg, cheese, salt, and pepper.
3. Heat a few tablespoons of oil in a non-stick skillet over medium heat.
4. Scoop tablespoons of the mixture into the skillet, flattening them slightly.
5. Cook each fritter until golden brown, about 3-4 minutes per side.
6. Serve warm with yogurt or your favorite sauce.
Tips to Make Them Even Better:
– Add fresh herbs like dill or parsley for an extra burst of flavor.
– Pack leftover fritters in lunchboxes for a fun veggie snack!
Frequently Asked Questions:
– Can I bake these fritters instead? Yes! For a healthier option, bake them at 400°F for about 20 minutes.
These zucchini fritters are not just tasty; they’re also a clever way to get kids excited about eating their vegetables. You’ll find that they quickly become a family favorite!
Zucchini Fritters
Editor’s Choice
CAROTE Nonstick Frying Pan Skillet,Non Stick Granite Fry Pan Egg Pan Ome…
Urbanstrive Cheese Grater With Container Box Grater Stainless Steel Grat…
Umite Chef Mixing Bowls with Airtight Lids Set, 8PCS Stainless Steel Kha…
27. Nut Butter and Banana Roll-Ups

Nut butter and banana roll-ups make for a fun and healthy snack that even picky eaters will love! This simple recipe is quick to prepare, and kids can join in on the fun. Just imagine spreading creamy nut butter on a whole-grain tortilla, placing a ripe banana right in the center, and rolling it all up. The result? A delightful snack that combines protein and wholesome carbohydrates to keep energy levels up throughout the day.
Here’s how to make this tasty treat in just a few minutes. It’s a fantastic option for busy afternoons or as a light breakfast. Plus, you can customize it with different nut butters or toppings to keep things exciting!
Ingredients
– 2 whole-grain tortillas
– 2 tablespoons nut butter (choose peanut, almond, or your favorite)
– 1 ripe banana
Instructions
1. Take a tortilla and spread nut butter evenly over one side. Make sure to cover it well for maximum flavor.
2. Place the banana in the center of the tortilla.
3. Roll the tortilla tightly around the banana, securing it in place.
4. Slice the roll-up into pinwheels or halves for easy eating.
Tips for Extra Flavor
– Drizzle a little honey or sprinkle some cinnamon inside for a sweet twist.
– Experiment with different nut butters like cashew or sunflower for a unique taste.
Frequently Asked Questions
– Can I use a different fruit?
Absolutely! Apples or strawberries work great too, adding a refreshing crunch.
These roll-ups not only taste amazing but also provide a simple way for kids to get involved in making their own healthy snacks. Enjoy this quick recipe any time you need a nutritious boost!
Little hands can turn healthy snack ideas into wins. Nut butter and banana roll-ups make healthy snack recipes for picky eaters feel fun and doable, and even the pickiest kid will reach for a roll instead of a cookie.
Nut Butter and Banana Roll-Ups
Editor’s Choice

365 by Whole Foods Market Flour Tortillas, 10.7 OZ

Fueled by AF Nut Butter Variety pack, Pistachio, Dubai, Maple Pecan nut …

No‑Drip Honey Dispenser Bottle FIFO – 18 oz BPA-Free Squeeze Jar with Si…
28. Berry Oatmeal Bars

Get ready to enjoy a delicious and nutritious snack: Berry Oatmeal Bars! These bars are perfect for busy parents and picky eaters alike. They’re chewy, fruity, and easy to grab on the go. Plus, kids will love their sweet taste, making healthy snacking a breeze.
Imagine a snack that combines the wholesome goodness of oats with the burst of flavor from mixed berries. These bars are not only tasty but also a great way to fuel your day. You can whip them up quickly, making them a fantastic choice for breakfast or an afternoon pick-me-up.
Overview
– Servings: 12 bars
– Prep Time: 10 minutes
– Cook Time: 25 minutes
– Total Time: 35 minutes
– Calories: About 150 per bar
Nutritional Information
– Protein: 4g
– Carbohydrates: 24g
– Healthy Fats: 5g
– Fiber: 3g
Ingredients List
– 2 cups rolled oats
– 1 cup mixed berries (fresh or frozen)
– 1/2 cup honey or maple syrup
– 1/2 teaspoon vanilla extract
Step-by-Step Instructions
1. Preheat your oven to 350°F (175°C) and grease a baking pan.
2. In a large bowl, mix together oats, berries, honey, and vanilla extract until well combined.
3. Press the mixture firmly into the prepared baking pan.
4. Bake for 25 minutes, or until the edges turn golden brown.
5. Let the bars cool completely before slicing them into squares.
Tips for Success
– Use a variety of berries for a burst of color and flavor.
– Wrap individual bars in parchment paper for easy snacking throughout the week.
FAQ
– Can I add nuts or seeds? Absolutely! Chopped nuts or seeds add a delicious crunch and extra nutrition.
With these Berry Oatmeal Bars, you can turn snacking into a fun, healthy habit for your kids. They’re simple to make and perfect for busy days. Enjoy your new favorite snack!
Berry Oatmeal Bars
Editor’s Choice
Amazon Basics Silicone Rectangular Baking Mat, Non-Stick Reusable Oven B…

Rubbermaid Brilliance 16-Cup Airtight Food Storage Container with Lid Cl…
29. Chocolate-Dipped Fruit

Indulge in the delightful world of chocolate-dipped fruit! This treat is not only tasty but also a fun way for you and your kids to enjoy a healthy snack. Picture juicy strawberries, ripe bananas, or crisp apple slices, all coated in rich, melted dark chocolate. This sweet and satisfying combination makes for a perfect after-school snack or party treat that your picky eaters will love!
Ready to make this tasty snack? Here’s what you need:
Ingredients
– 1 cup dark chocolate chips
– 2 cups assorted fruits (like strawberries, bananas, and apples)
Instructions
1. Start by melting the dark chocolate. You can use a microwave or a double boiler for this.
2. Take your favorite fruits and dip each piece into the melted chocolate, making sure to coat them halfway.
3. Place the coated fruit on a tray lined with parchment paper.
4. Pop the tray in the fridge for about 30 minutes, or until the chocolate hardens.
5. Serve these delicious bites chilled for a refreshing treat!
Here are some tips to make your chocolate-dipped fruit even more exciting:
Tips
– Choose a mix of colorful fruits to make the snack visually appealing.
– Drizzle some white chocolate on top for a fun design!
– Experiment with sprinkles or nuts for added crunch.
FAQ
– Can I use milk chocolate instead?
Yes, but dark chocolate is a healthier choice, packed with antioxidants.
With this easy recipe, you can create a fun and healthy snack that your kids will ask for again and again. Enjoy the sweet moments together!
Chocolate-Dipped Fruit
Editor’s Choice

Enjoy Life Baking Dark Chocolate Morsels, Dairy Free, Soy Free, Nut Free…

Fruit Slicer Cup – Strawberry, Banana, Grape Cutter, Egg Slicer for Hard…
30. Veggie Sushi Rolls

Veggie sushi rolls are a fun and nutritious snack that even picky eaters will love! They offer a wonderful way to introduce kids to new flavors and textures while keeping snack time exciting. With colorful ingredients wrapped in seaweed, these rolls are as appealing to the eyes as they are to the taste buds. Plus, you can easily customize them with your kids’ favorite veggies!
Imagine the delight on your child’s face as they take a bite of their very own sushi roll. The creamy avocado paired with crunchy cucumbers makes for a satisfying snack. You can get creative by adding bell peppers, carrots, or even tofu for protein. Trust me, your little ones will be eager to help in the kitchen!
Overview
– Servings: 4
– Prep Time: 15 minutes
– Total Time: 15 minutes
– Calories: Approximately 180
Nutritional Information
– Protein: 4g
– Carbohydrates: 30g
– Healthy Fats: 5g
– Fiber: 2g
Ingredients List
– 4 sheets of nori (seaweed)
– 2 cups cooked sushi rice
– 1 avocado, sliced
– 1 cucumber, julienned
– Optional: additional vegetables like bell peppers or tofu
Step-by-Step Instructions
1. Place a sheet of nori on a bamboo sushi mat or a clean surface.
2. Spread a thin layer of cooked sushi rice evenly over the nori.
3. Line up slices of avocado, cucumber, and any other veggies across the rice.
4. Use the mat to roll the sushi tightly, sealing the edges with a little water.
5. Slice the roll into bite-sized pieces and serve with a dipping sauce like soy sauce or a homemade dip!
Tips
– Experiment with different fillings to keep things interesting.
– Try adding some sesame seeds or a drizzle of soy sauce for extra flavor.
– Get the kids involved in making their own rolls for a fun family activity!
These veggie sushi rolls make snack time an adventure. Not only are they healthy, but they also encourage your kids to explore new foods. Enjoy making them together!
Fun fact: veggie sushi rolls can pack 4 colorful veggies into one bite, boosting fiber by 6 grams per roll. Let kids help roll them and watch picky eaters open up to new flavors!
Veggie Sushi Rolls
Editor’s Choice

2 Pack Bamboo Sushi Rolling Mat, Sushi roll maker,Sushi making kit, Bamb…

CHOI’s 1(Daechun) Roasted Seaweed, Gim, Sushi Nori /(50 full sheets) /Go…
Conclusion

With these 30+ healthy snack recipes for picky eaters, snack time can be exciting and nutritious! You now have a roster of creative options that cater to diverse tastes and preferences, making it easier to keep your little ones happily munching. Encourage them to try new flavors while enjoying healthier choices, and watch as they grow into adventurous eaters!
Don’t hesitate to mix and match these recipes or improvise based on your kids’ preferences. The key is to make health fun, and with these easy snack ideas, you’re set for success. Happy snacking!
Note: We aim to provide accurate product links, but some may occasionally expire or become unavailable. If this happens, please search directly on Amazon for the product or a suitable alternative.
This post contains Amazon affiliate links, meaning I may earn a small commission if you purchase through my links, at no extra cost to you.
Frequently Asked Questions
What Are Some Quick Healthy Snacks for Picky Eaters?
If you’re in search of quick healthy snacks for picky eaters, you’re in luck! Consider options like fruit skewers with a mix of berries and bananas, or yogurt parfaits layered with granola and honey. You could also whip up some peanut butter energy balls using oats and a touch of maple syrup. These snacks are not only easy to prepare but also packed with nutrients to keep those little ones satisfied!
How Can I Make Nutritious Snacks More Appealing to My Kids?
Making nutritious snacks appealing to kids can be a fun challenge! Involve your children in the snack-making process—let them choose the ingredients or help assemble the snacks. Use colorful fruits and veggies to create visually appealing plates. Also, try fun shapes with cookie cutters or turn snacks into mini meals that they can customize. The key is to make it interactive and enjoyable!
Are There Any Plant-Based Snack Ideas for Toddlers?
Absolutely! There are plenty of nutritious snacks for toddlers that are plant-based. Think of avocado toast on whole-grain bread topped with a sprinkle of hemp seeds, or banana pancakes made with just bananas and oats. Another great option is homemade hummus served with sliced cucumbers and carrots—perfect for little hands to dip and enjoy!
What Healthy Snacks Can I Prepare in Under 10 Minutes?
When time is tight, there are still plenty of delicious healthy snack ideas you can whip up in under 10 minutes! Try apple slices with almond butter, or a smoothie with spinach, banana, and almond milk. You could also mix together a quick trail mix with nuts, seeds, and dried fruit. These quick snacks are not only nutritious but also super easy to make!
How Can I Incorporate More Vegetables into My Kids’ Snacks?
Incorporating more vegetables into snacks can be made fun and delicious! Try making veggie sticks with a tasty dip like ranch or tzatziki. You can also create vegetable muffins or add finely chopped veggies to homemade pizza on whole wheat pita bread. Get creative with dips and toppings—your kids might surprise you by loving their veggies!
Related Topics
healthy snack recipes
picky eaters
nutritious snacks
easy snack ideas
kid-friendly recipes
plant-based snacks
quick healthy snacks
snacks for toddlers
wholesome treats
fun food for kids
healthy eating habits
simple recipes